
Latest Webcast: From Data to Decisions: Unleashing ServiceTeam ITSM Power BI Reporting
Discover the power of ServiceTeam ITSM Power BI reports and dashboards. Gain insights and get your questions answered by our experts…
ServiceTeam ITAM lets you leverage Microsoft Power Apps, Dynamics 365 and the Power Platform eco-system to proactively plan and manage IT hardware, contracts, and software assets cost-effectively. Leave spreadsheets behind and get control and insight into both active and inactive assets to support effective onboarding and offboarding, crisis management, security risks, financial analysis, budgeting and operational planning. And by having visibility and control of your assets throughout their entire lifecycle—from request to disposal—you’ll optimize asset use, reduce costs and guarantee your enterprise gets the full value of its technology investments.
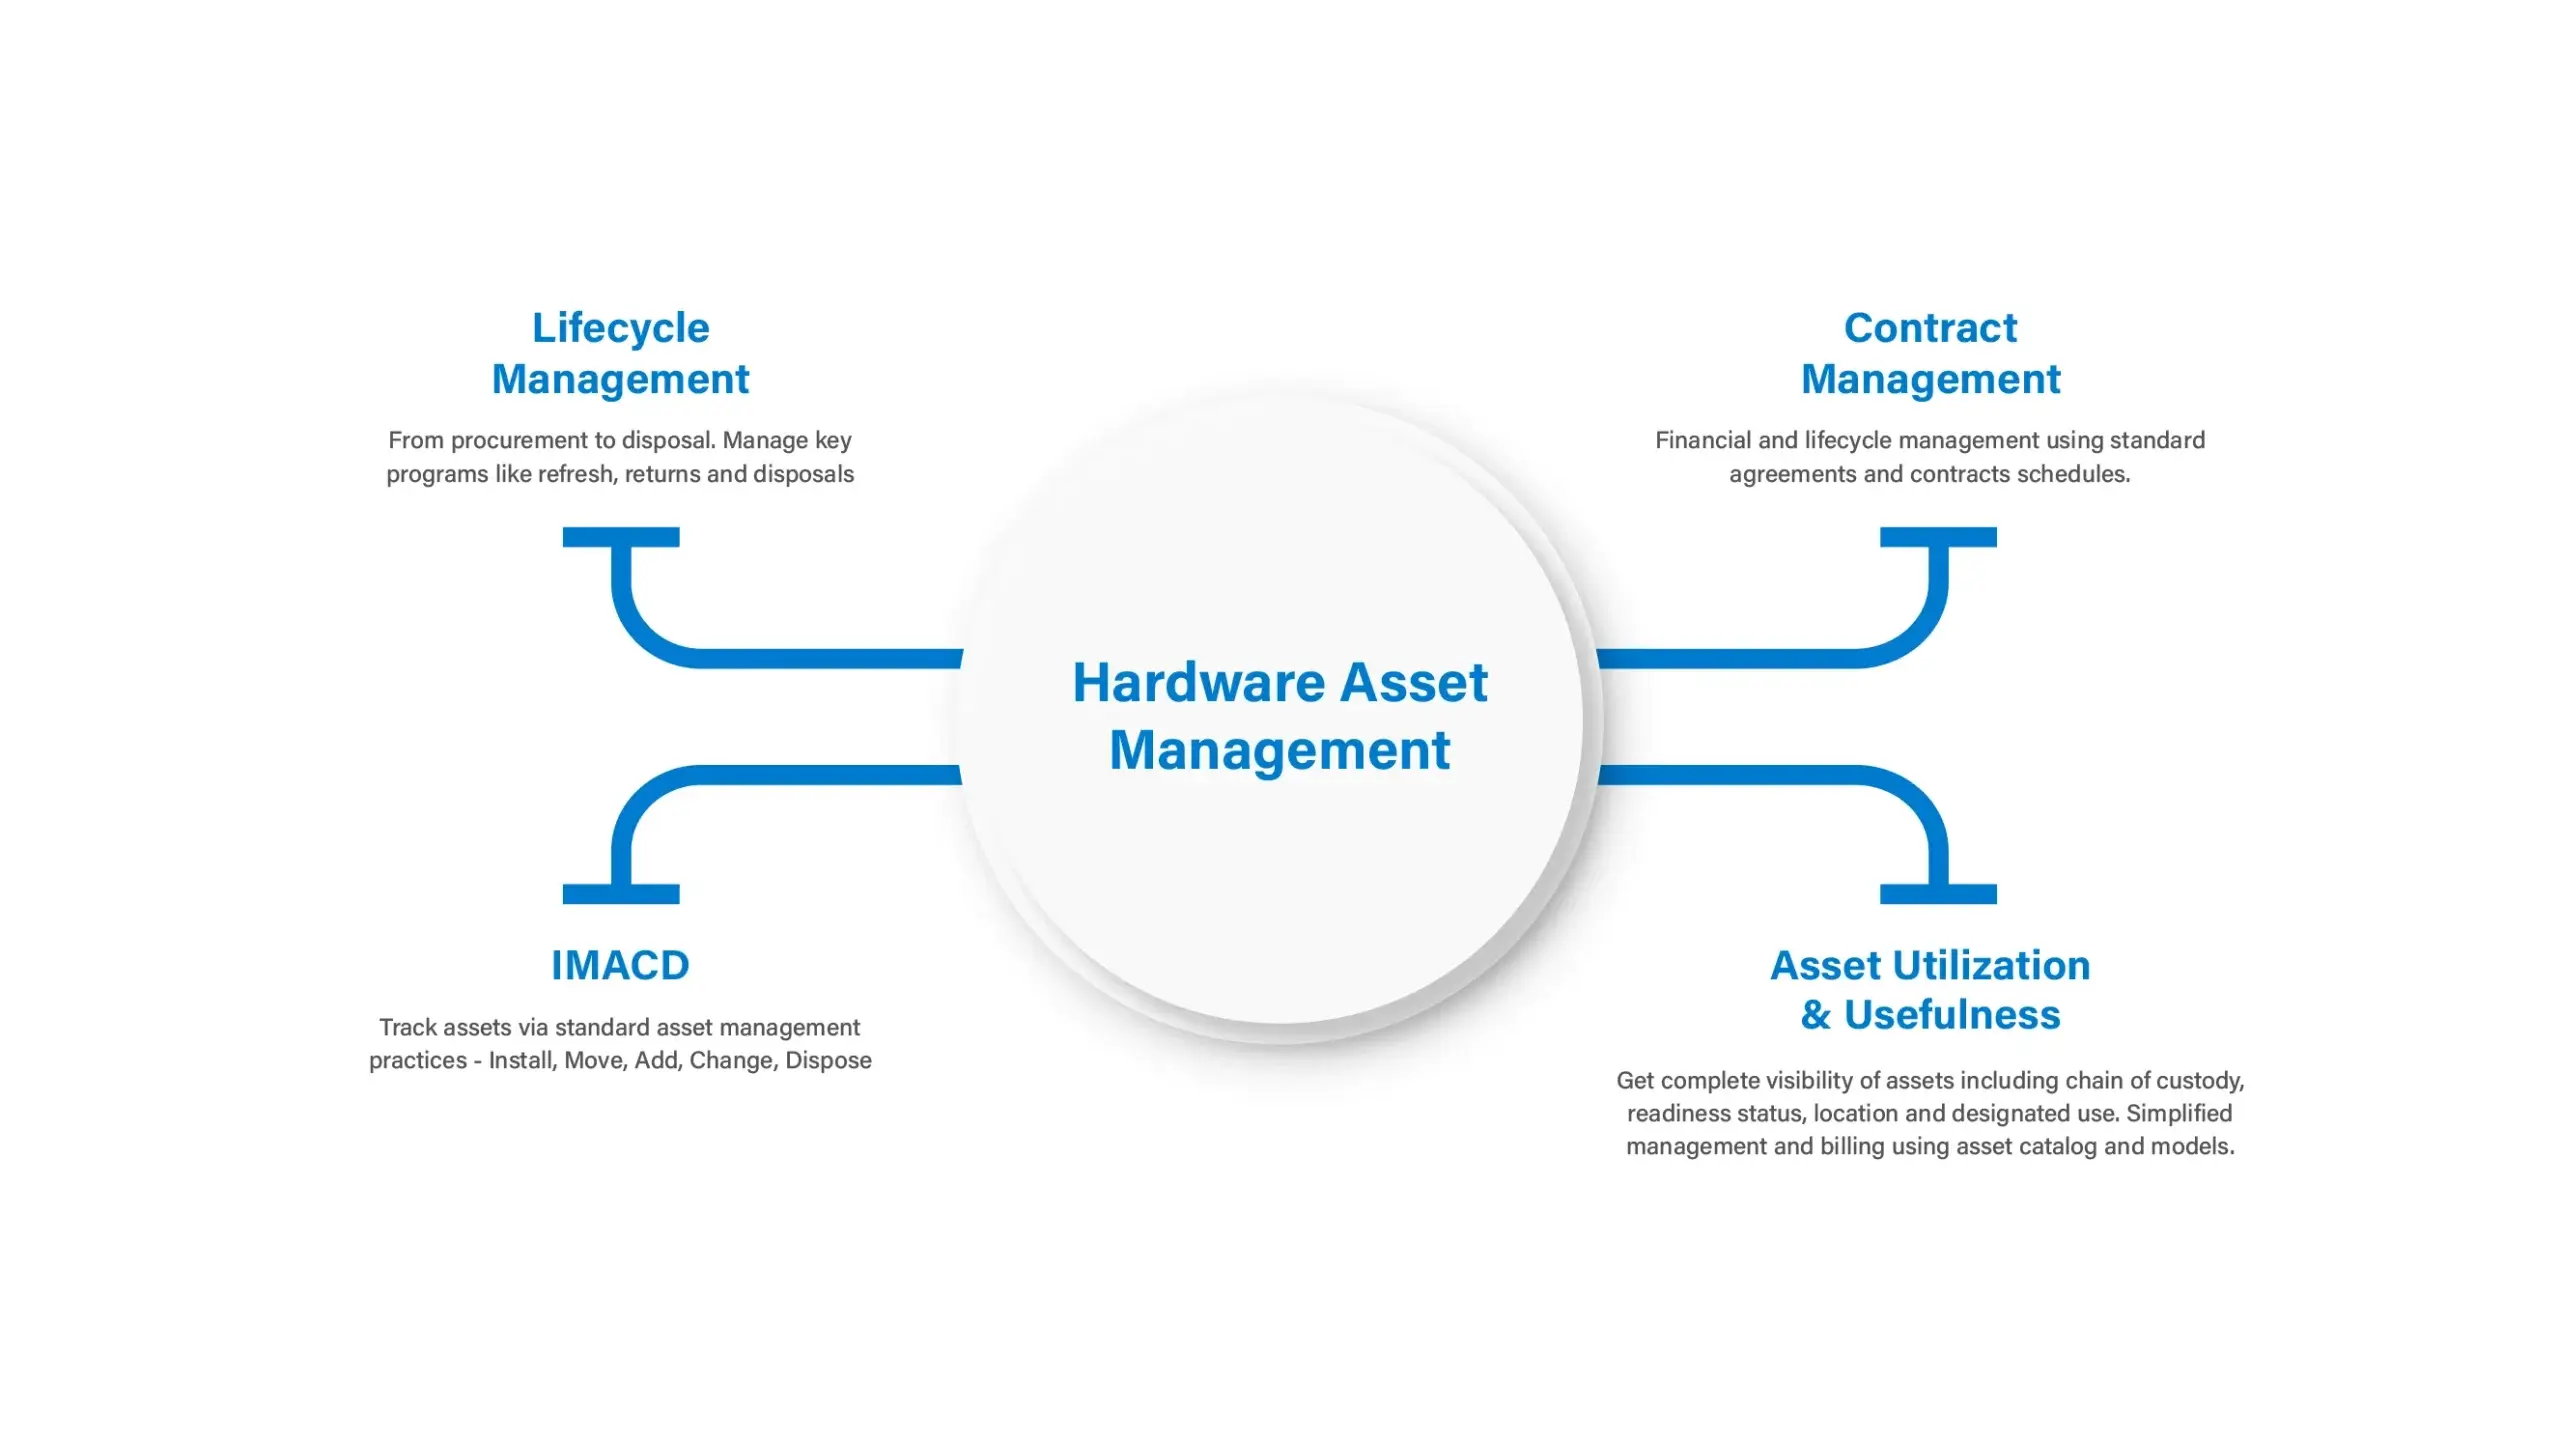
Gain the full value of your assets throughout their complete lifecycle with serialized asset management, regardless of how widely your assets are dispersed (on premise, mobile or Cloud). ServiceTeam ITAM maintains comprehensive details about all your assets within the CMDB (Dataverse). Manage across 6 asset classes. Easily search and track multiple assets across employees, locations, and contracts. Leverage common asset management tasks, including SWAP. View contract schedule statements supporting showback/chargeback and/or payment calculators. Capitalize on hardware catalog capabilities to make ordering and replacing assets easier. With ServiceTeam ITAM, you’ll have a common and complete view of your assets across your entire organization, helping you to avoid unnecessary purchases and take full advantage of economies of scale to minimize costs.
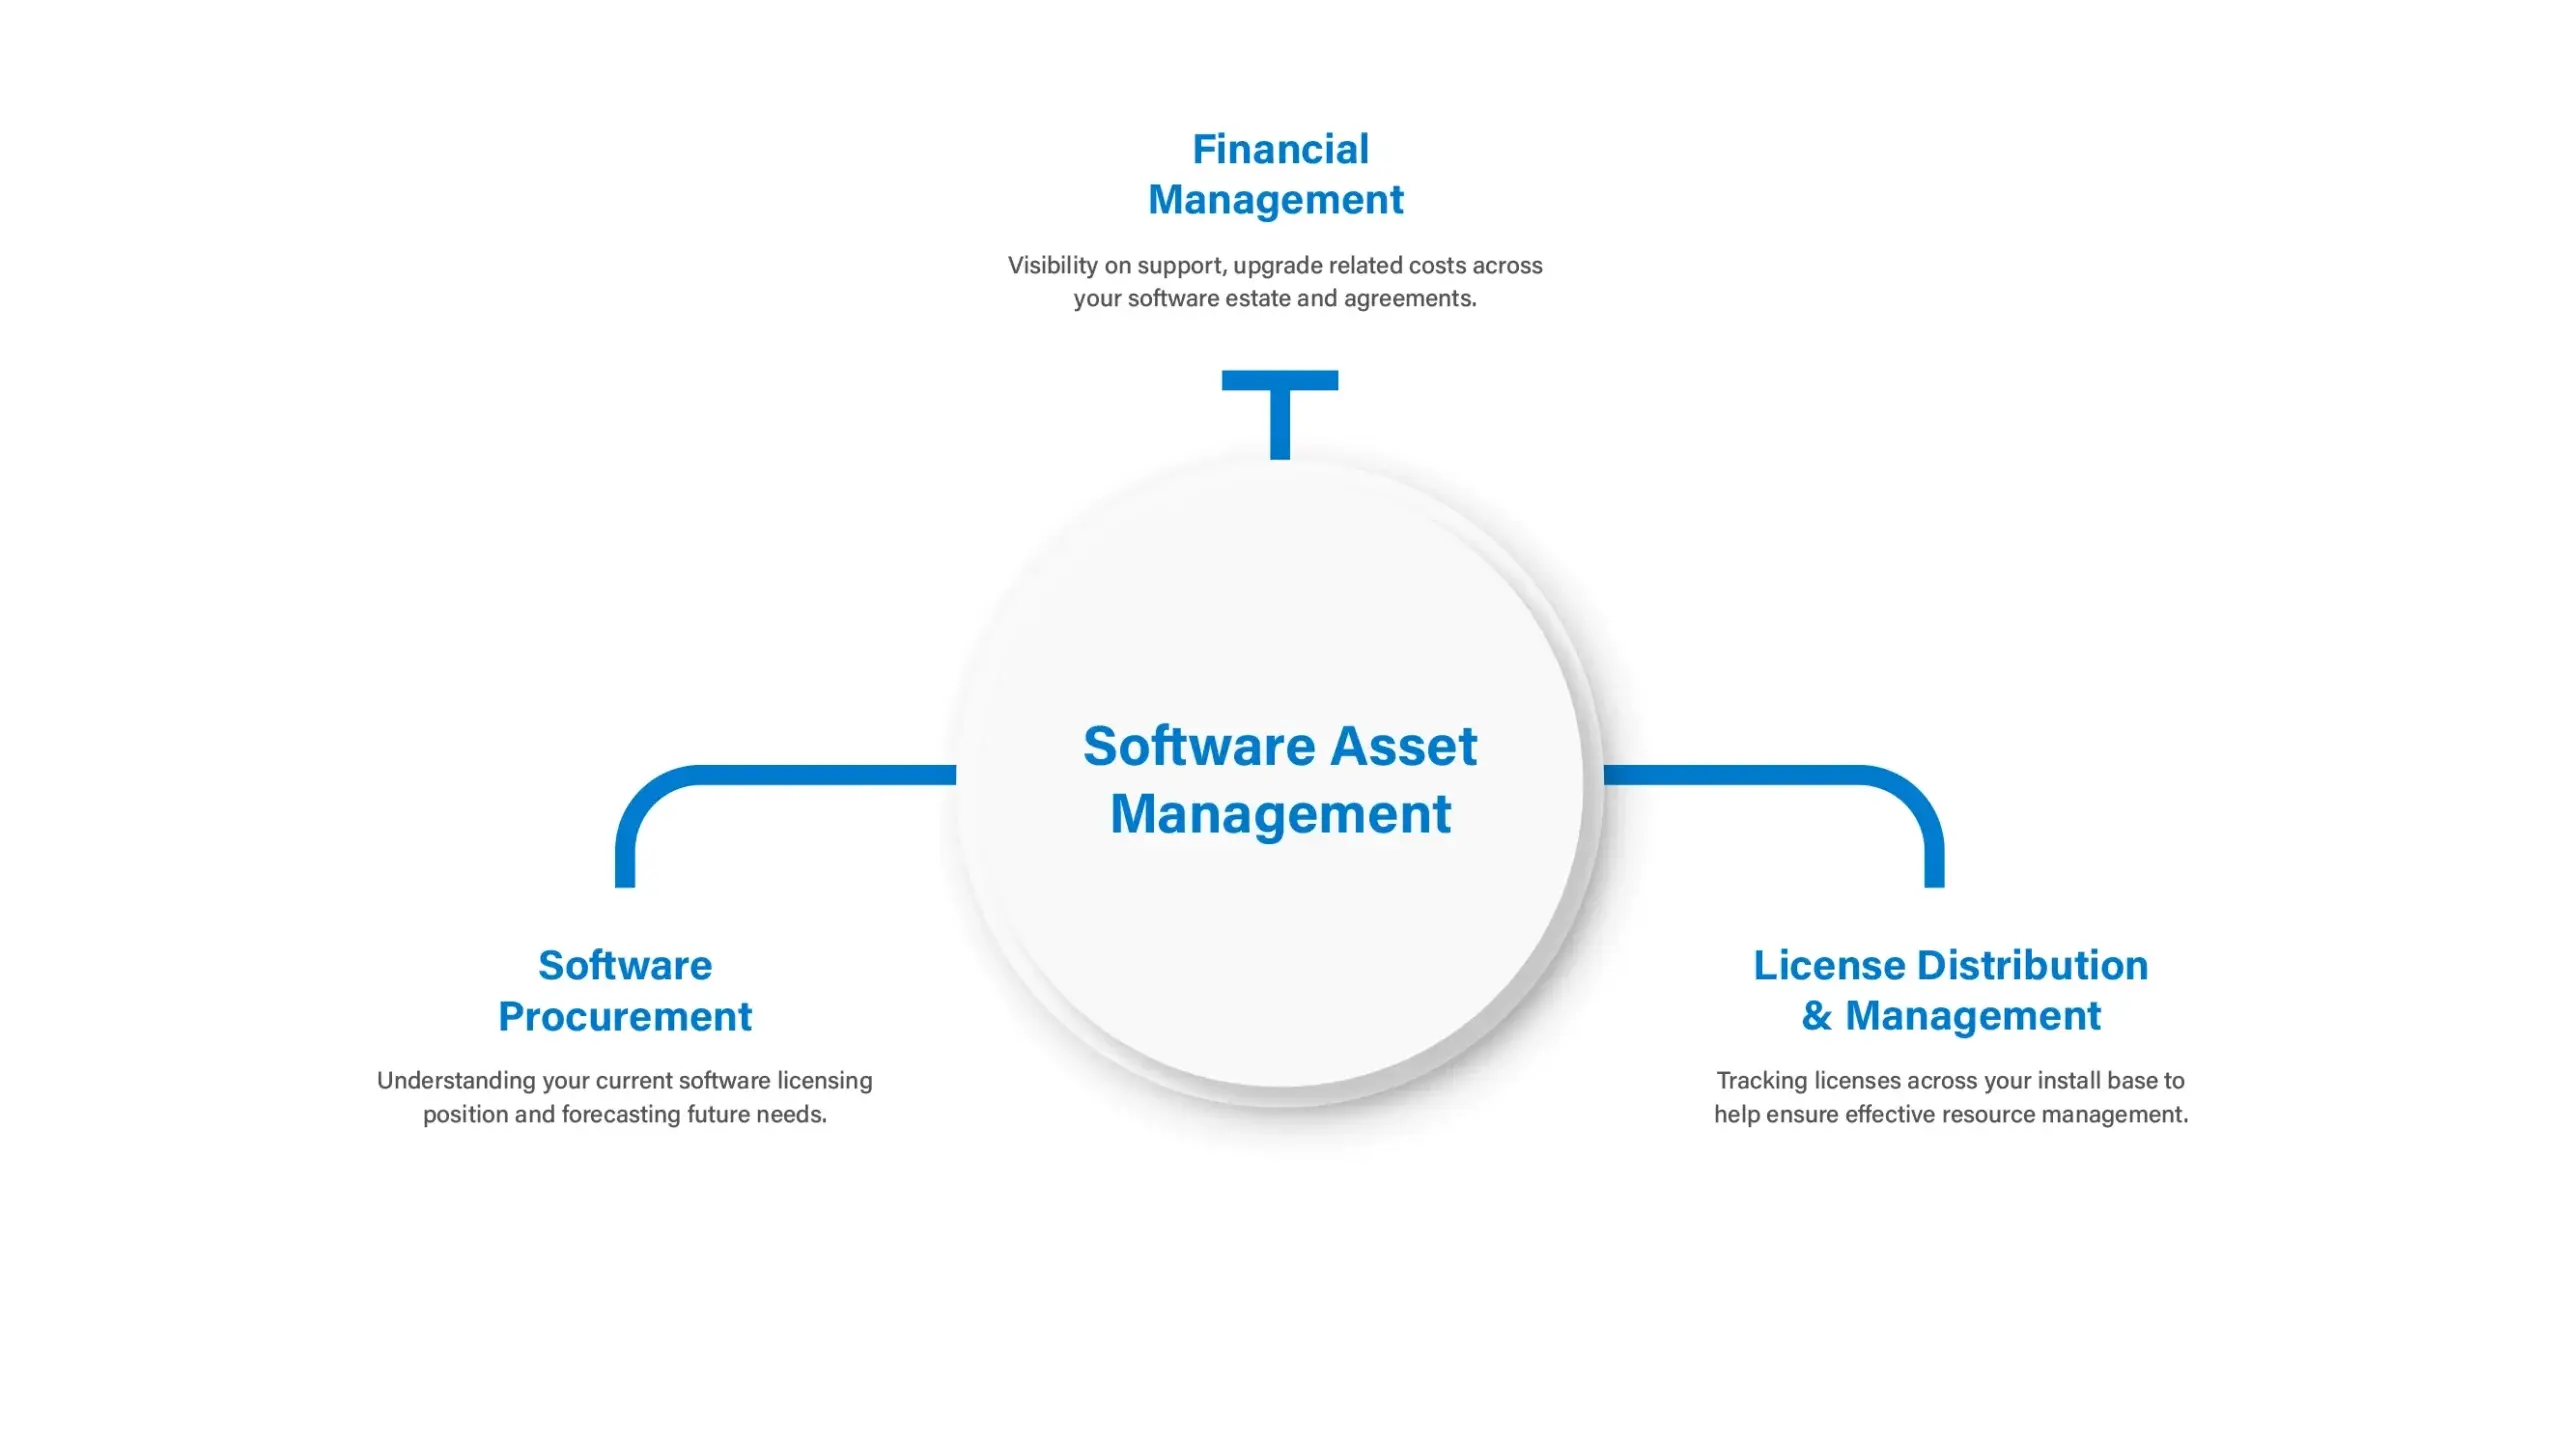
Mitigate risks and save costs with ServiceTeam ITSM software asset management. Leverage centralized software asset management for your applications and software titles to eliminate waste and redundancy. Track assignments, installs and license purchases. Get insight into whether your licenses are aligned with your business needs. Make assignments, ordering and replacing software assets easier by leveraging the ServiceTeam Software Catalog capabilities. ServiceTeam ITSM also supports agreement and financial management for software assets to help you get the maximum value over their complete lifecycle.
ServiceTeam ITAM guides asset managers and configuration teams through every stage in the lifecycle of the asset – from request to disposal – organizing important information to ensure accuracy and cost-effective decision-making. Leverage built-in support for hardware and software agreements lifecycle management. With ServiceTeam ITAM, less time and effort is wasted reconciling inventories and auditing asset history, allowing you to stay on top of the location and status of all of your assets and to optimize asset use and productivity.
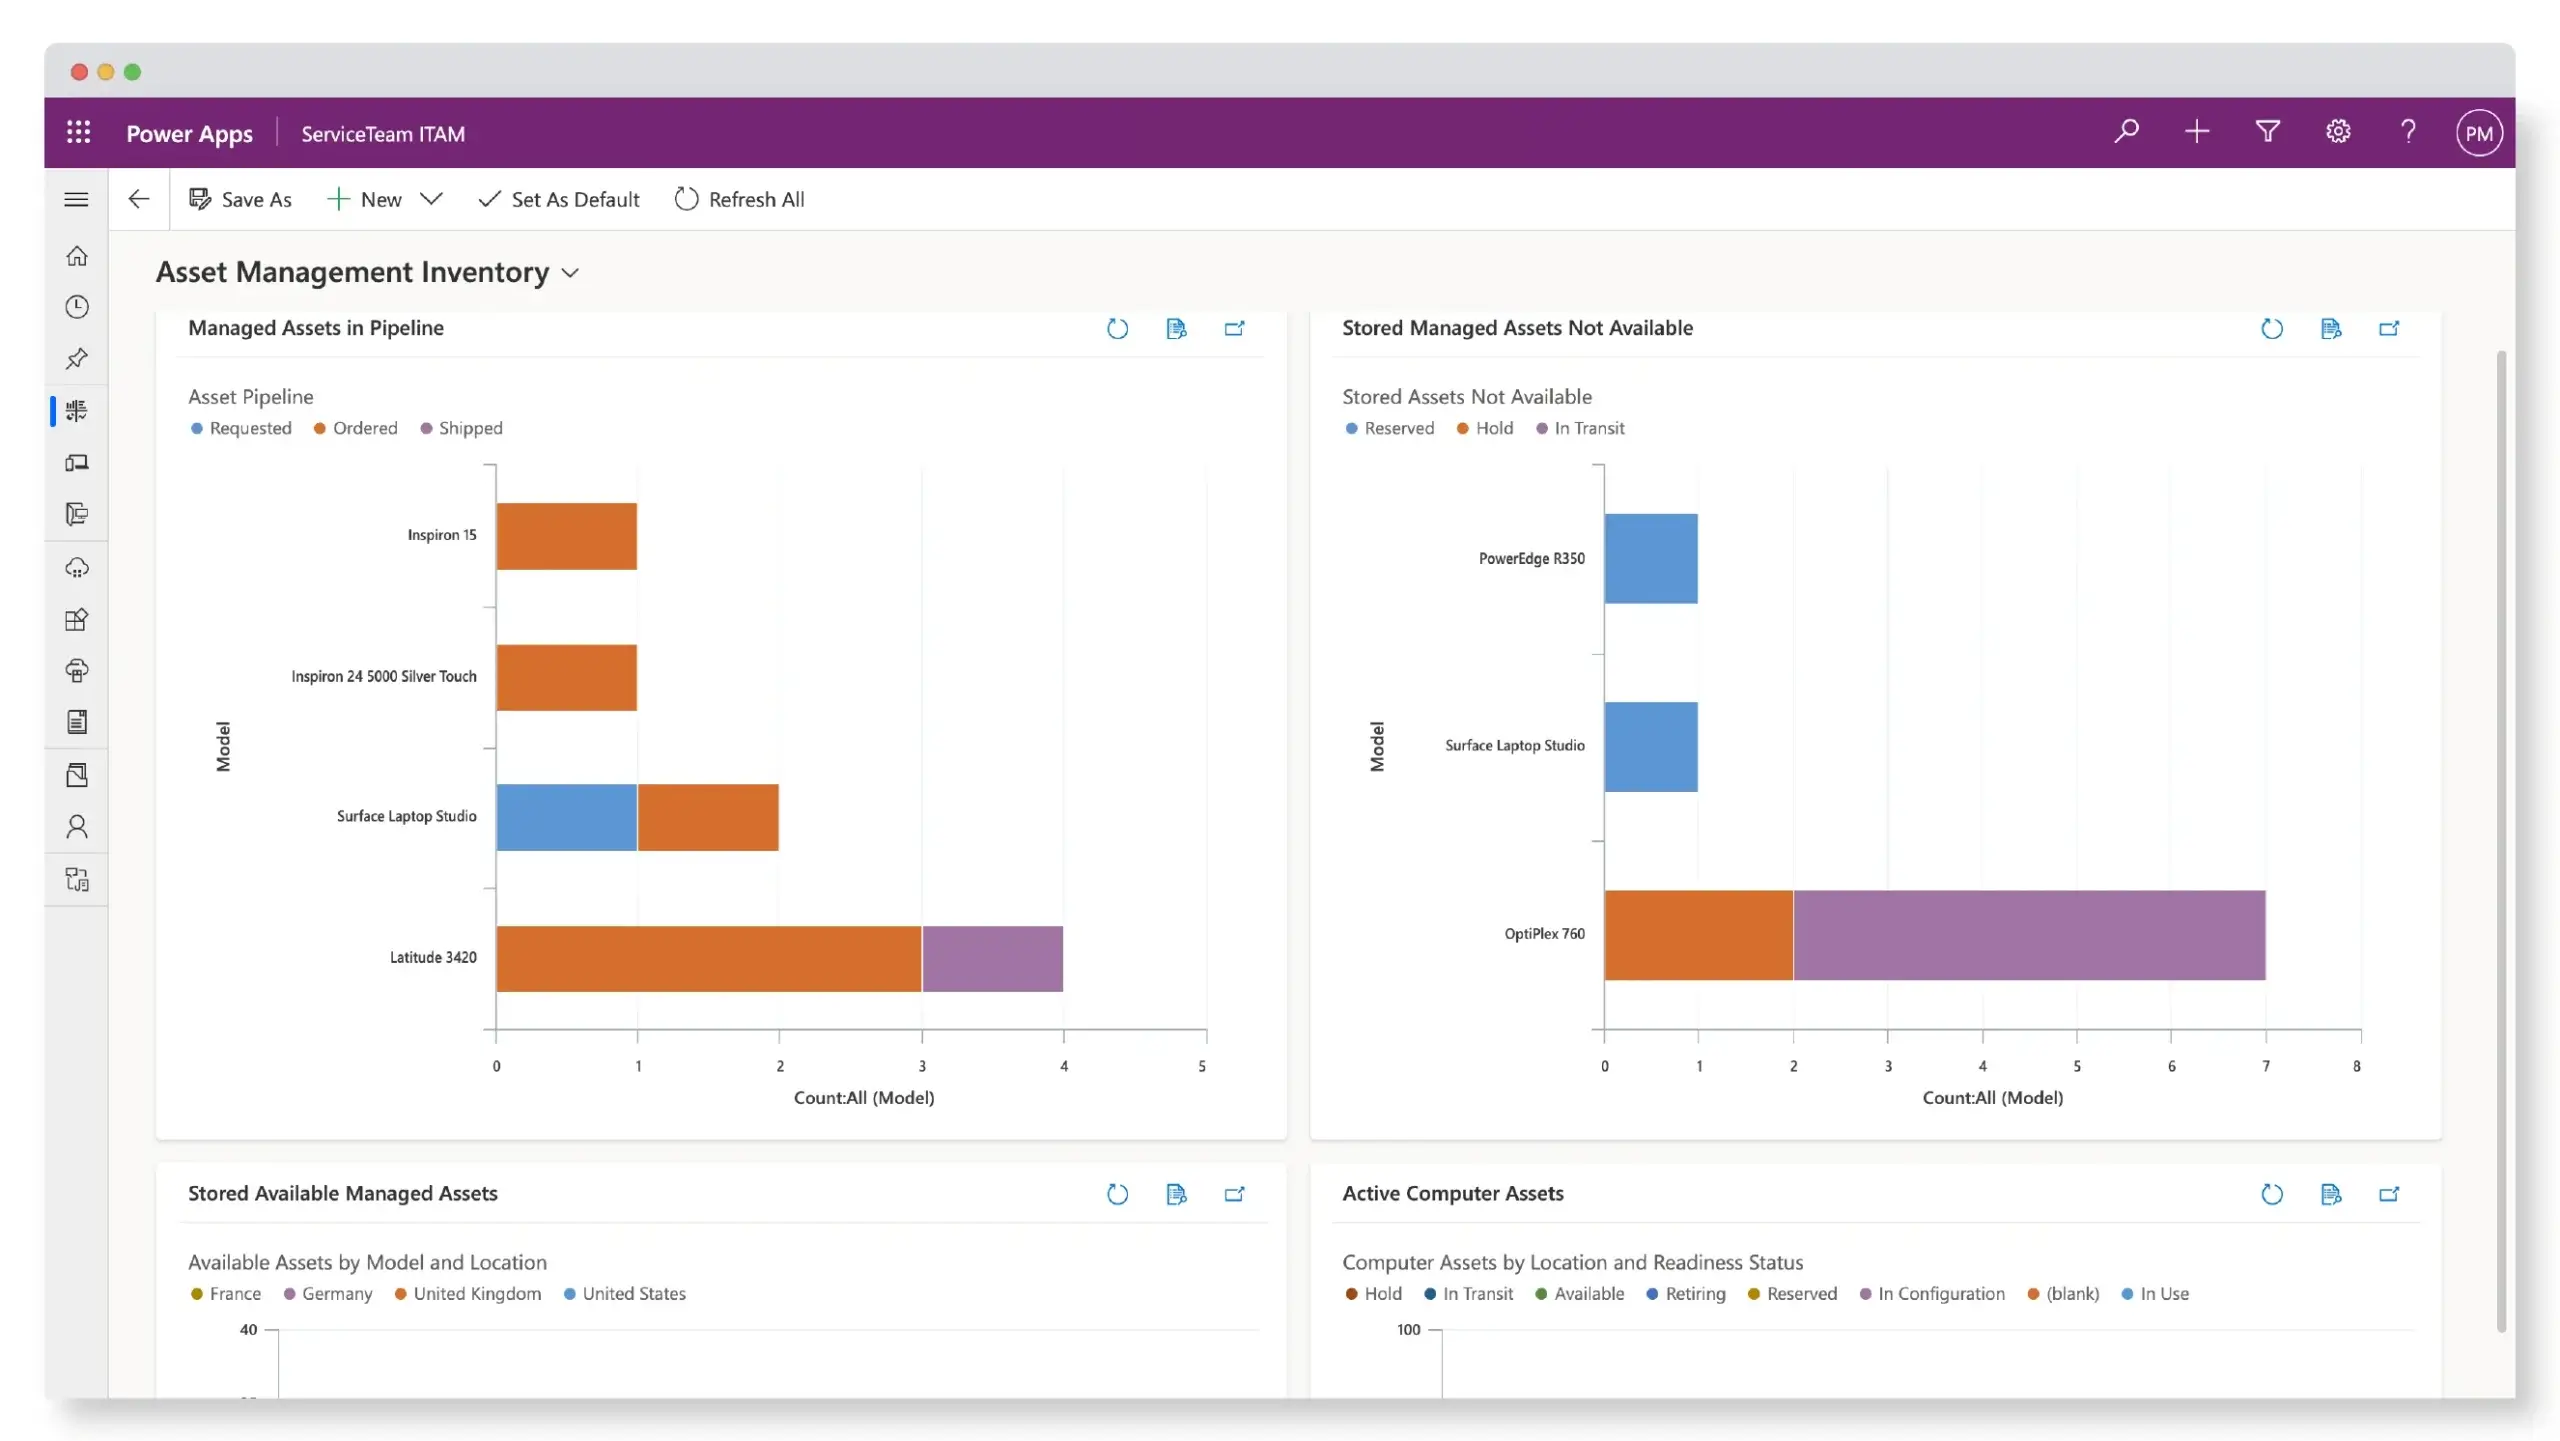
ServiceTeam ITAM features intuitive and easy to configure out-of-the-box ITAM dashboards and charts, giving you better clarity and visibility into asset usage, expenses and lifecycle. Plus, you can extend your reporting to leverage Power BI for more advanced analytics. While the integration with Microsoft Office® 365, lets you create Microsoft Word and Excel templates to instantly collect, correlate and aggregate real-time data—no need to continually export data to a static report template, simply refresh. Likewise, data manipulations and updates performed in Excel will simultaneously update the document within ServiceTeam ITAM. Reports are also easily shared among colleagues, executives or other departments, so you can proactively show details on the services that you have delivered. For example, you can give your finance department the ability to work with real-time data to conduct “what if” analysis. ServiceTeam ITAM empowers users to easily create and save their own dashboards, reports, and views—getting the insight they need, when they need it.
Get the full picture when it comes to the total cost of ownership of an asset across its entire life. By tracking costs related to purchases, repairs and support against individual assets or maintenance contracts, ServiceTeam ITAM lets you make more cost-effective decisions about asset use, negotiate more favorable terms with vendors and improve budget management and forecasting.

Get a window on your consumption of Microsoft licenses with ServiceTeam ITAM. The Provance Services Platform Gateway can access information on purchased and used licenses for Microsoft products such as Microsoft Office, which allows a broader overview and understanding of the license’s users are consuming.
Bring together isolated silos of operational and financial information into a unified actionable view. Easily import and associate detailed hardware and software configuration data with your business systems, such as invoicing, finance or human resources. ServiceTeam ITAM brings together asset detail from multiple sources—auto discovery solutions, business systems, manual entry, CSV or flat files, spreadsheets and databases—and provides you with a single, consolidated source of data for analysis and reporting. Plus, with the ability to build actionable dashboards, export reports into Word or Excel templates, or use Power BI for more advanced analysis, you can use familiar tools to deliver easily understandable reports to various roles and departments across your organization.
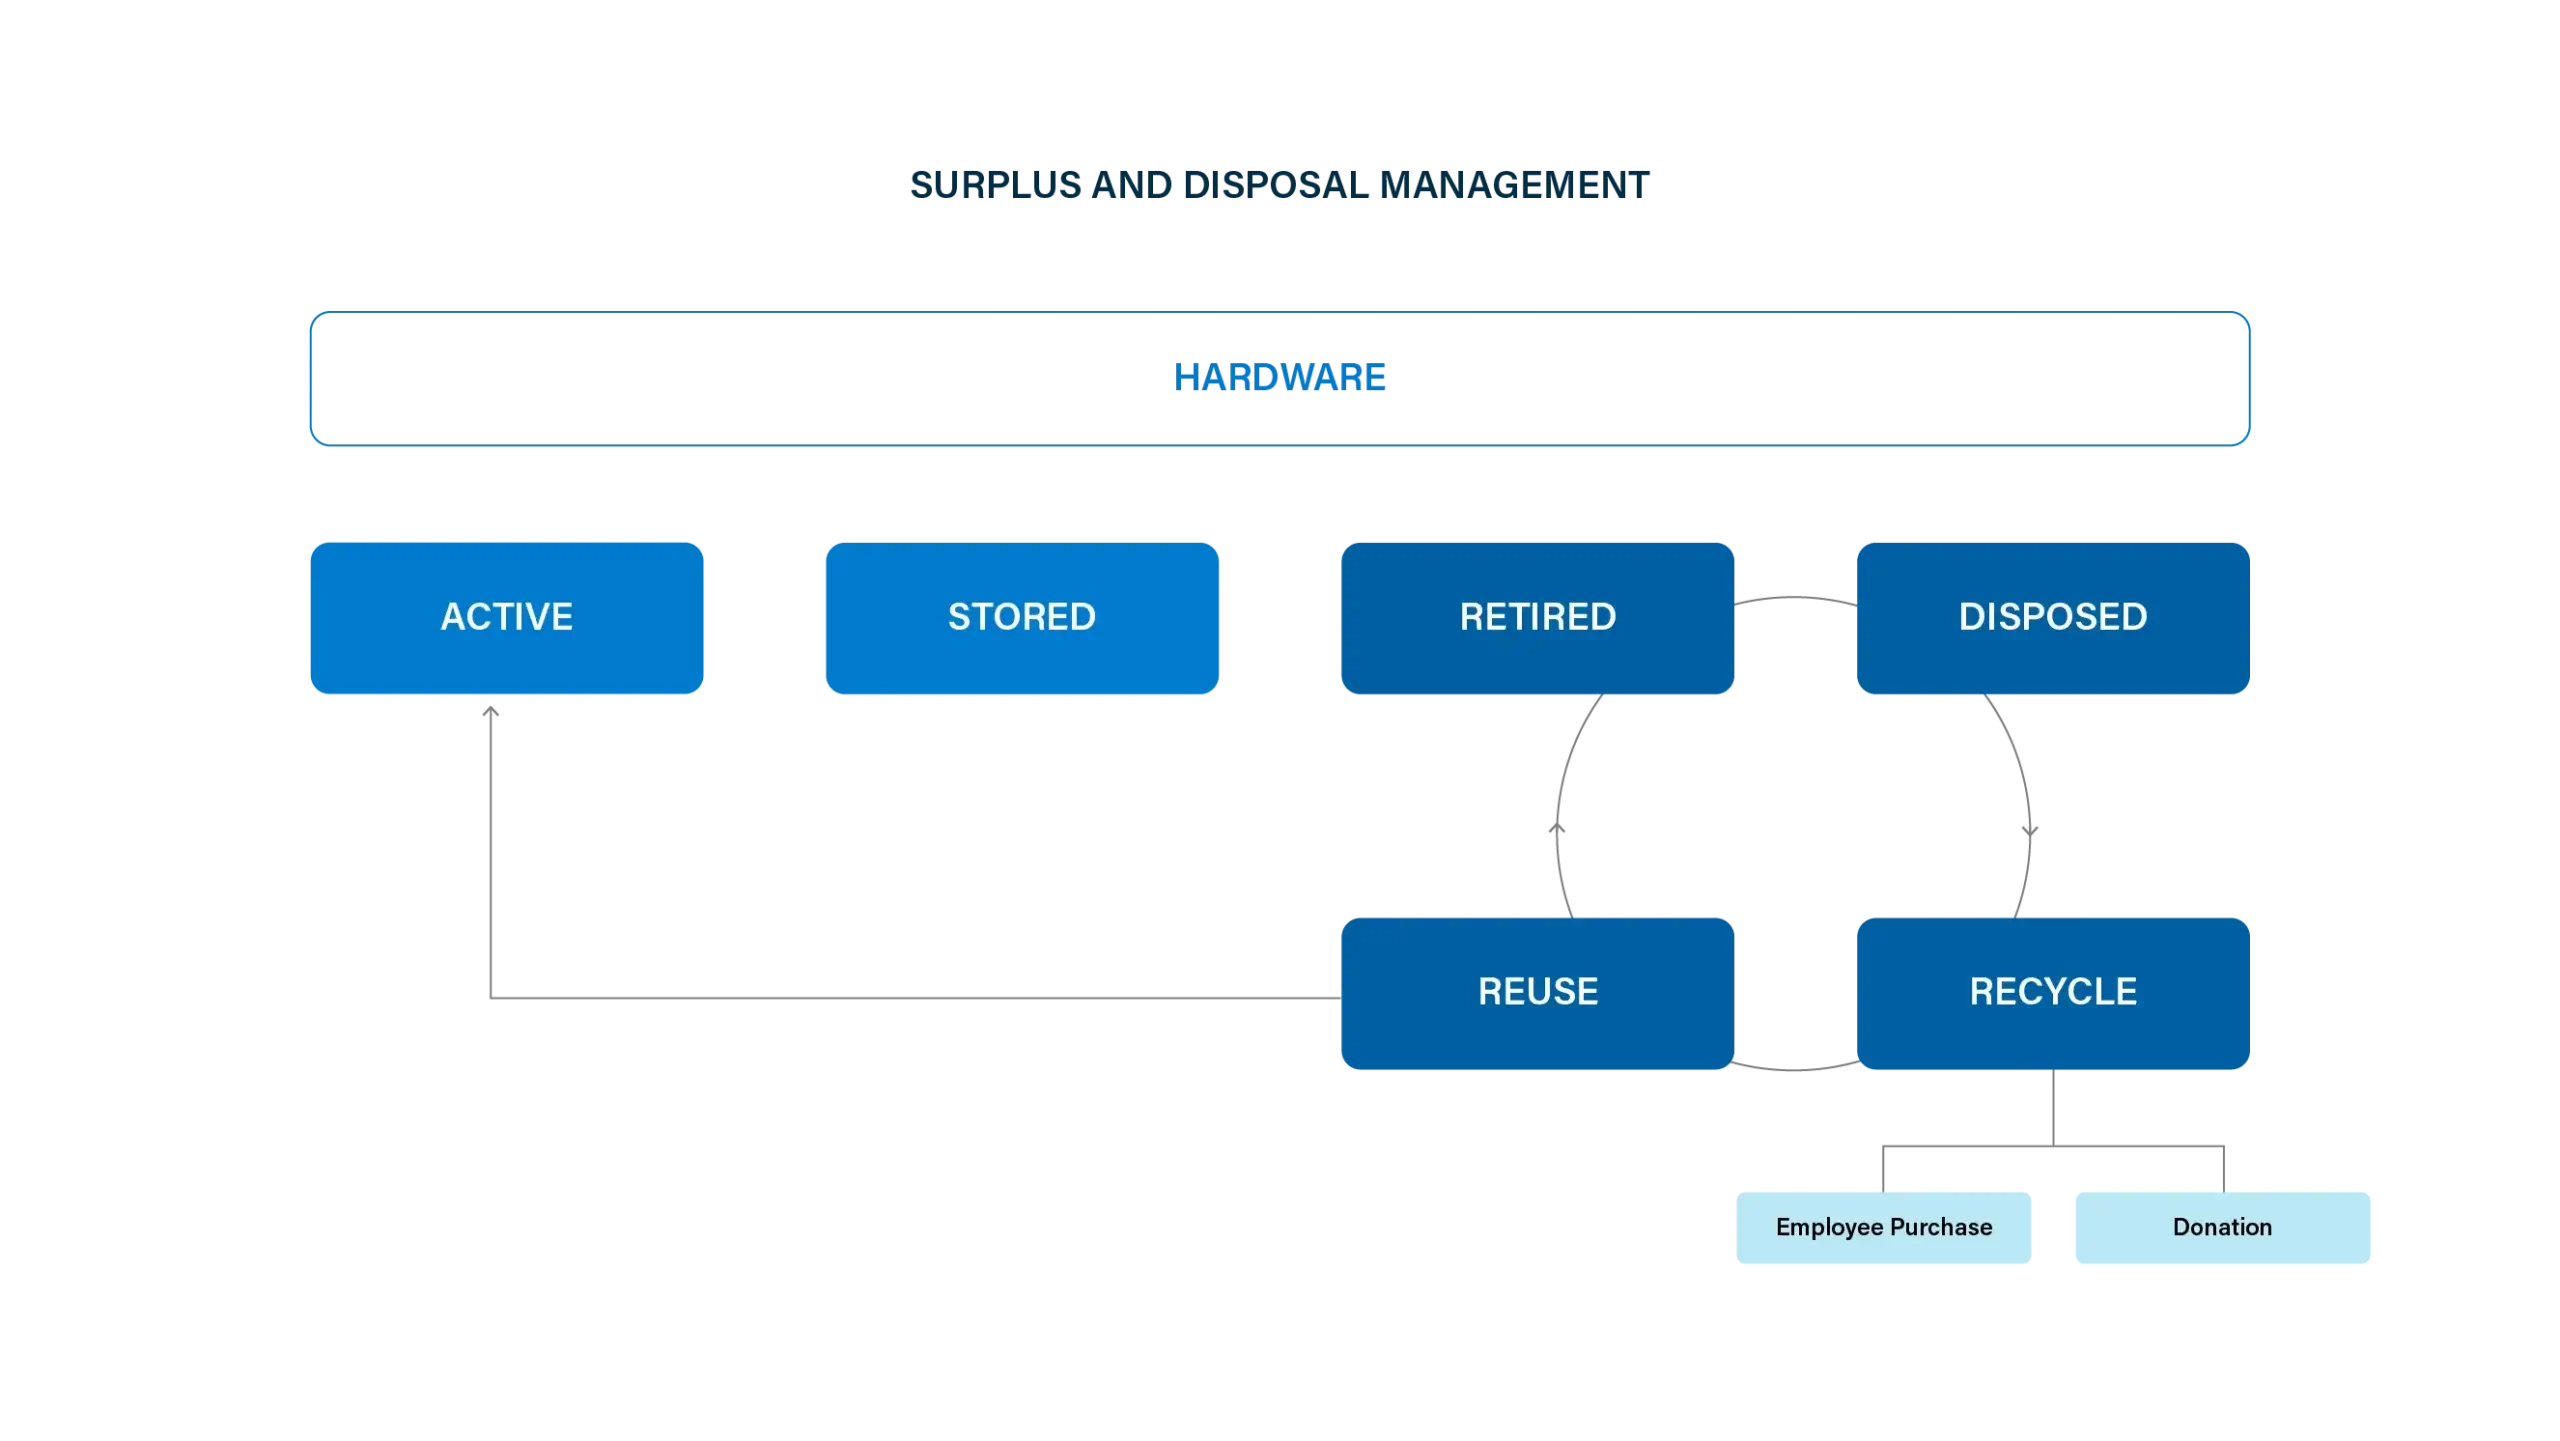
The need to manage assets doesn’t end when they’re no longer in use. Management of inactive surplus inventory and proper disposal of assets is critical for cost recovery, security and to meet regulatory and financial requirements. With ServiceTeam ITAM you can reallocate or resell surplus assets, terminate maintenance, support and insurance contracts on disposed assets. Asset history tracking ensures you meet regulatory auditing requirements and maintain information important for financial reporting and tax purposes. Asset tracking of disposal certificates and supplier contracts will help maintain integrity and safety. ServiceTeam ITAM lets you greatly reduce the effort, risk and costs associated with surplus and disposed assets.
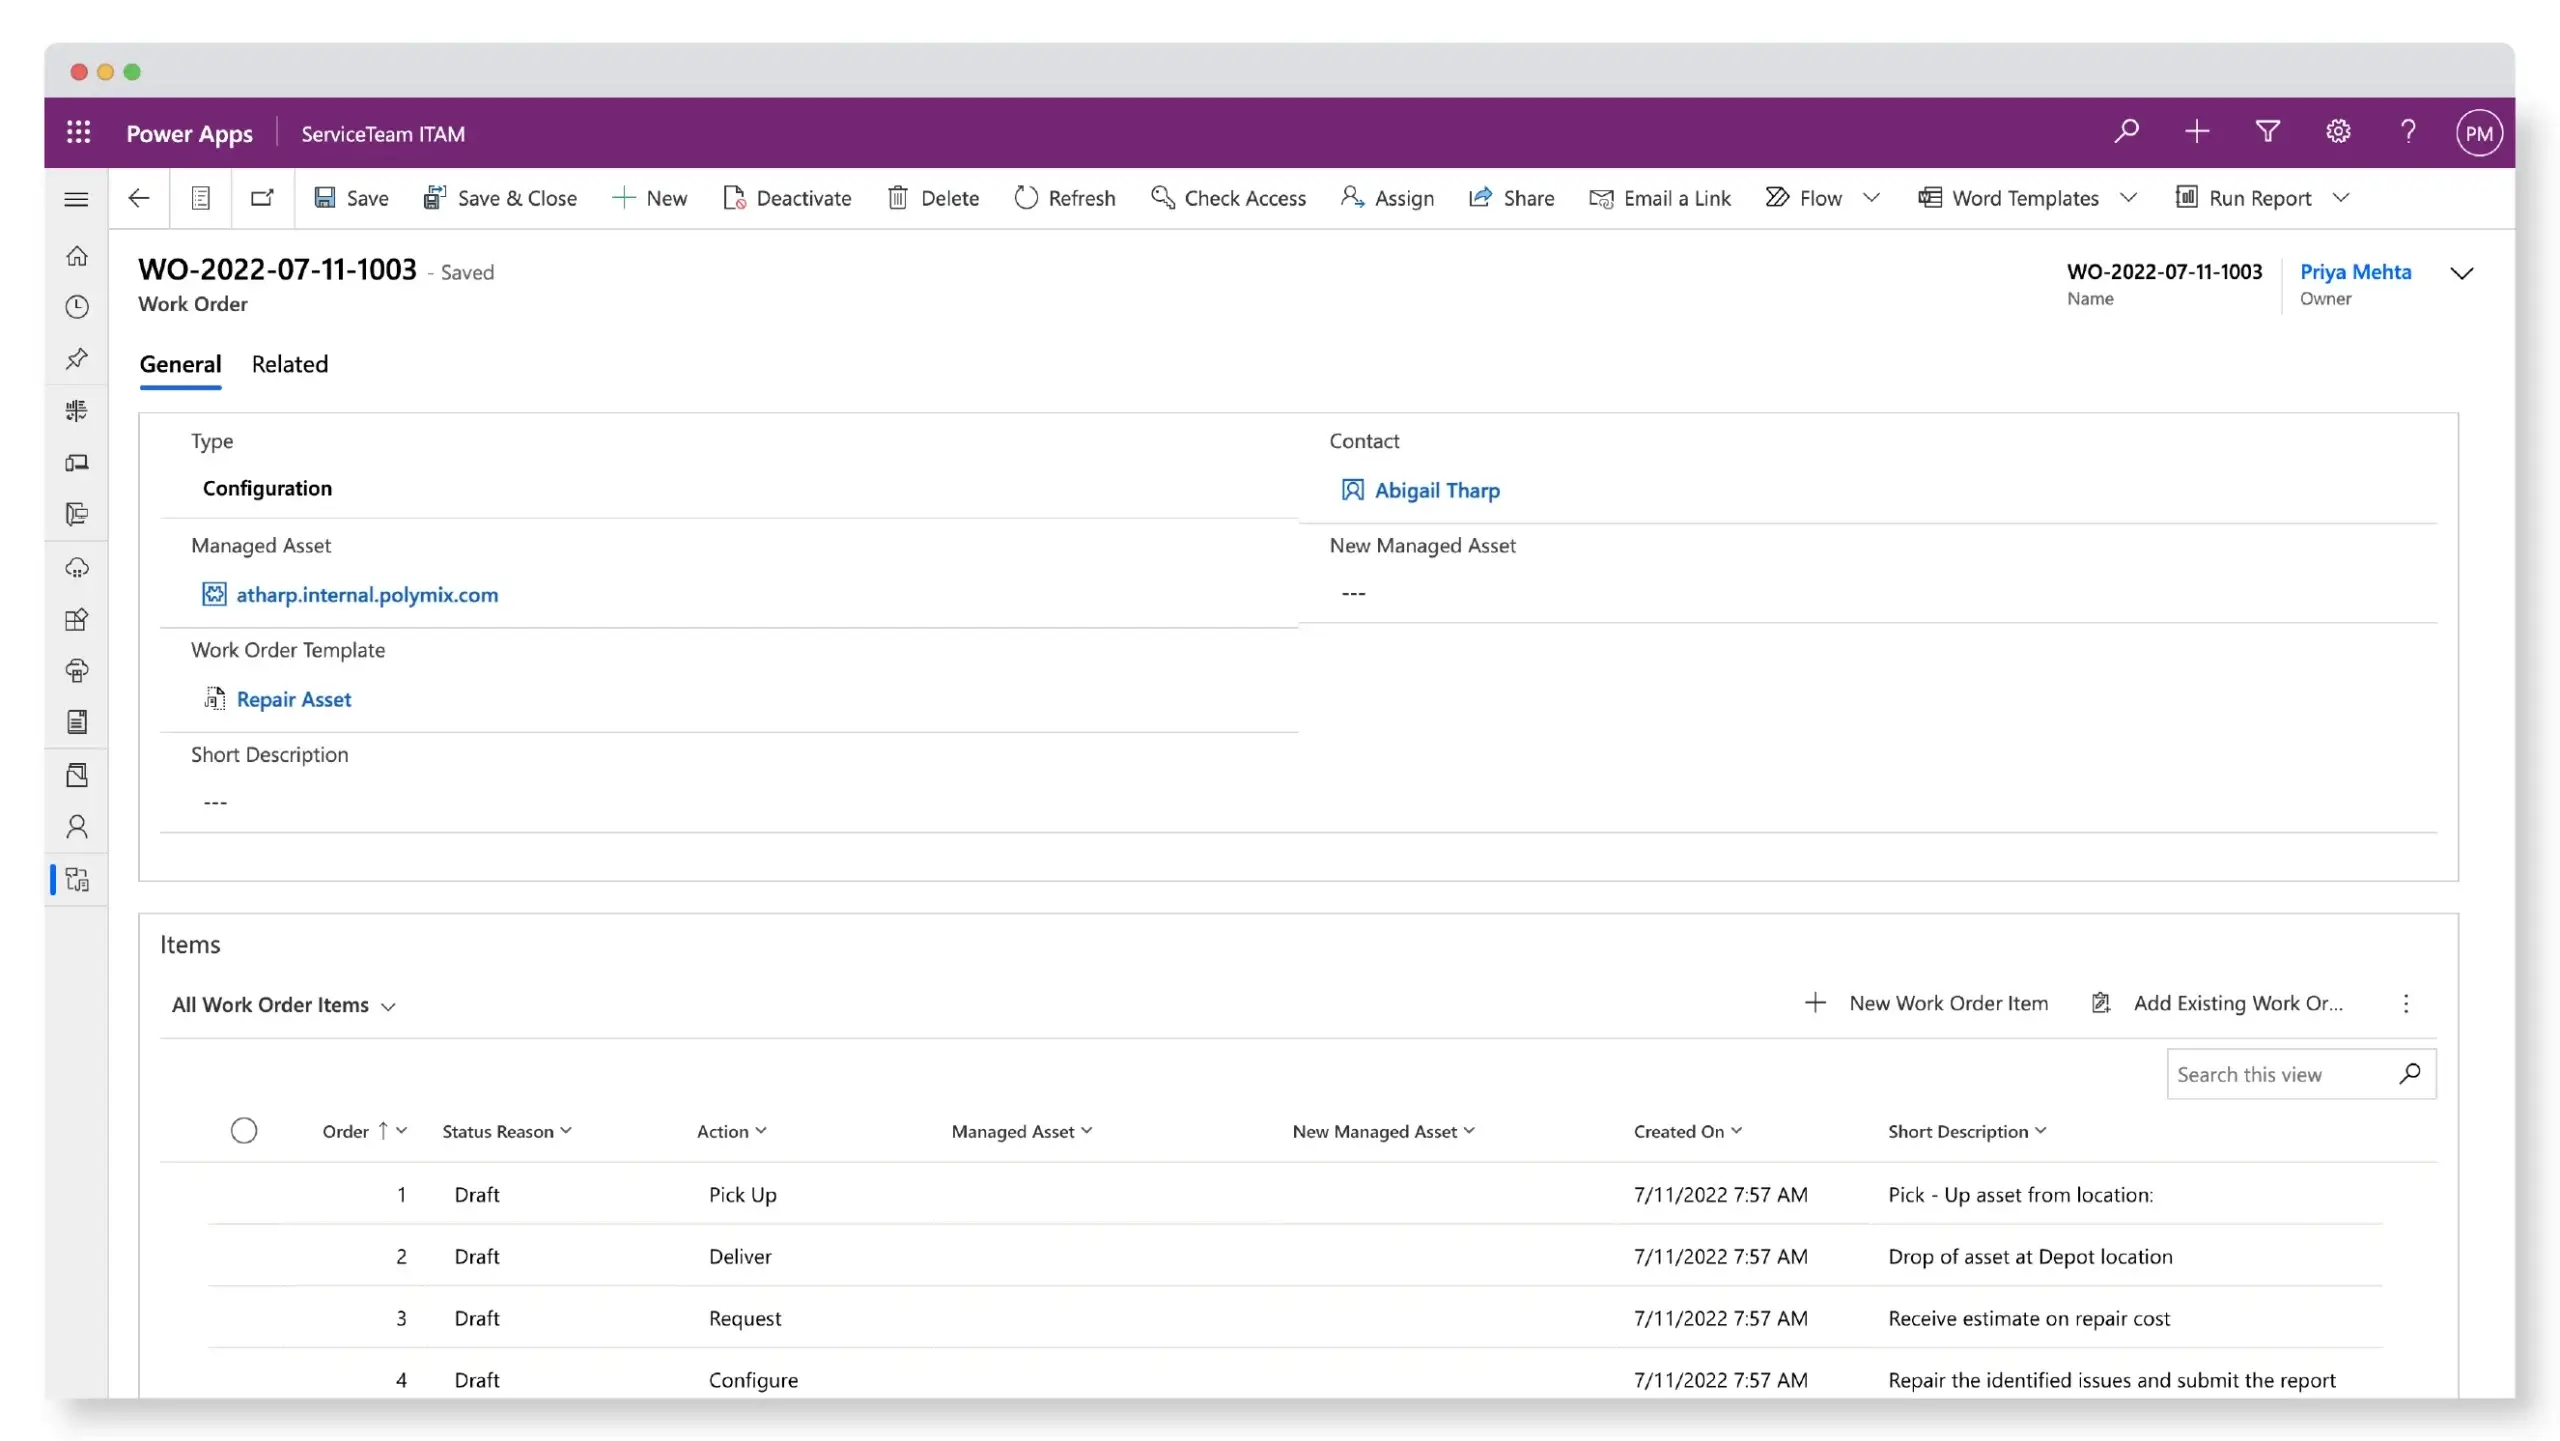
When assets are removed from your premises for repair by a third-party, it becomes extremely difficult to track and manage. ServiceTeam ITAM lets you track lifecycle status so you have full visibility of assets out on repair. Also, Cost Events allow you to maintain an itemized record of service related expenditures for each asset, including maintenance, repairs and upgrades. Plus, you can analyze asset history, including incidents, problems and repairs, to better plan and negotiate future purchasing and maintenance contracts.

To efficiently and cost-effectively manage financial commitments, ServiceTeam ITAM gives a comprehensive overview of your contractual relationships with external companies. Whether assets are under leased service agreements or you are trying to manage maintenance agreements, you can proactively monitor contract commitments, meet dates for returns and expirations, and thereby optimize asset deployment and avoid late return penalties.
For assets under lease, ServiceTeam ITAM provides comprehensive historical tracking. You can also keep track of lease expiration dates, recover and receive credit for hardware or software added to an asset as well as keep track of credit owing to service providers for any equipment upgrades.
For warranty and maintenance agreements, you can derive maximum value by having immediate access to up-to-date information by using a centralized information repository. Important details are tracked—such as maintenance period, warranty end dates, terms and conditions, supplier contacts, support coverage and so on, letting you easily identify issues before they cost money. Notifications provide you with automatic reminders, such as for warranty end dates, while the integration to IT service delivery processes enable service desk personnel, for example, to easily determine the required scope of restoration for failed equipment.
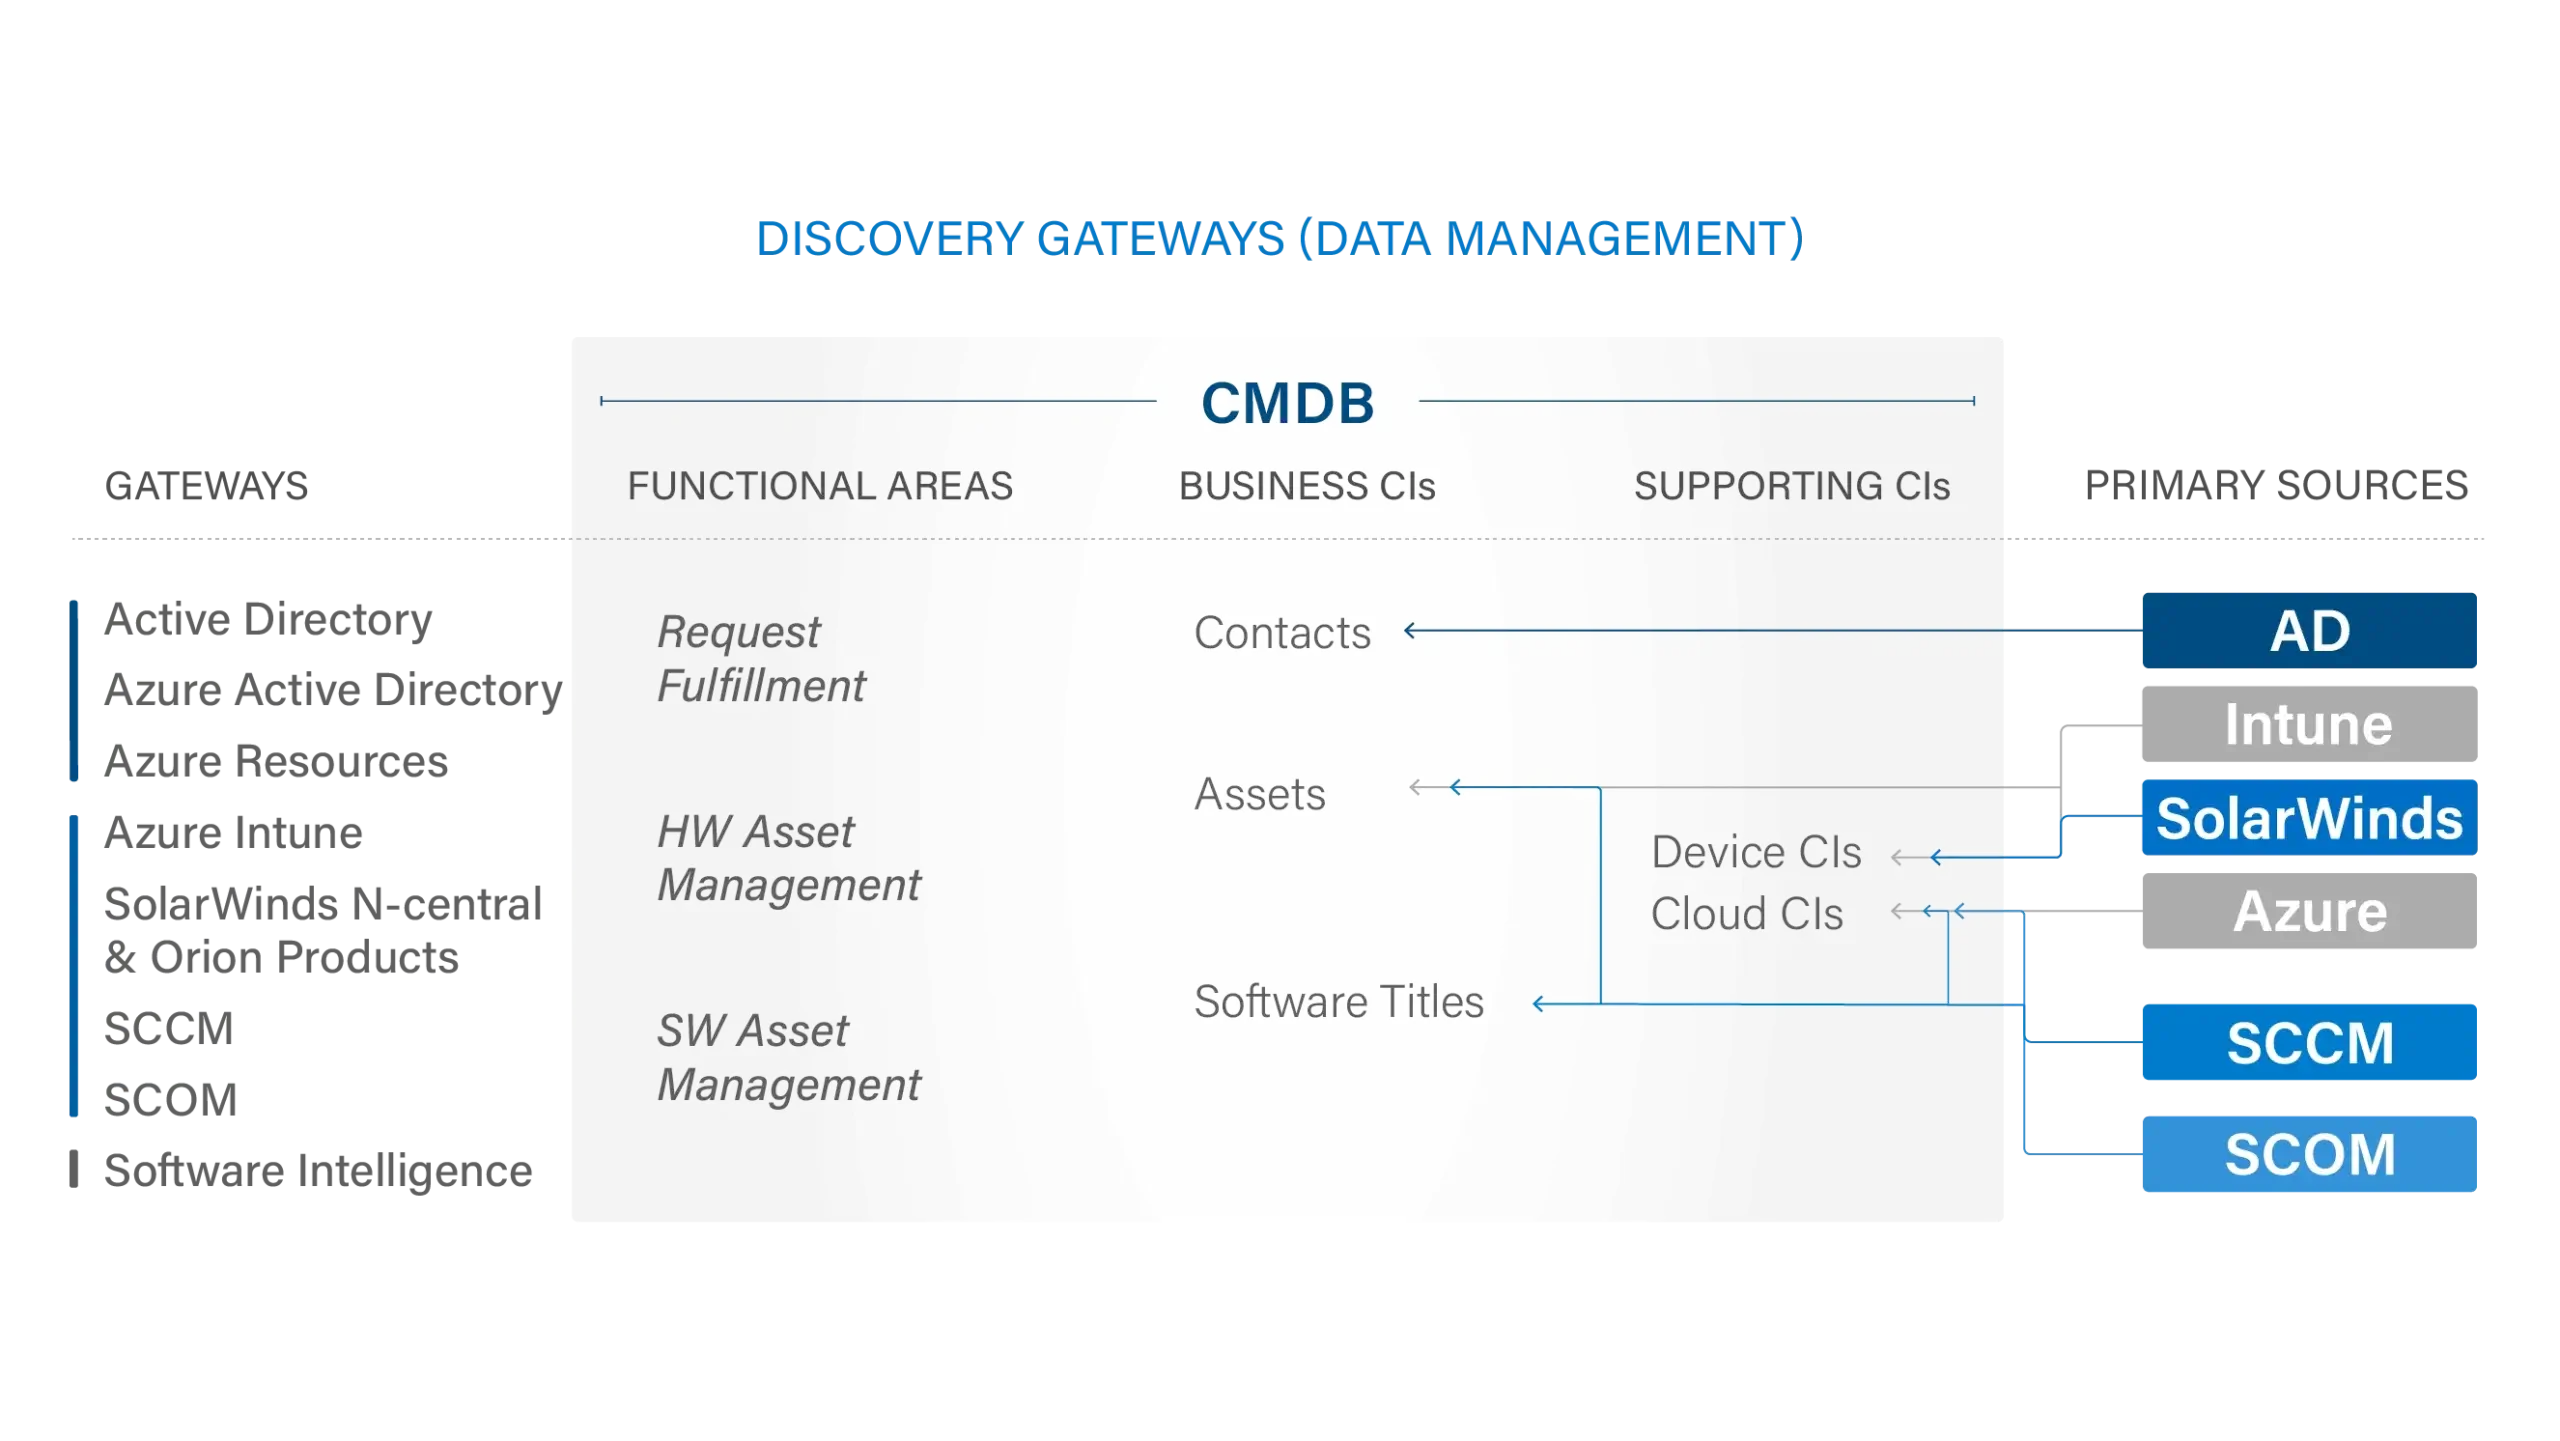
ServiceTeam ITAM ensures that your service and business processes are supported with accurate, timely and consistent data. Maintaining a history of all data changes, ServiceTeam ITAM allows for trend analysis and auditing, and your data is reliably maintained in theCMDB (Dataverse). With ServiceTeam ITAM, you can connect to a variety of sources to import accurate data and there are several out-of-the-box connectors for easy integration with System Center Configuration Manager, System Center Operations Manager, Microsoft Graph, Active Directory and leverage Cloud discovery sources, like Azure and Microsoft Intune.
Take advantage of ServiceTeam ITAM for greater productivity, reduced risks, better analysis and increased cost savings.
ITAM is the key to effective crisis management, letting you mobilize quickly to mitigate the impact. Stay on top of inventory, contracts, licenses and more.
Great crisis management starts with knowledge. ServiceTeam ITAM puts comprehensive must-know asset details at your fingertips.
Get a clearer picture and bring assets into focus for better analysis and decisions. Save costs throughout an assets’ lifecycle.
Manage risk and provide better security and data protection by having visibility into the who, what and where of hardware and software assets.

Discover the power of ServiceTeam ITSM Power BI reports and dashboards. Gain insights and get your questions answered by our experts…
At Provance, we go out of our way to bring you great service. That’s in our digital DNA. Your IT success is our success.