
Independent Review: ITSM.tools Solution Snapshot – A Review of ServiceTeam ITSM
Choosing the Right ITSM Tool Makes or Breaks Your Daily Workflow…
Designed for Microsoft-centric Customers, ServiceTeam ITSM takes a fresh approach to the service desk agent experience with a simplified and high-performance interface focused on the activities most important to them. Engineered natively in Microsoft Power Apps, ServiceTeam ITSM not only provides ITIL-aligned ITSM capabilities, but directly takes advantage of the Power Platform, Dynamics 365, Microsoft 365 and Azure to maximize investments in Microsoft technologies and deliver a highly secure, scalable, and flexible ITSM solution. ServiceTeam ITSM lets you leverage Power BI for management reporting, configure automated workflows with Power Automate, deploy Power Virtual Agent chatbots, capitalize on existing Microsoft technology skillsets, and so much more. With ServiceTeam ITSM, you can achieve excellent customer service—supporting business growth with a ‘best-of-platform’ solution. ServiceTeam ITSM is comprised of two editions, Professional and Enterprise, plus a ServiceTeam ITAM add on.
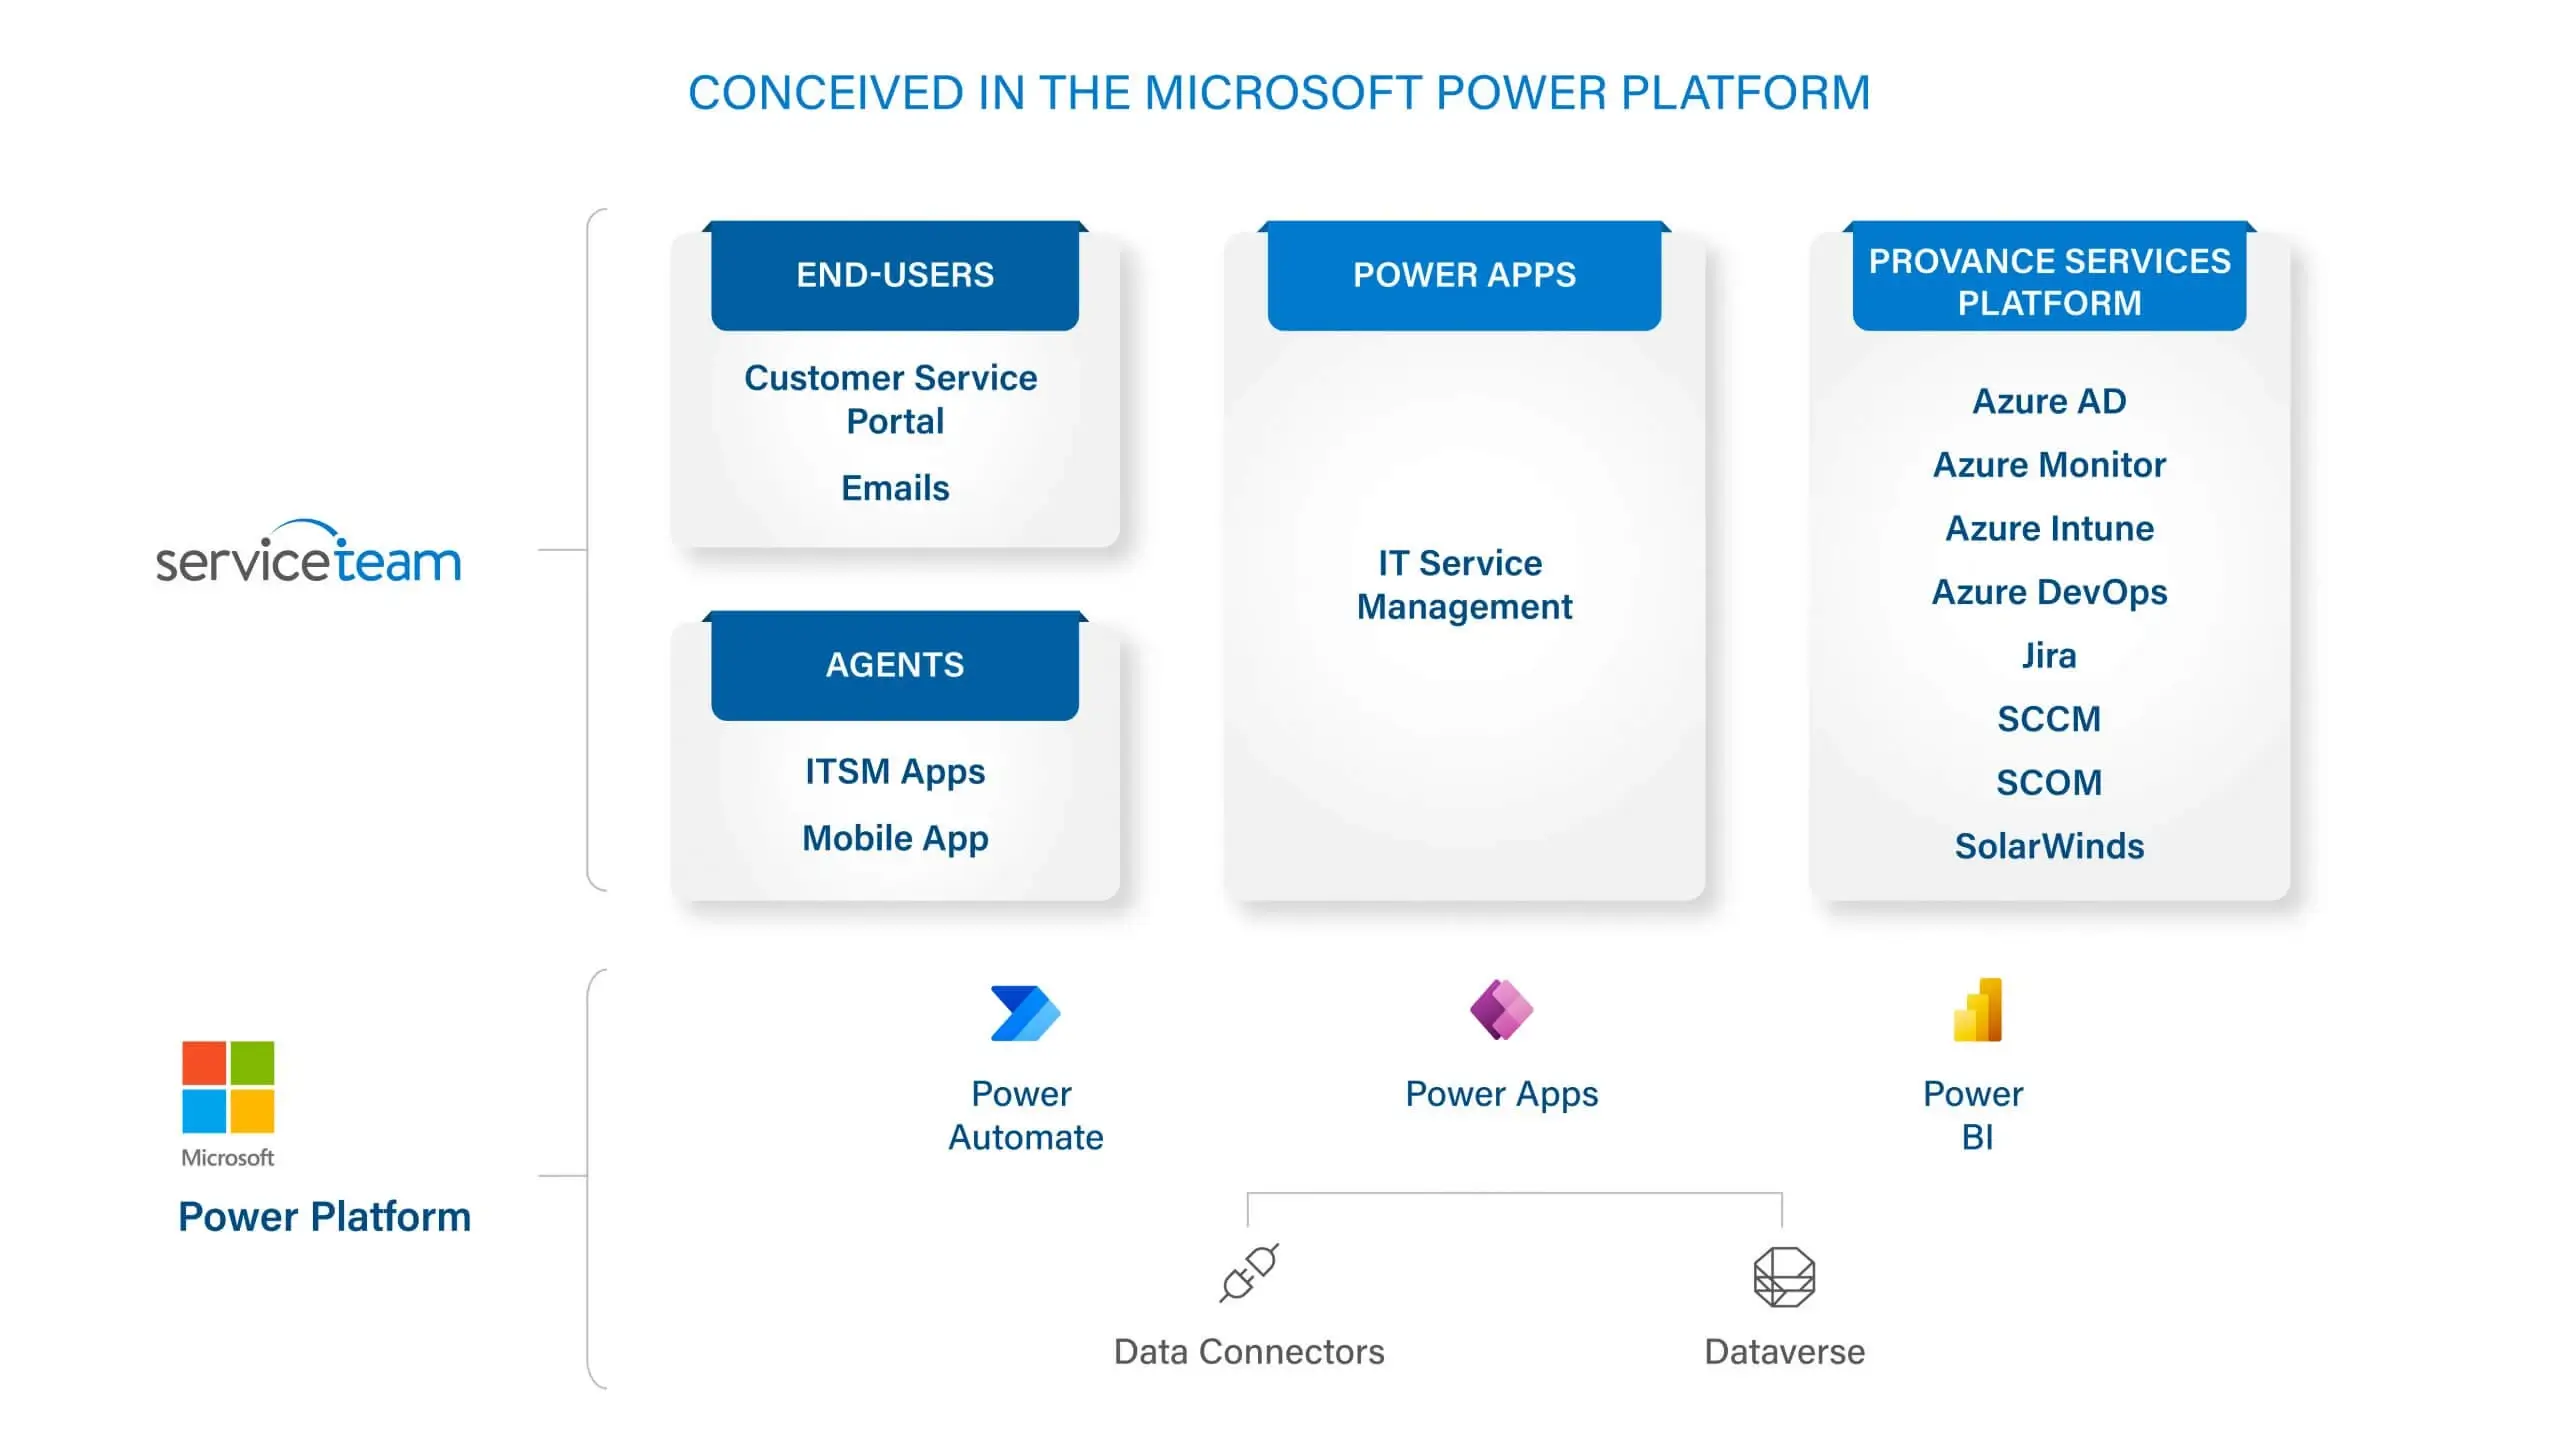
ServiceTeam ITSM empowers IT to deliver modern, effective and intelligent customer service utilizing the latest and greatest technology from Microsoft, the Power Platform. ServiceTeam ITSM is a Power App, that leverages Power BI and Power Automate to boost your business productivity and give you meaningful data for intelligent insight into your service environment. The Power Platform and Microsoft Dataverse let you say goodbye to application and data silos, while extending value and reducing costs.
ServiceTeam ITSM lets you benefit from a “best of platform” approach, whether you run your operations through Microsoft Power Apps or Dynamics 365 they work seamlessly together. ServiceTeam ITSM also lets Microsoft Partners and MSPs utilize a multi-tenant service management solution to get a 360-degree view of their customers, while also being able to leverage the familiarity of the Microsoft products they already depend upon to run their business. Additionally, the ServiceTeam ITSM suite of products provides next-gen IT Service Management, letting you streamline operations, increase profits and deliver first-rate customer service no matter your company size, maturity or structure.
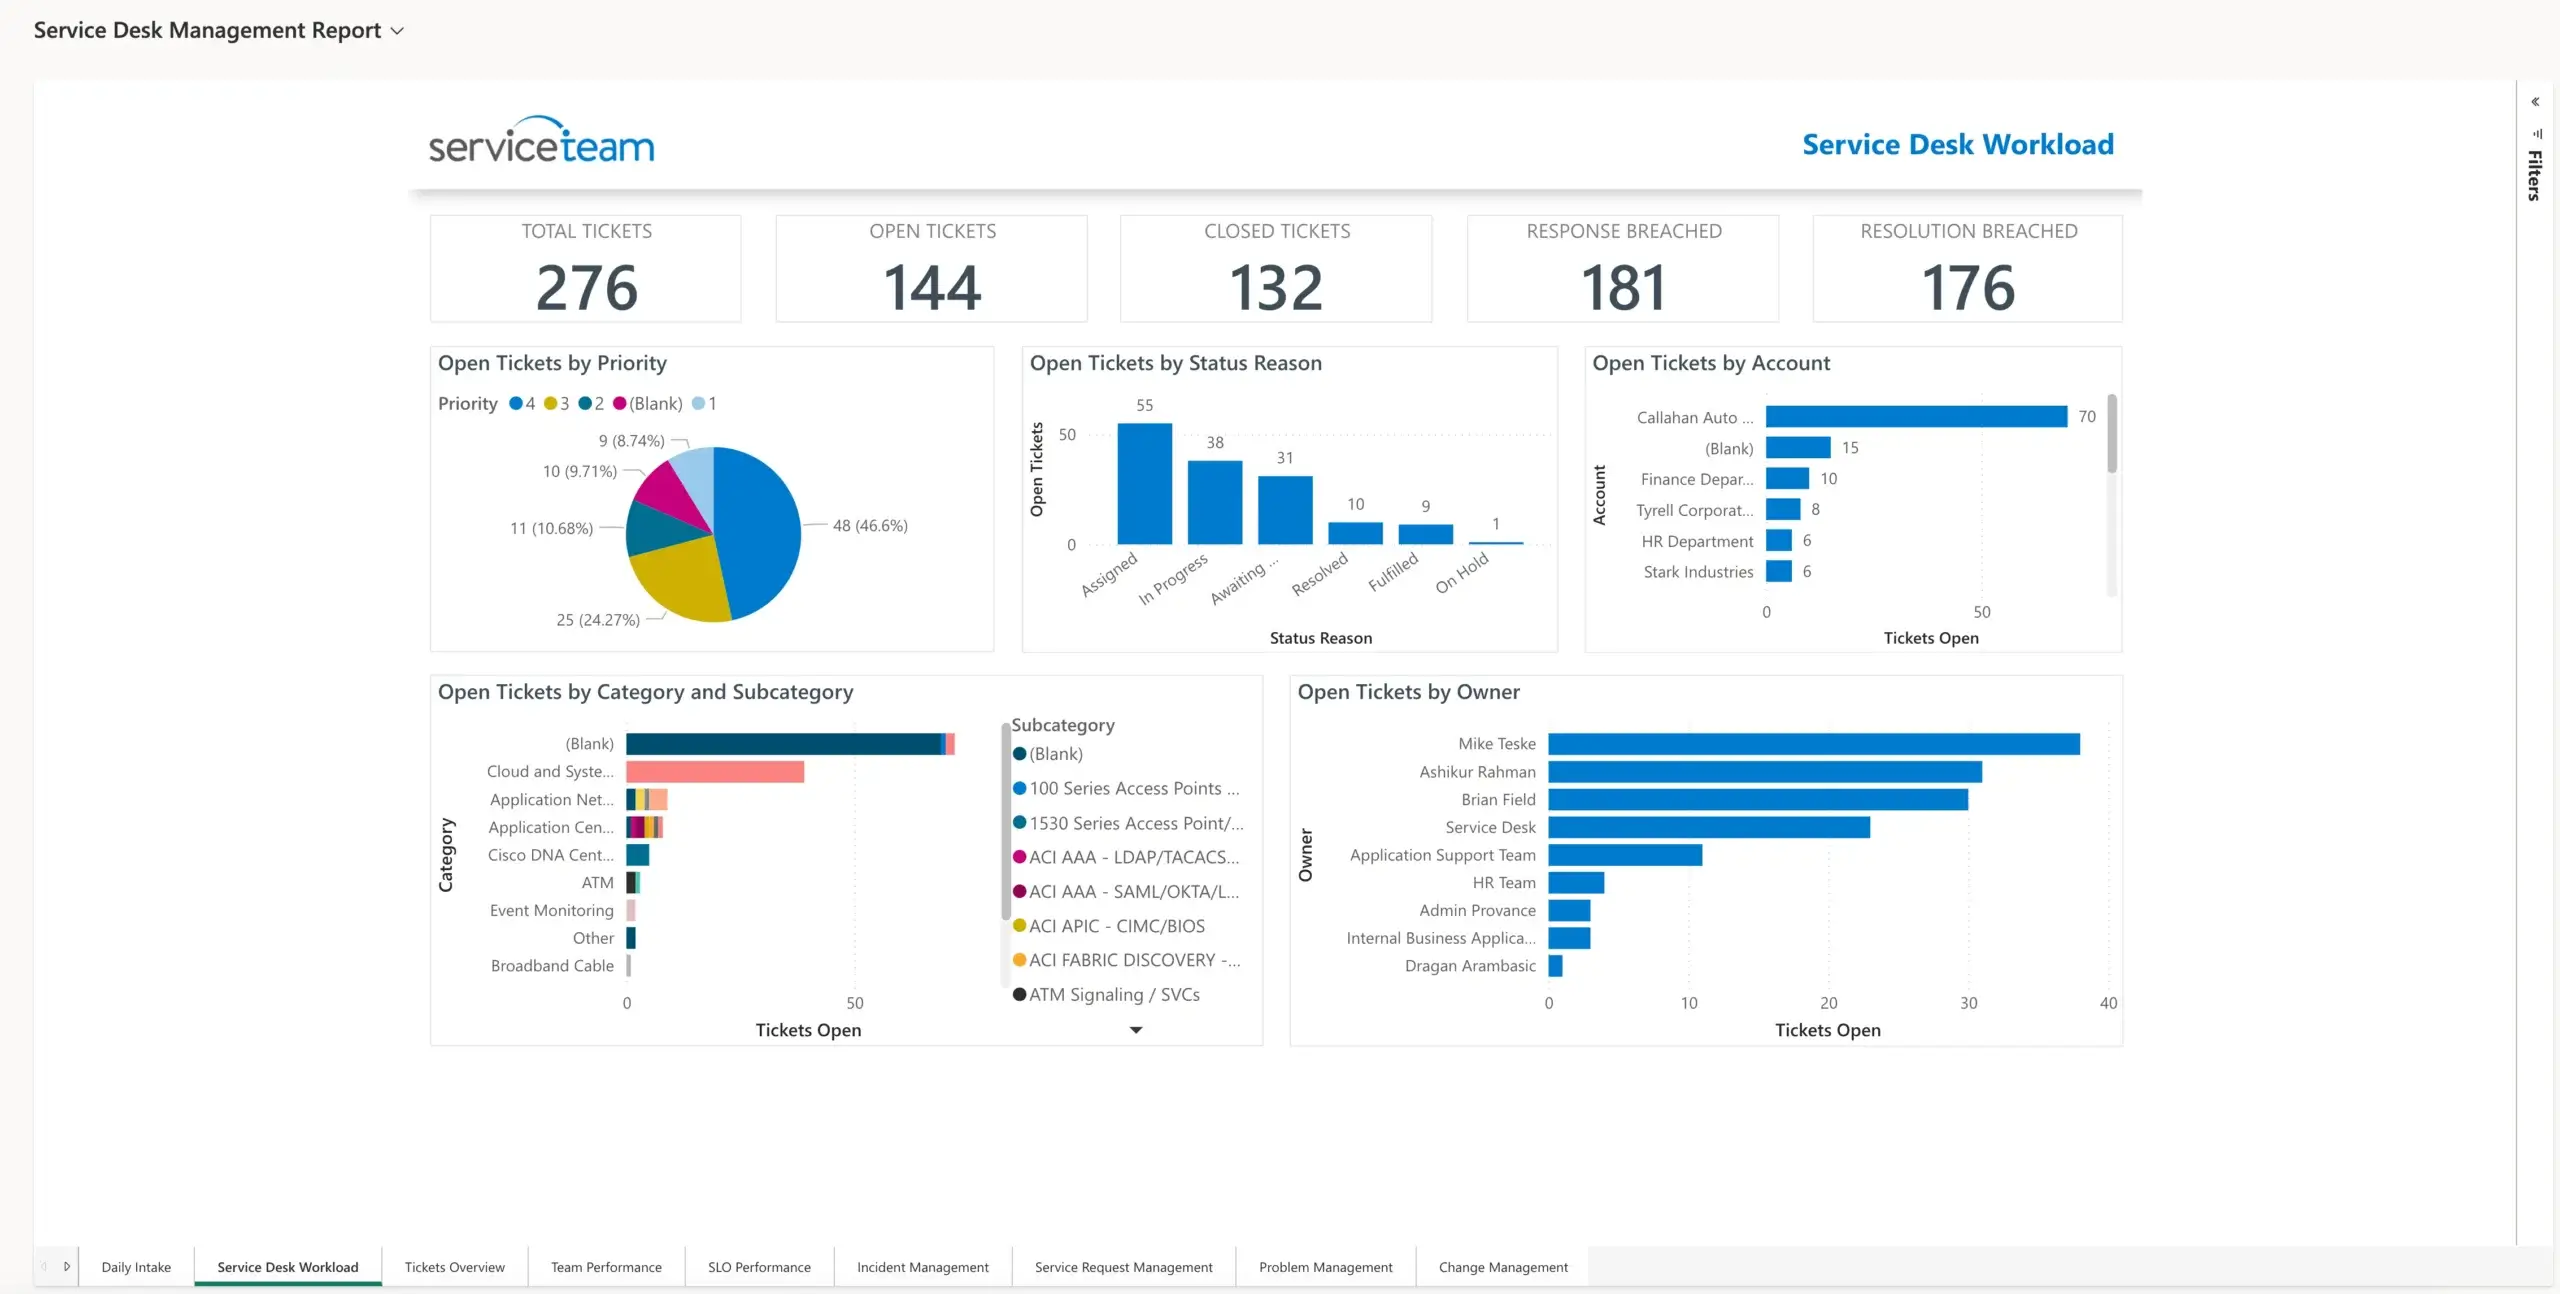
ServiceTeam ITSM provides an array of dashboards, views and reports to let you easily monitor operations, spot trends and analyze historical information. Out-of-the-box Microsoft Power BI dashboards and reports visually communicate and deliver intelligent ITSM insights and answers to common questions for managers and key stakeholders. Analytical reports allow you to identify key issues, such as the root cause of errors and failures and take immediate action, preventing additional downtime, loss and multiple incidents as a result. Efficiency reports give visibility into how long it takes for resolution and departmental efficiency.
With ServiceTeam ITSM, you’ll gain clarity, visibility and a 360-degree view of your service environment. Plus, you can easily create your own Power BI dashboards and reports to capture data and insights particular to your unique business scenario.
Watch a 2 minute video on the ServiceTeam ITSM Dashboards and Reports capability.
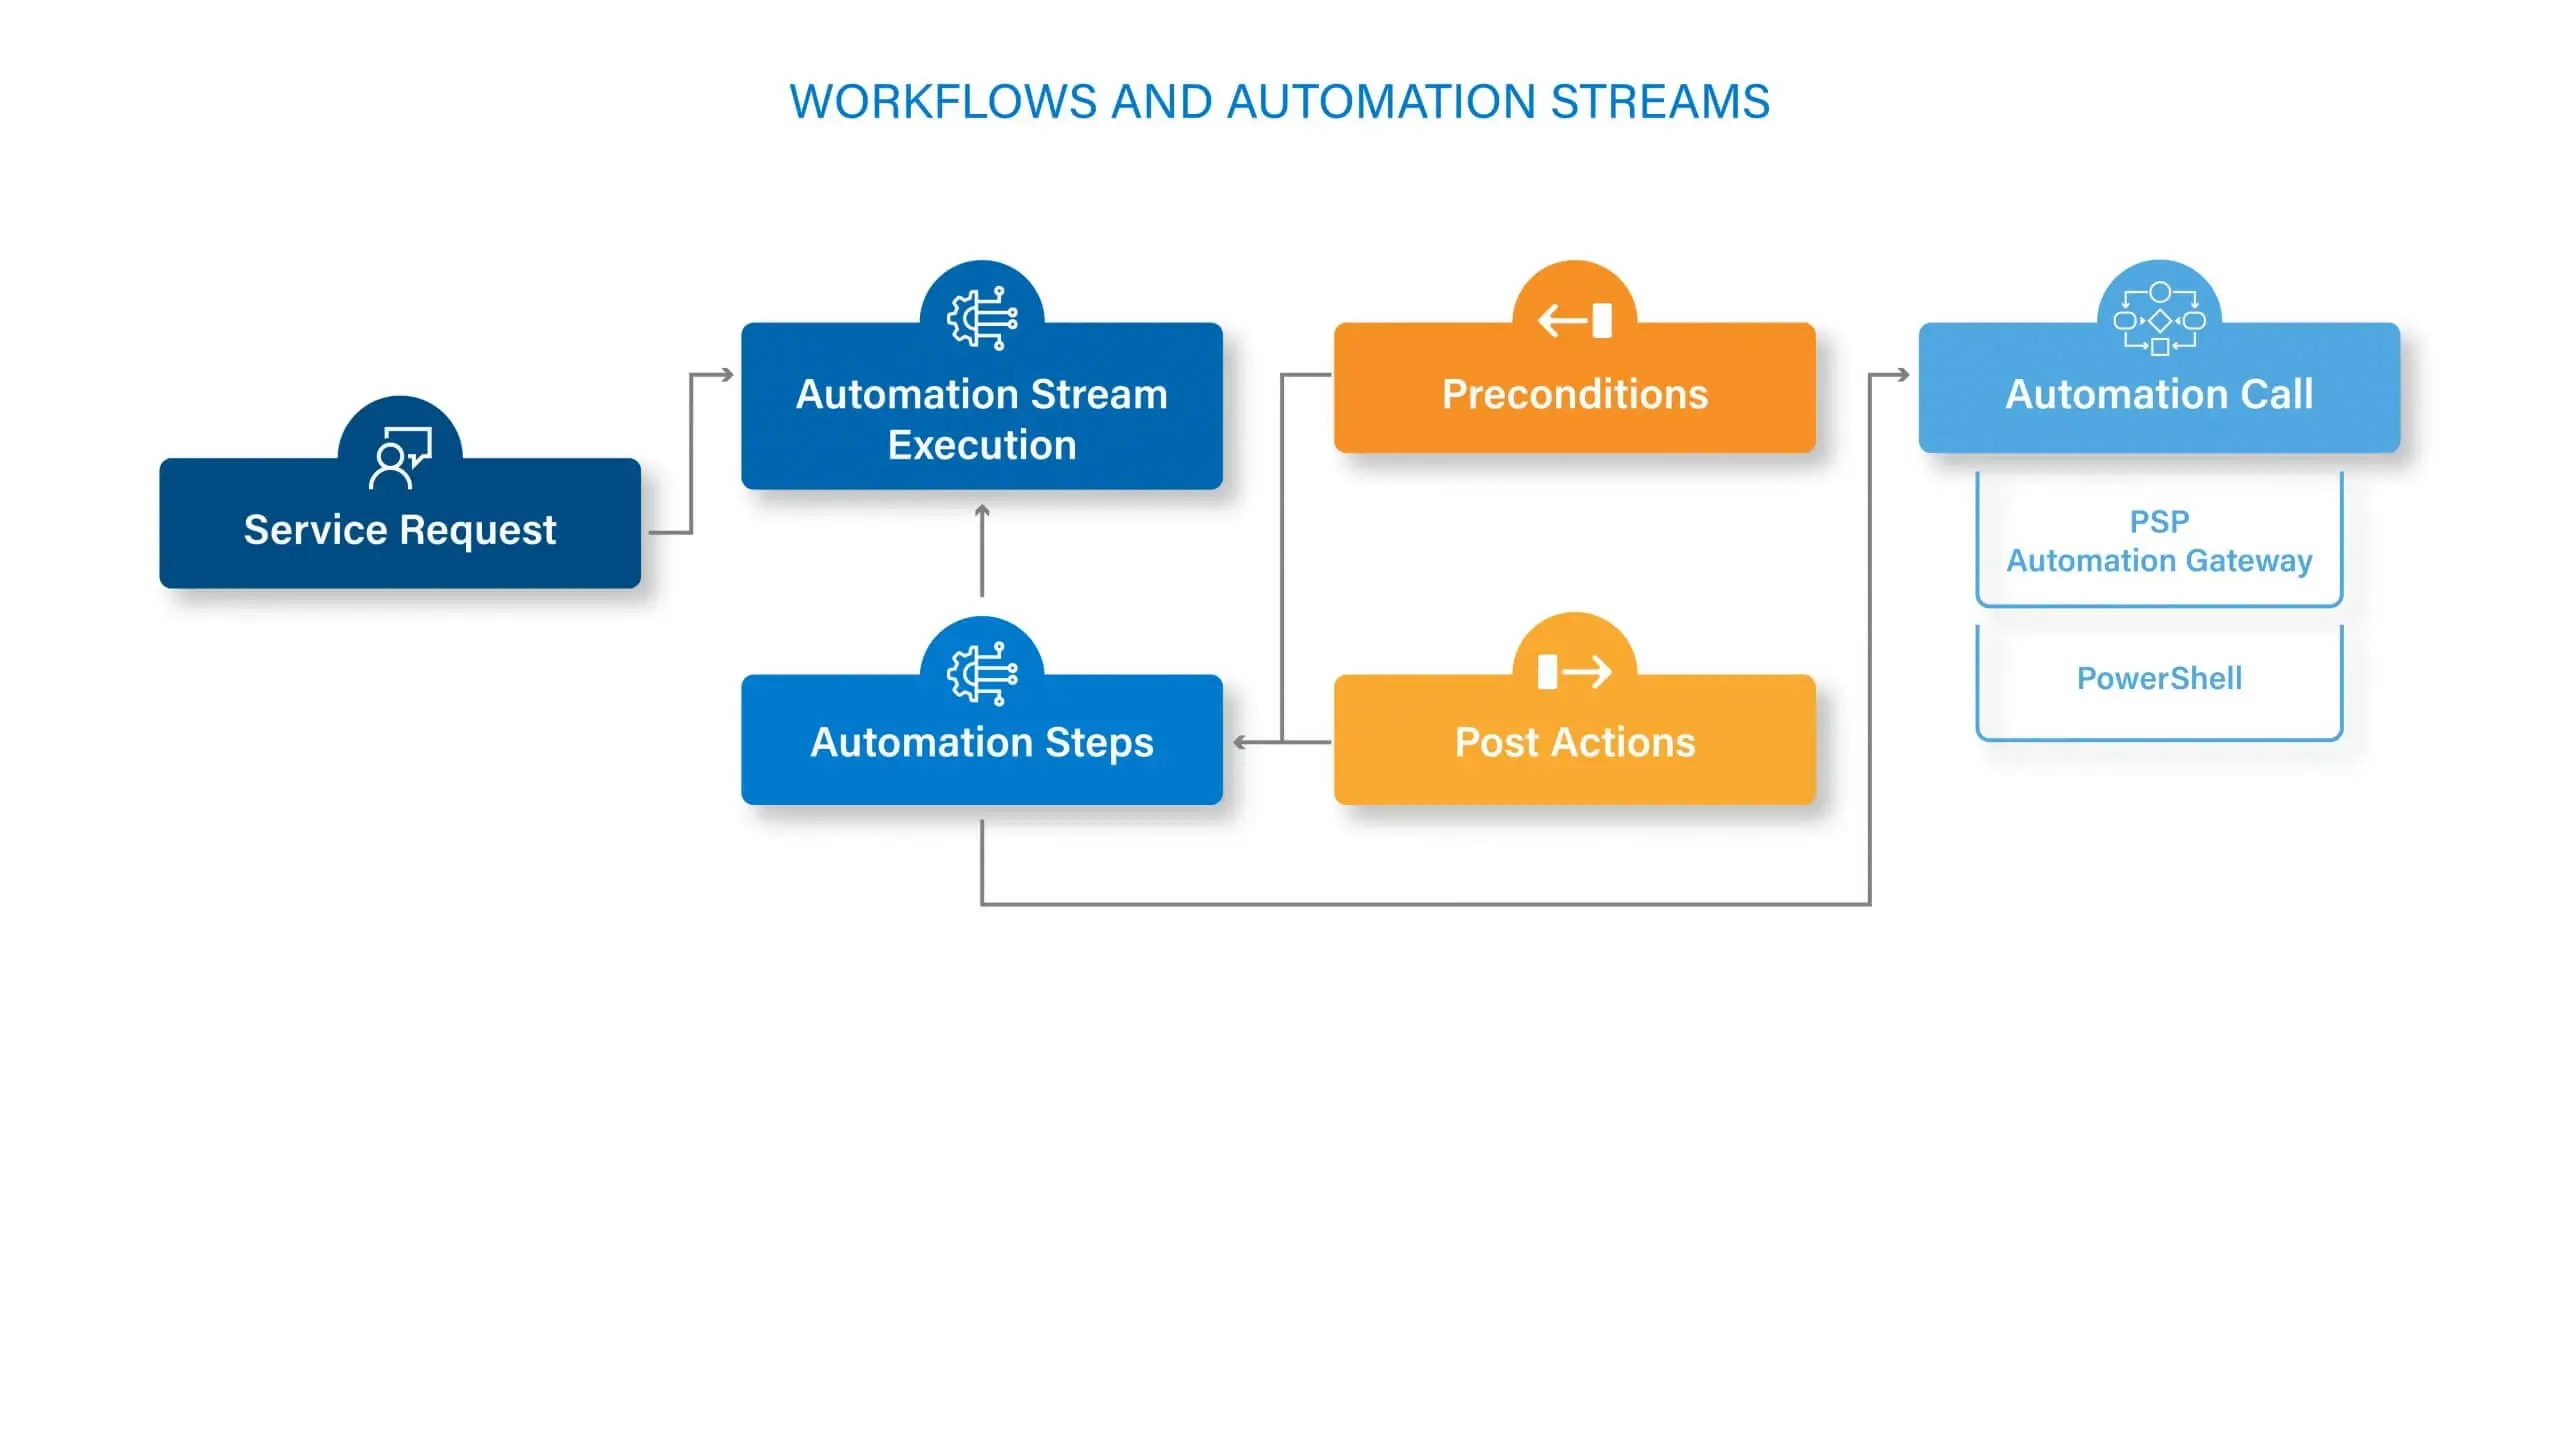
Automation is the foundation of modern and cost-effective ITSM. To boost productivity, increase efficiency and improve responsiveness, great service management teams know that automating frequent and repetitive processes and tasks is the way to go.
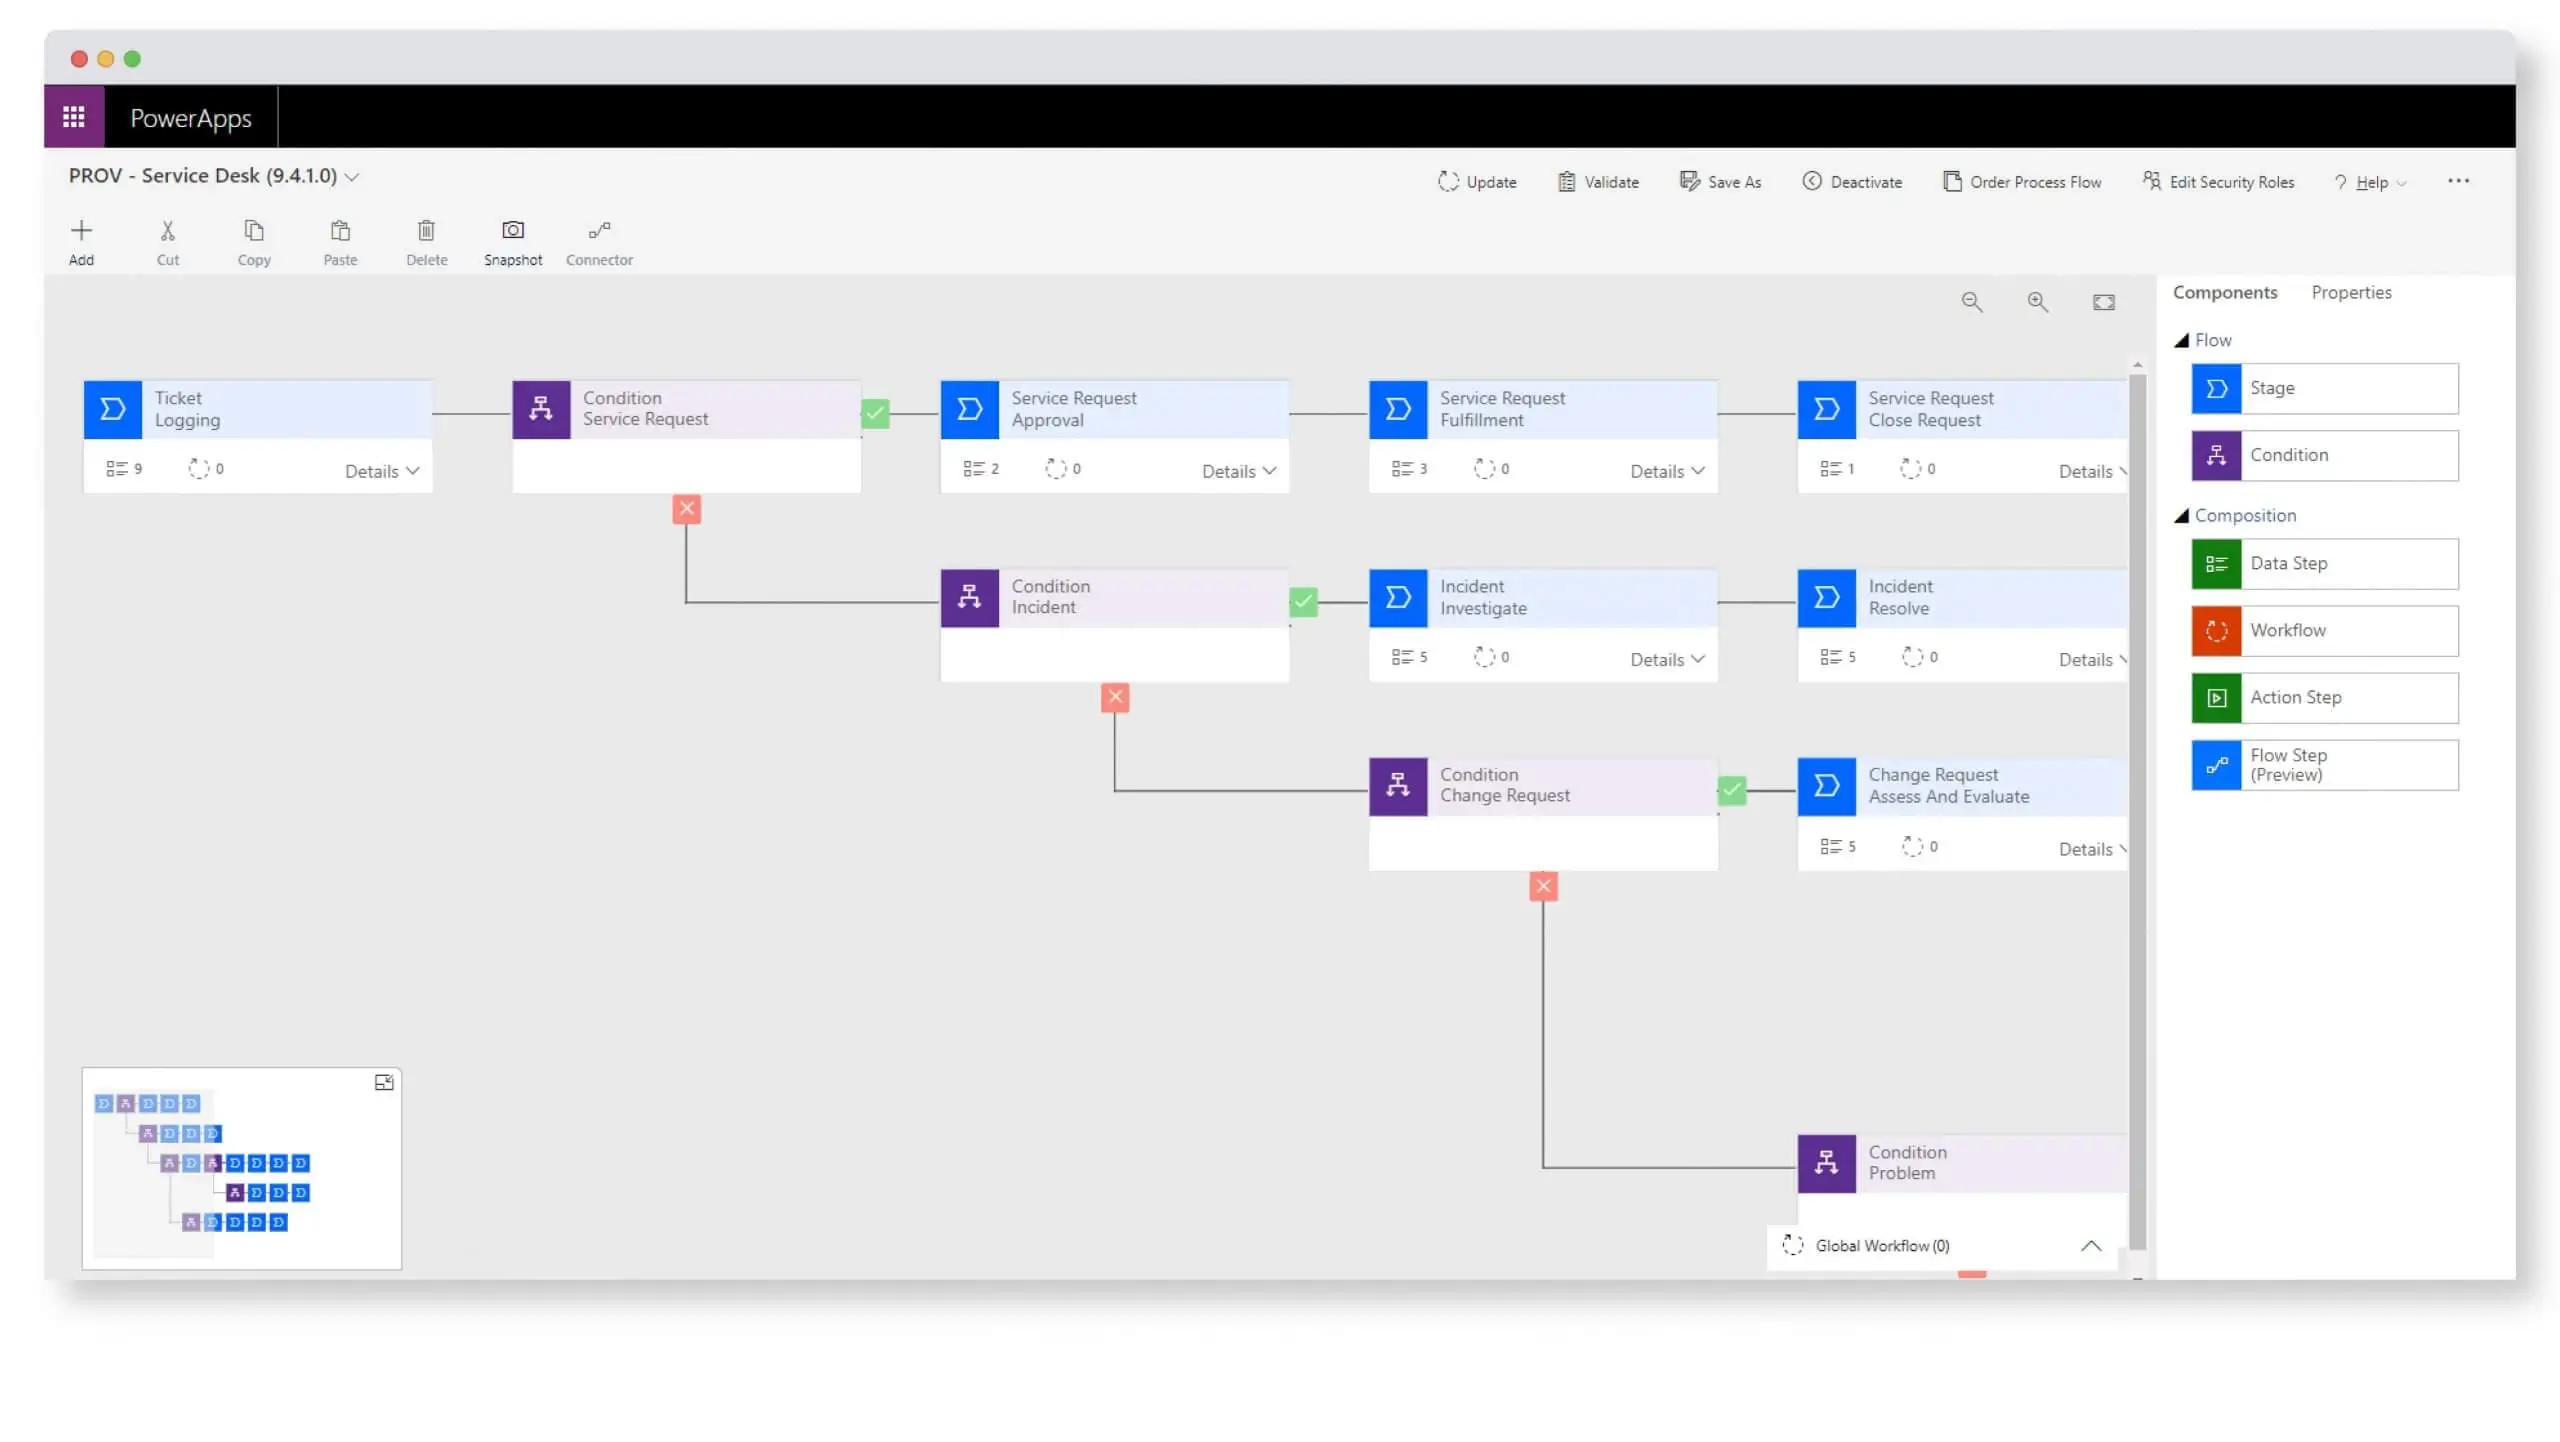
Without coding, ServiceTeam ITSM lets you easily create business process flows and workflows to execute activities, tasks and data manipulations that would otherwise require human effort. ServiceTeam ITSM Automation Streams capability let you configure complex workflows that involve many automated and manual activities and tasks. Long running workflows such as onboarding users and customers can include pre-and post-step activities, time dependencies, and manual steps within a single stream. Automations can also run in parallel or with serial branches. Automation Streams configuration is all codeless, letting you create touchless service requests, which only notify you if there is an issue or error.
Tailor ServiceTeam ITSM to your own specific processes, policies and structure. Codeless configuration means you can adapt quickly, without requiring expensive outside experts, saving you time and money while providing affordable IT services your business needs today. ServiceTeam ITSM is highly extensible and lets you make changes and modifications—all without coding. Designed with simplification in mind, ServiceTeam ITSM makes it easy to add and edit data tables and columns, create and edit forms, create business rules to automate actions, configure workflows and more. Save time and money by utilizing standardized and ITIL-aligned processes and automations with ServiceTeam ITSM, and then when necessary, easily configure based on your unique business scenario or customer requirements.
ServiceTeam ITSM provides ITIL®-aligned best practices for services-centric IT processes right from the get-go. Intuitive dashboards and flexible workflows surface critical information, reduce errors and help agents resolve incidents and service requests faster. Regardless of whether customer tickets come via email, the self-service portal, phone or in-person, ServiceTeam ITSM tracks, prioritizes and assigns tickets, ensuring standardization and important information is collected.
Automated issue escalation and auto routing of incidents and service requests ensure a faster resolution with minimal end-user effort. Step-by-step guidance reduces errors and produces consistency. ITSM Notifications inform Service Desk users and ensure important information is captured before activities or tasks are completed. ServiceTeam ITSM provides a standardized process where tickets are opened, triaged, worked on and closed. However, the ServiceTeam ITSM, ITIL-centric processes don’t impede service agent activity and responsiveness, as the service agent is given flexibility to manage and provide the necessary information. Watch a short video and see ServiceTeam ITSM Incident Management and Request Fulfillment capabilities in action.
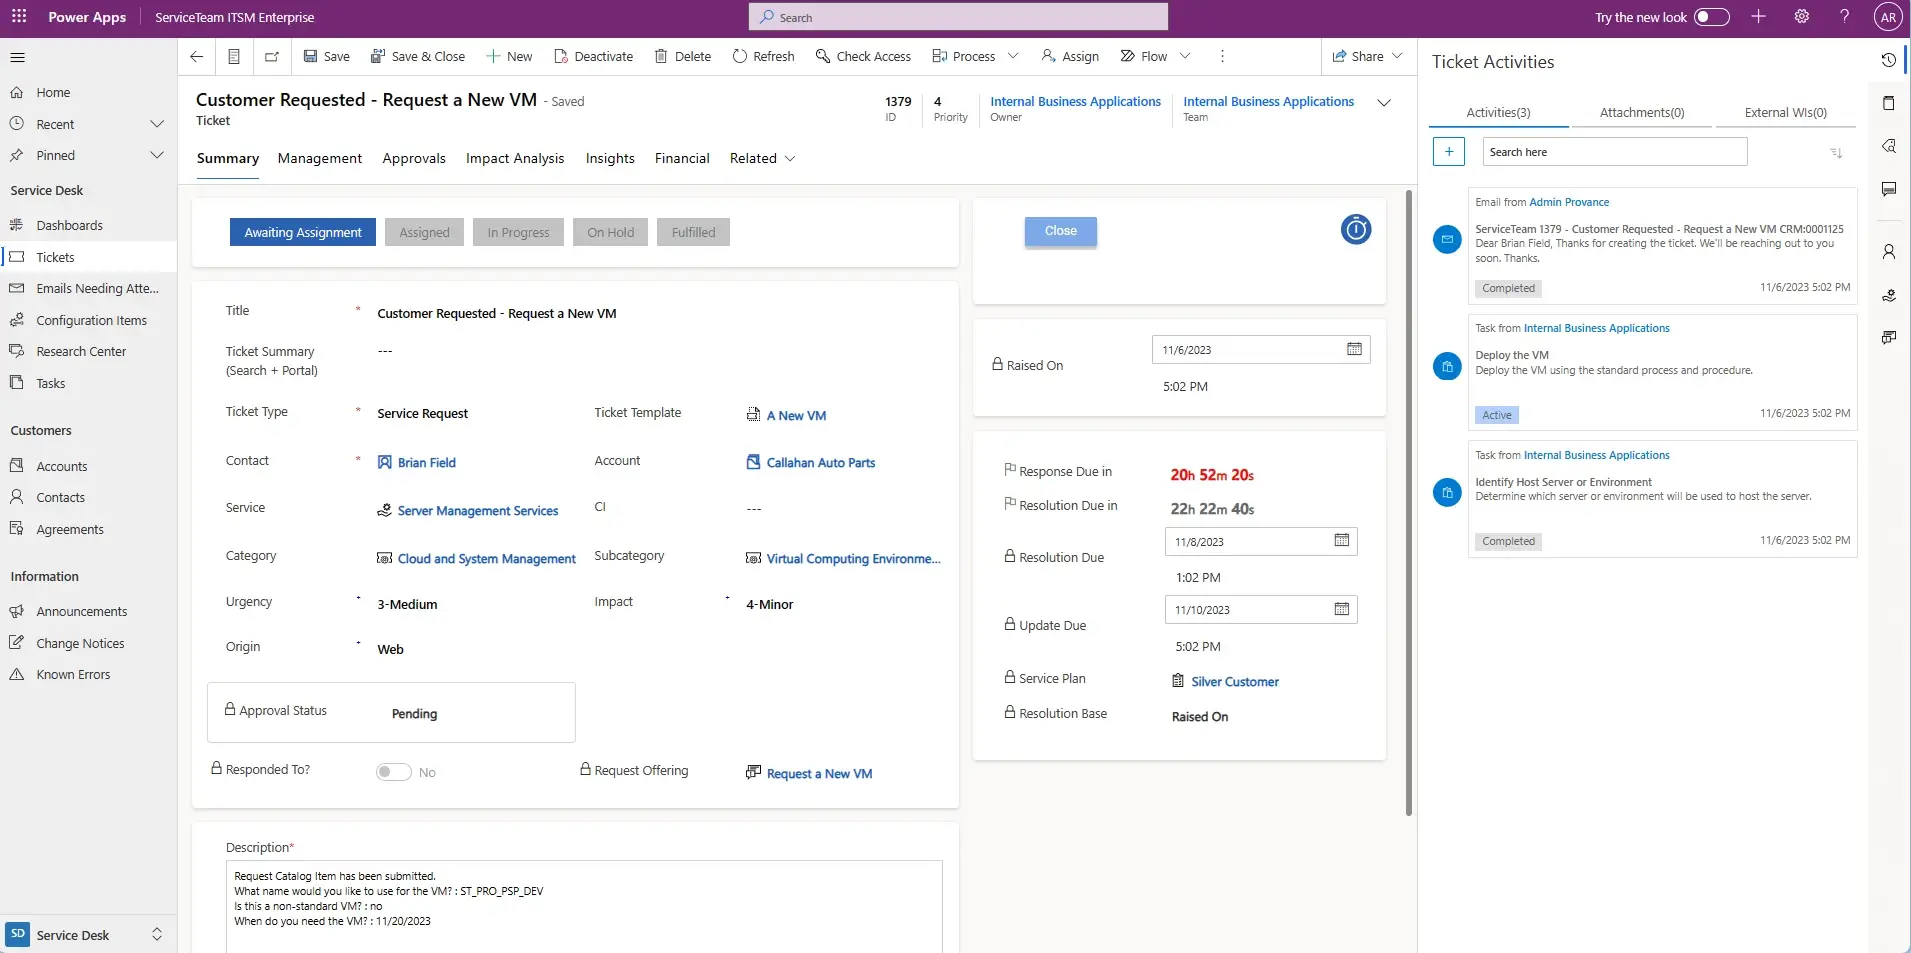
Engineered with the agent experience in mind, ServiceTeam ITSM Productivity Panes increases agent productivity by providing a 360-degree view of the information an agent needs to quickly assess and respond to customer incidents or requests without leaving the ticket. The surfaced information helps agents keep focus on the ticket and customer they are helping. The result: increased efficiency, reduced clicks, less time spent searching and no need to have multiple windows open. Types of Productivity Panes out-of-the-box include Activities, Events, Contracts, Accounts, Services and Knowledge, but all can be easily modified to reveal relevant information to maintain agent focus.
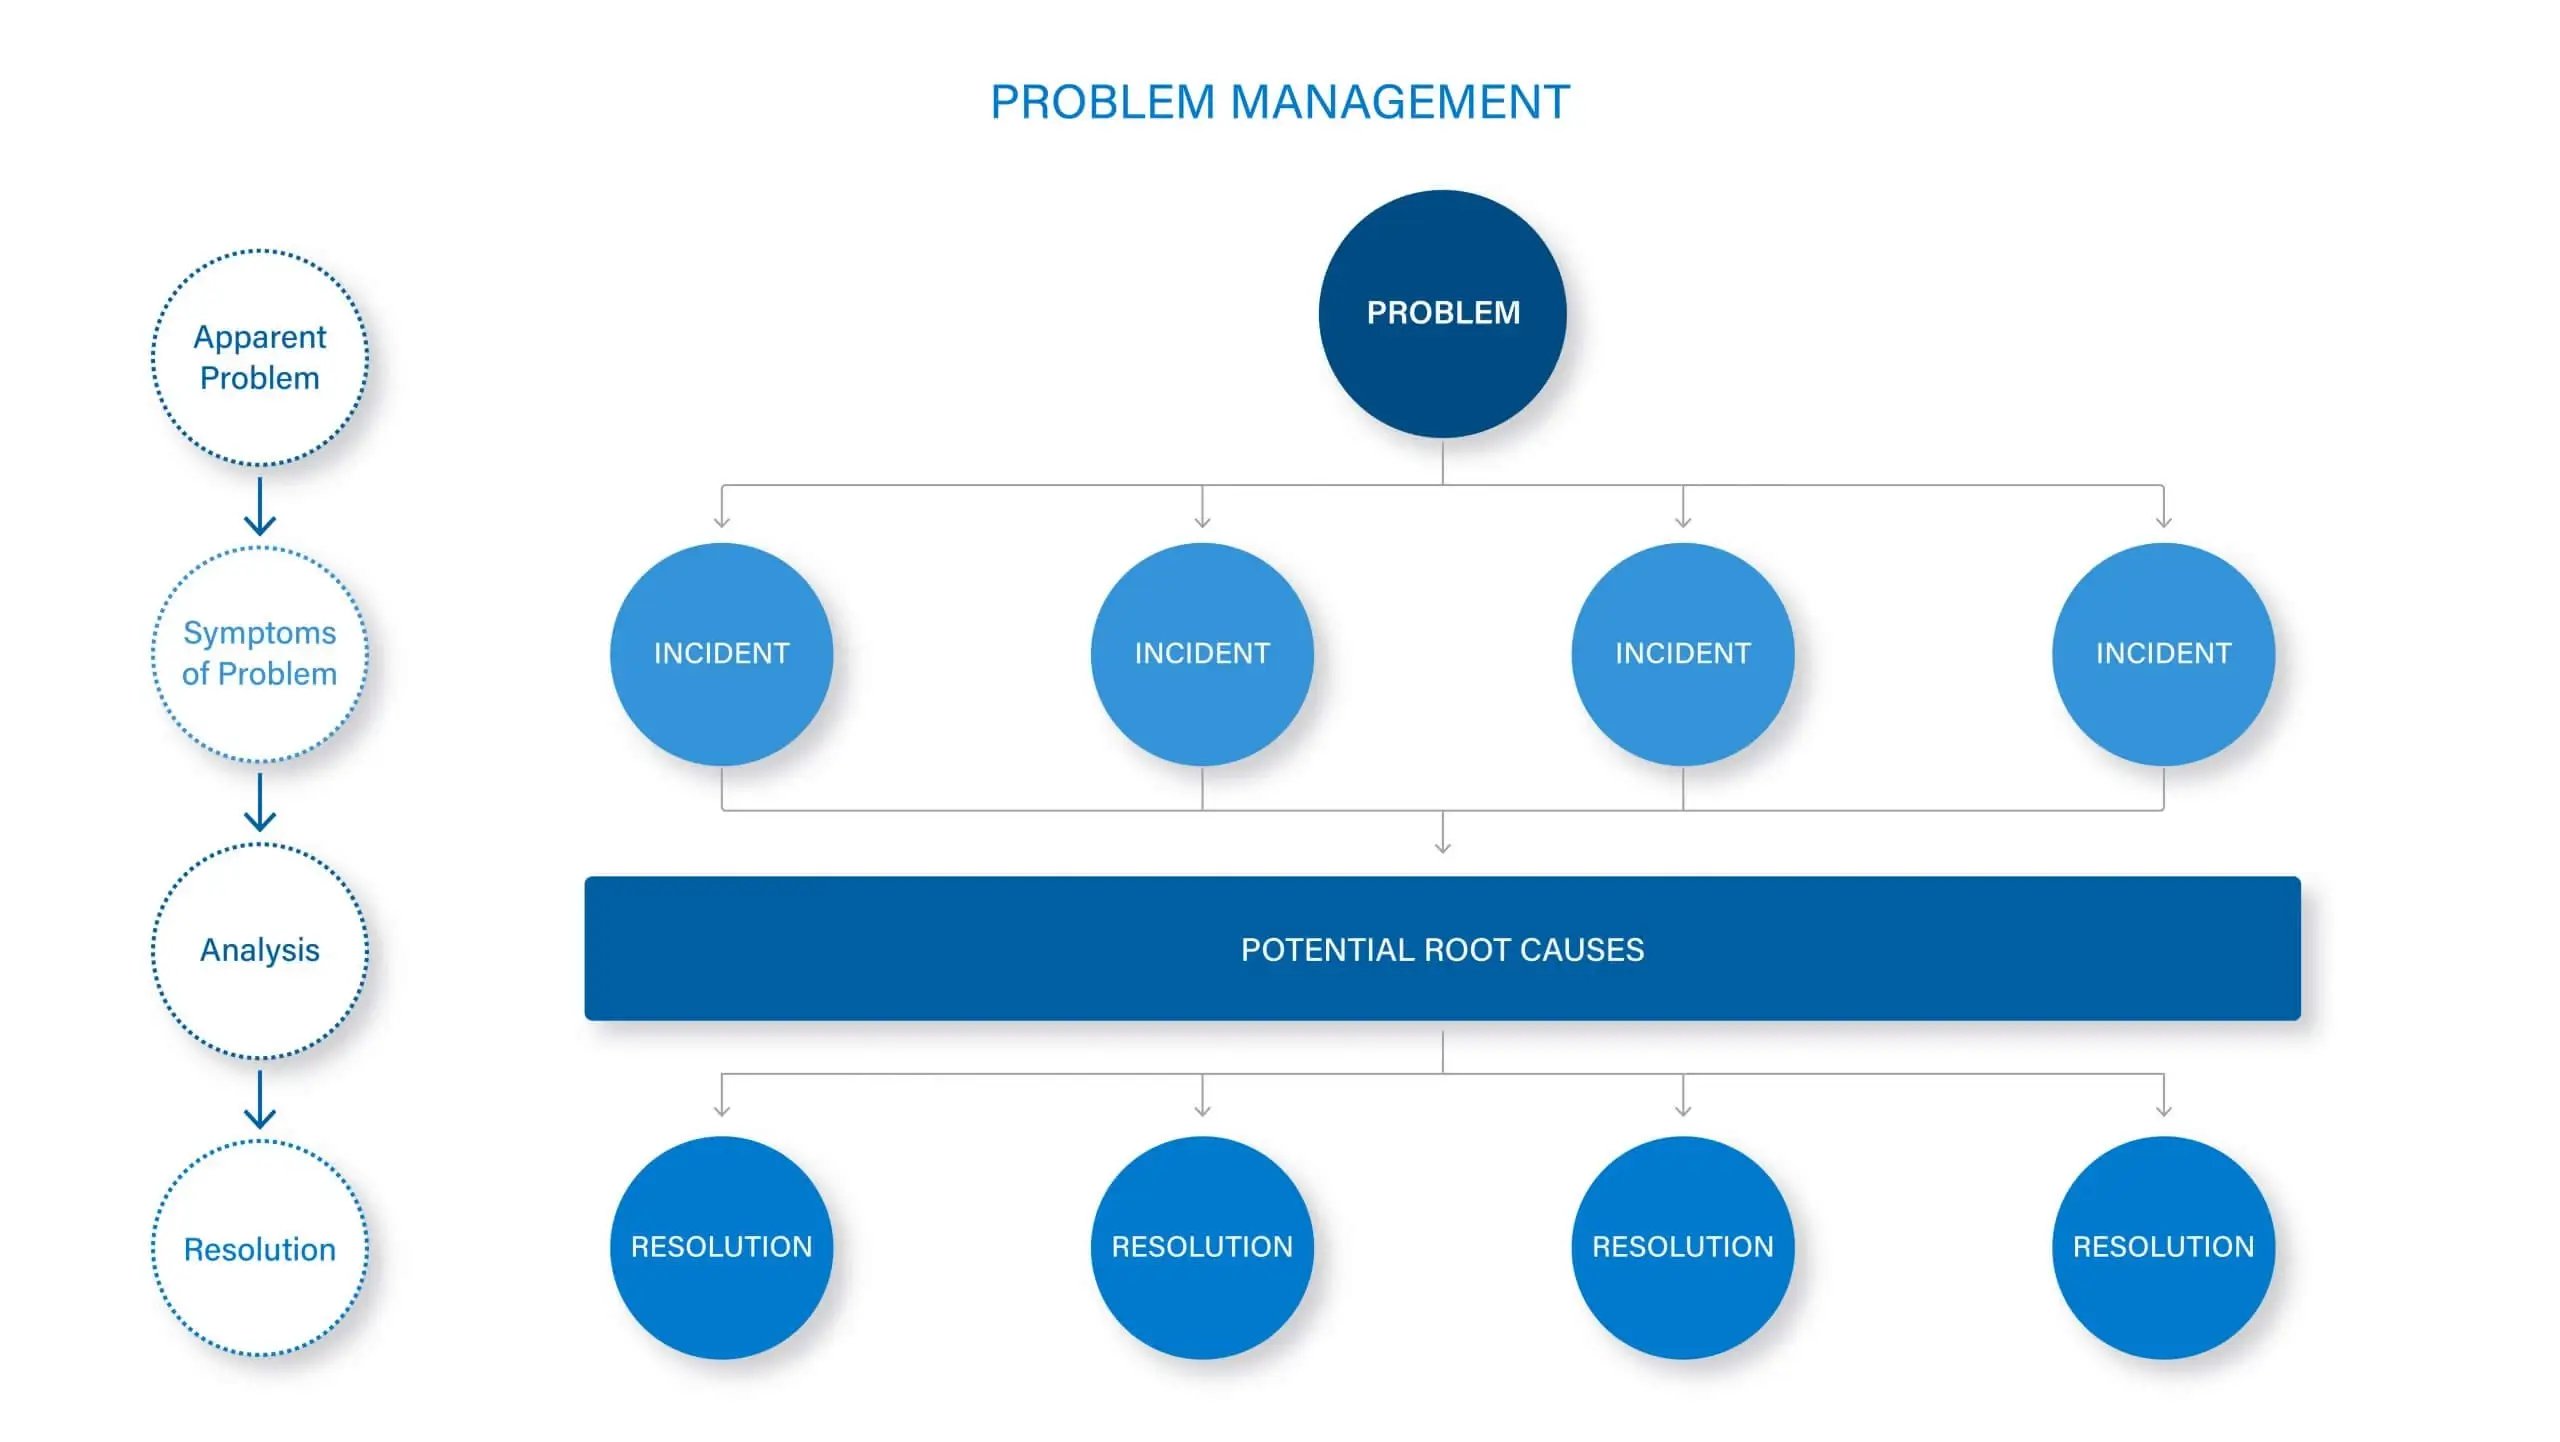
Facilitate root cause analysis, identify impacted services, inform users, deflect tickets and speed up resolution. With a 360-degree view of your service environment, ServiceTeam ITSM lets you easily identify when incidents have become problems, leverage a known error database, associate problems to tickets and services, notify users of known issues and deflect tickets once a problem has been identified, analyze the root causes, and if necessary, provide a temporary workaround. With ServiceTeam ITSM, you can also easily relate changes to services in your environment to problems so you can identify causes and potential impacts. ServiceTeam ITSM provides maximum flexibility, letting you resolve problems based on your own internal processes. Watch a short overview video to see the ServiceTeam ITSM Problem Management capability in action.
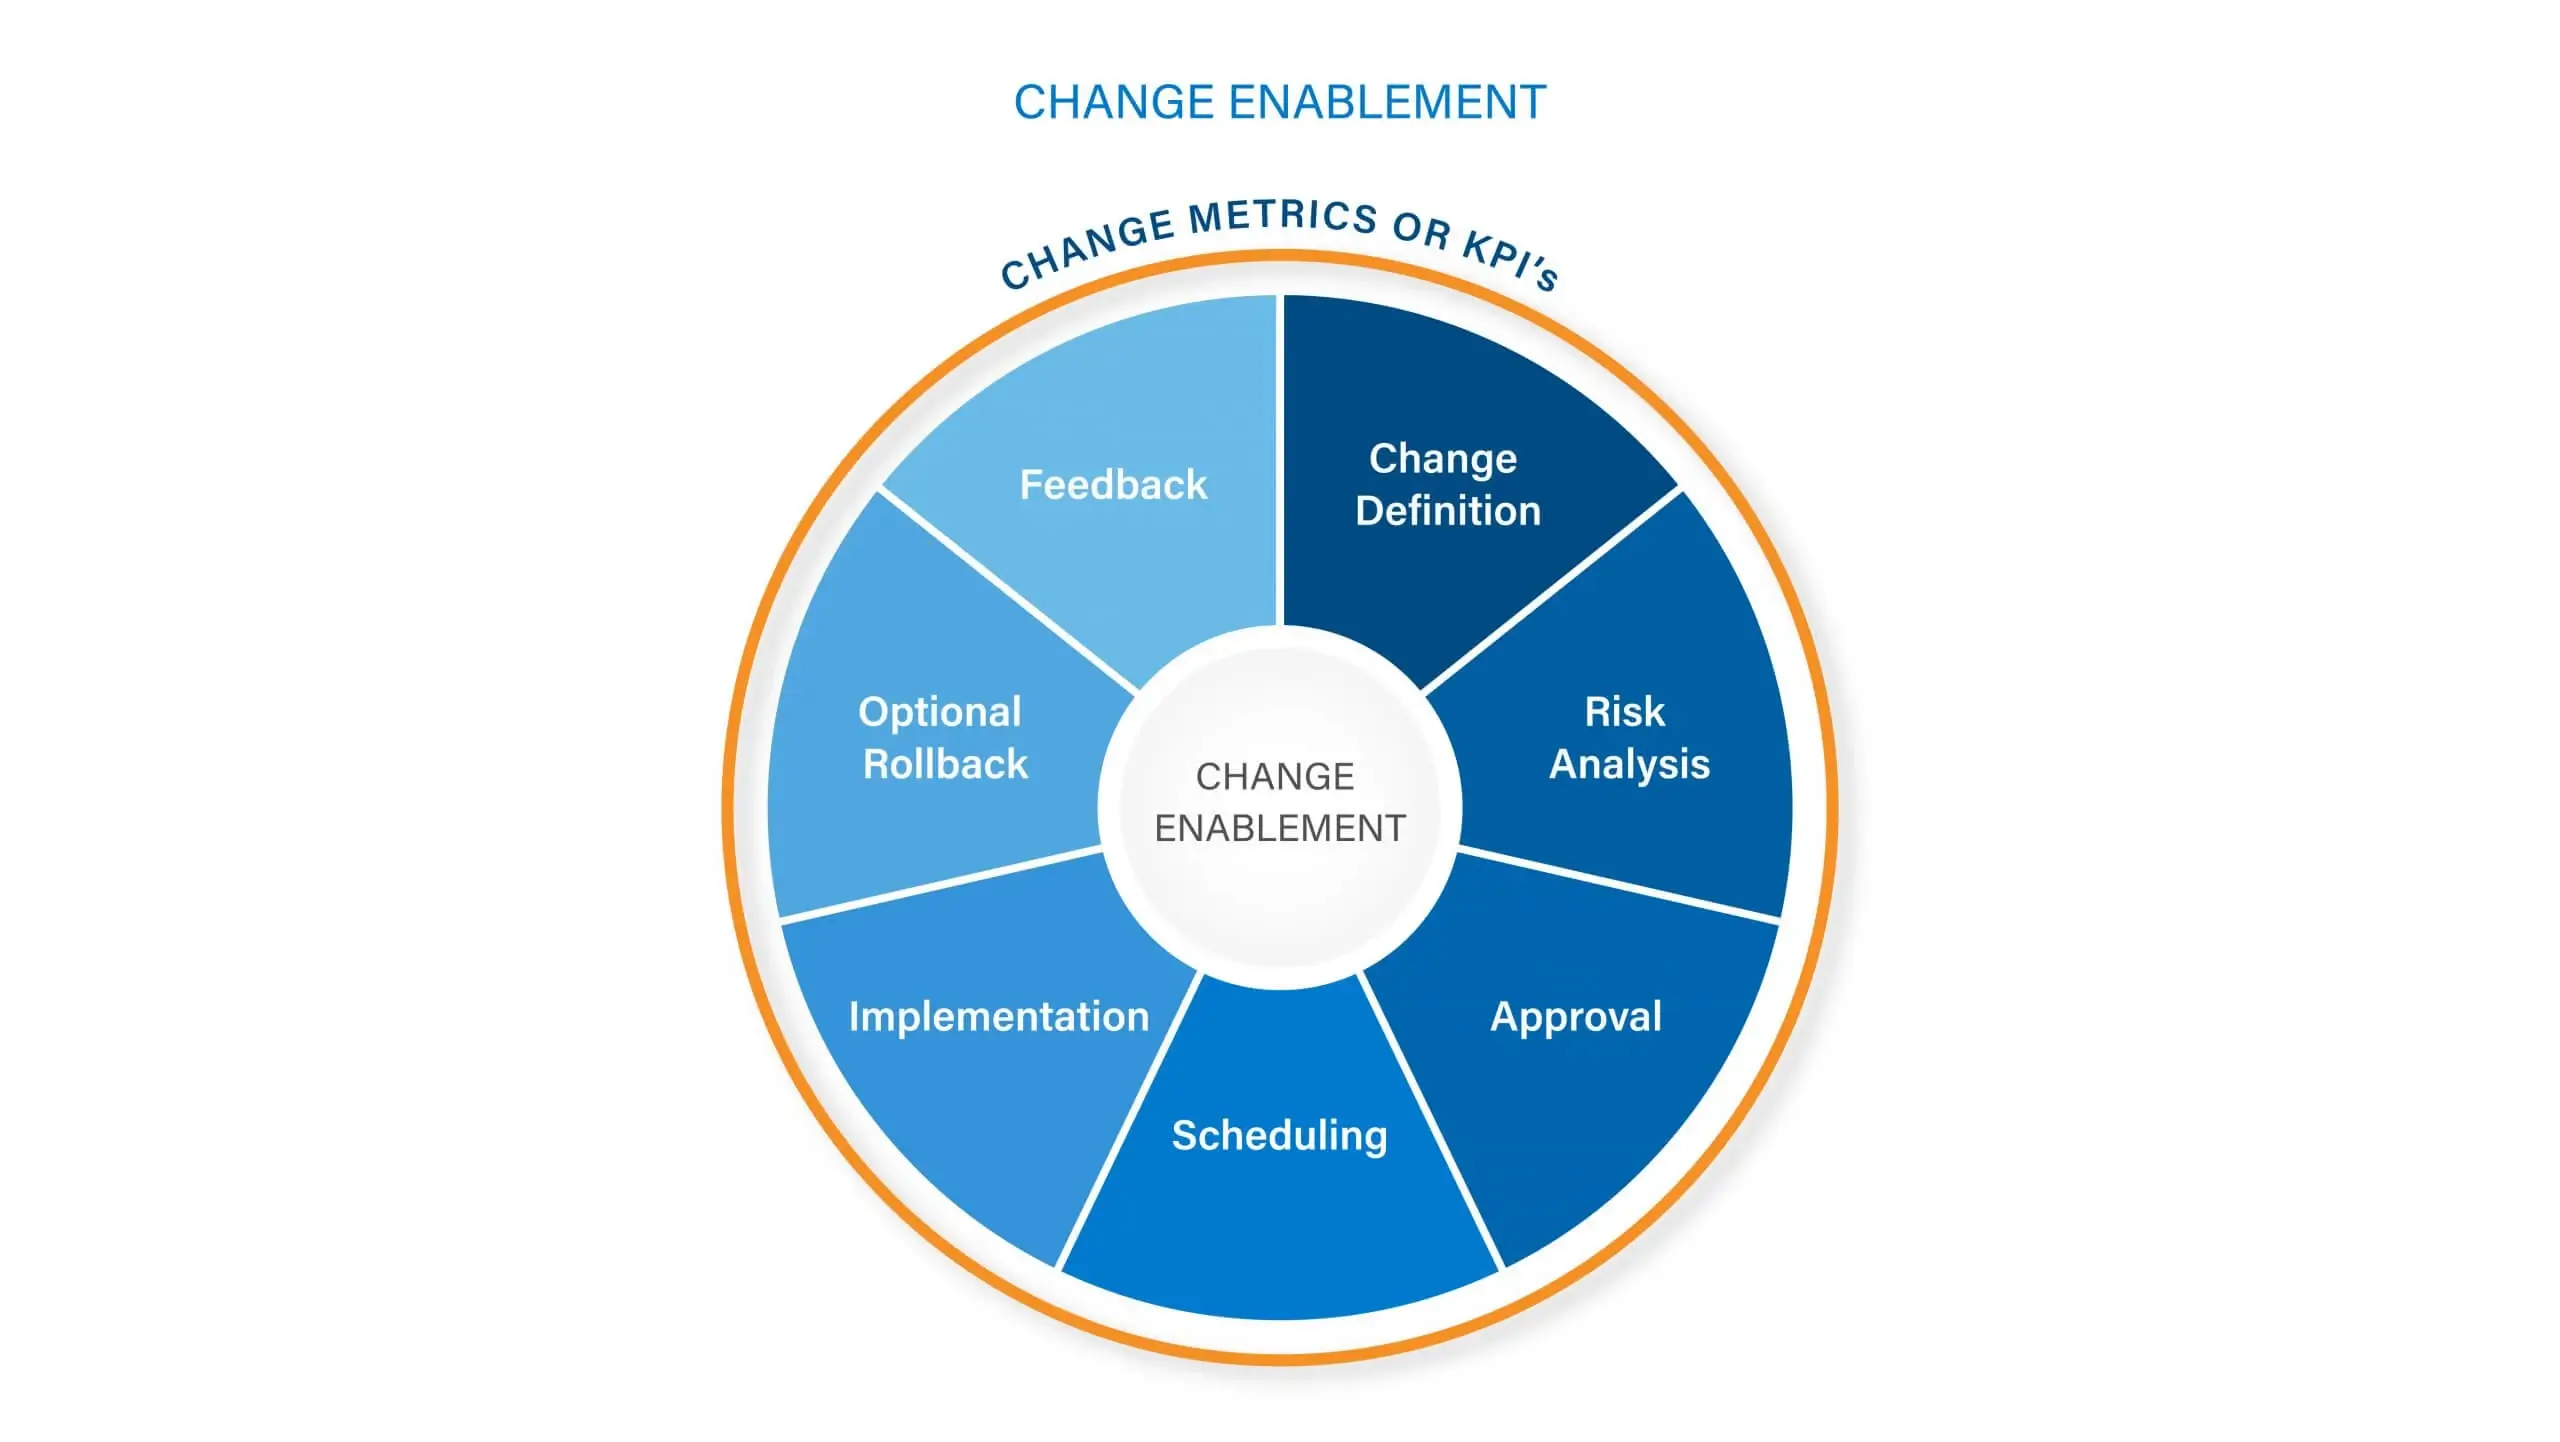
Support a smooth transition from the old to the new. ServiceTeam ITSM enables effective change management from start to finish by supporting the proper assessment of risks, ensuring automated approval processes are kept and carried out, letting you maintain and manage change schedules as well as broadcast change notices. Differentiate between types of changes, follow a business process flow to ensure requirements are met, and leverage out-of the-box Power BI reports to analyse success and fail metrics.
ServiceTeam ITSM makes communications and collaboration between teams easy. Allow approved and scheduled changes to be visible to service desk agents and use announcements to inform end users via the portal of impending changes and service interruptions. Leverage the real-time integration between ServiceTeam ITSM and Azure DevOps and Jira to breakdown silos, reduce time spent, streamline communications and solve problems more quickly. In fast-paced, always-changing environments, ServiceTeam ITSM is a one-stop solution to enable change, successfully.
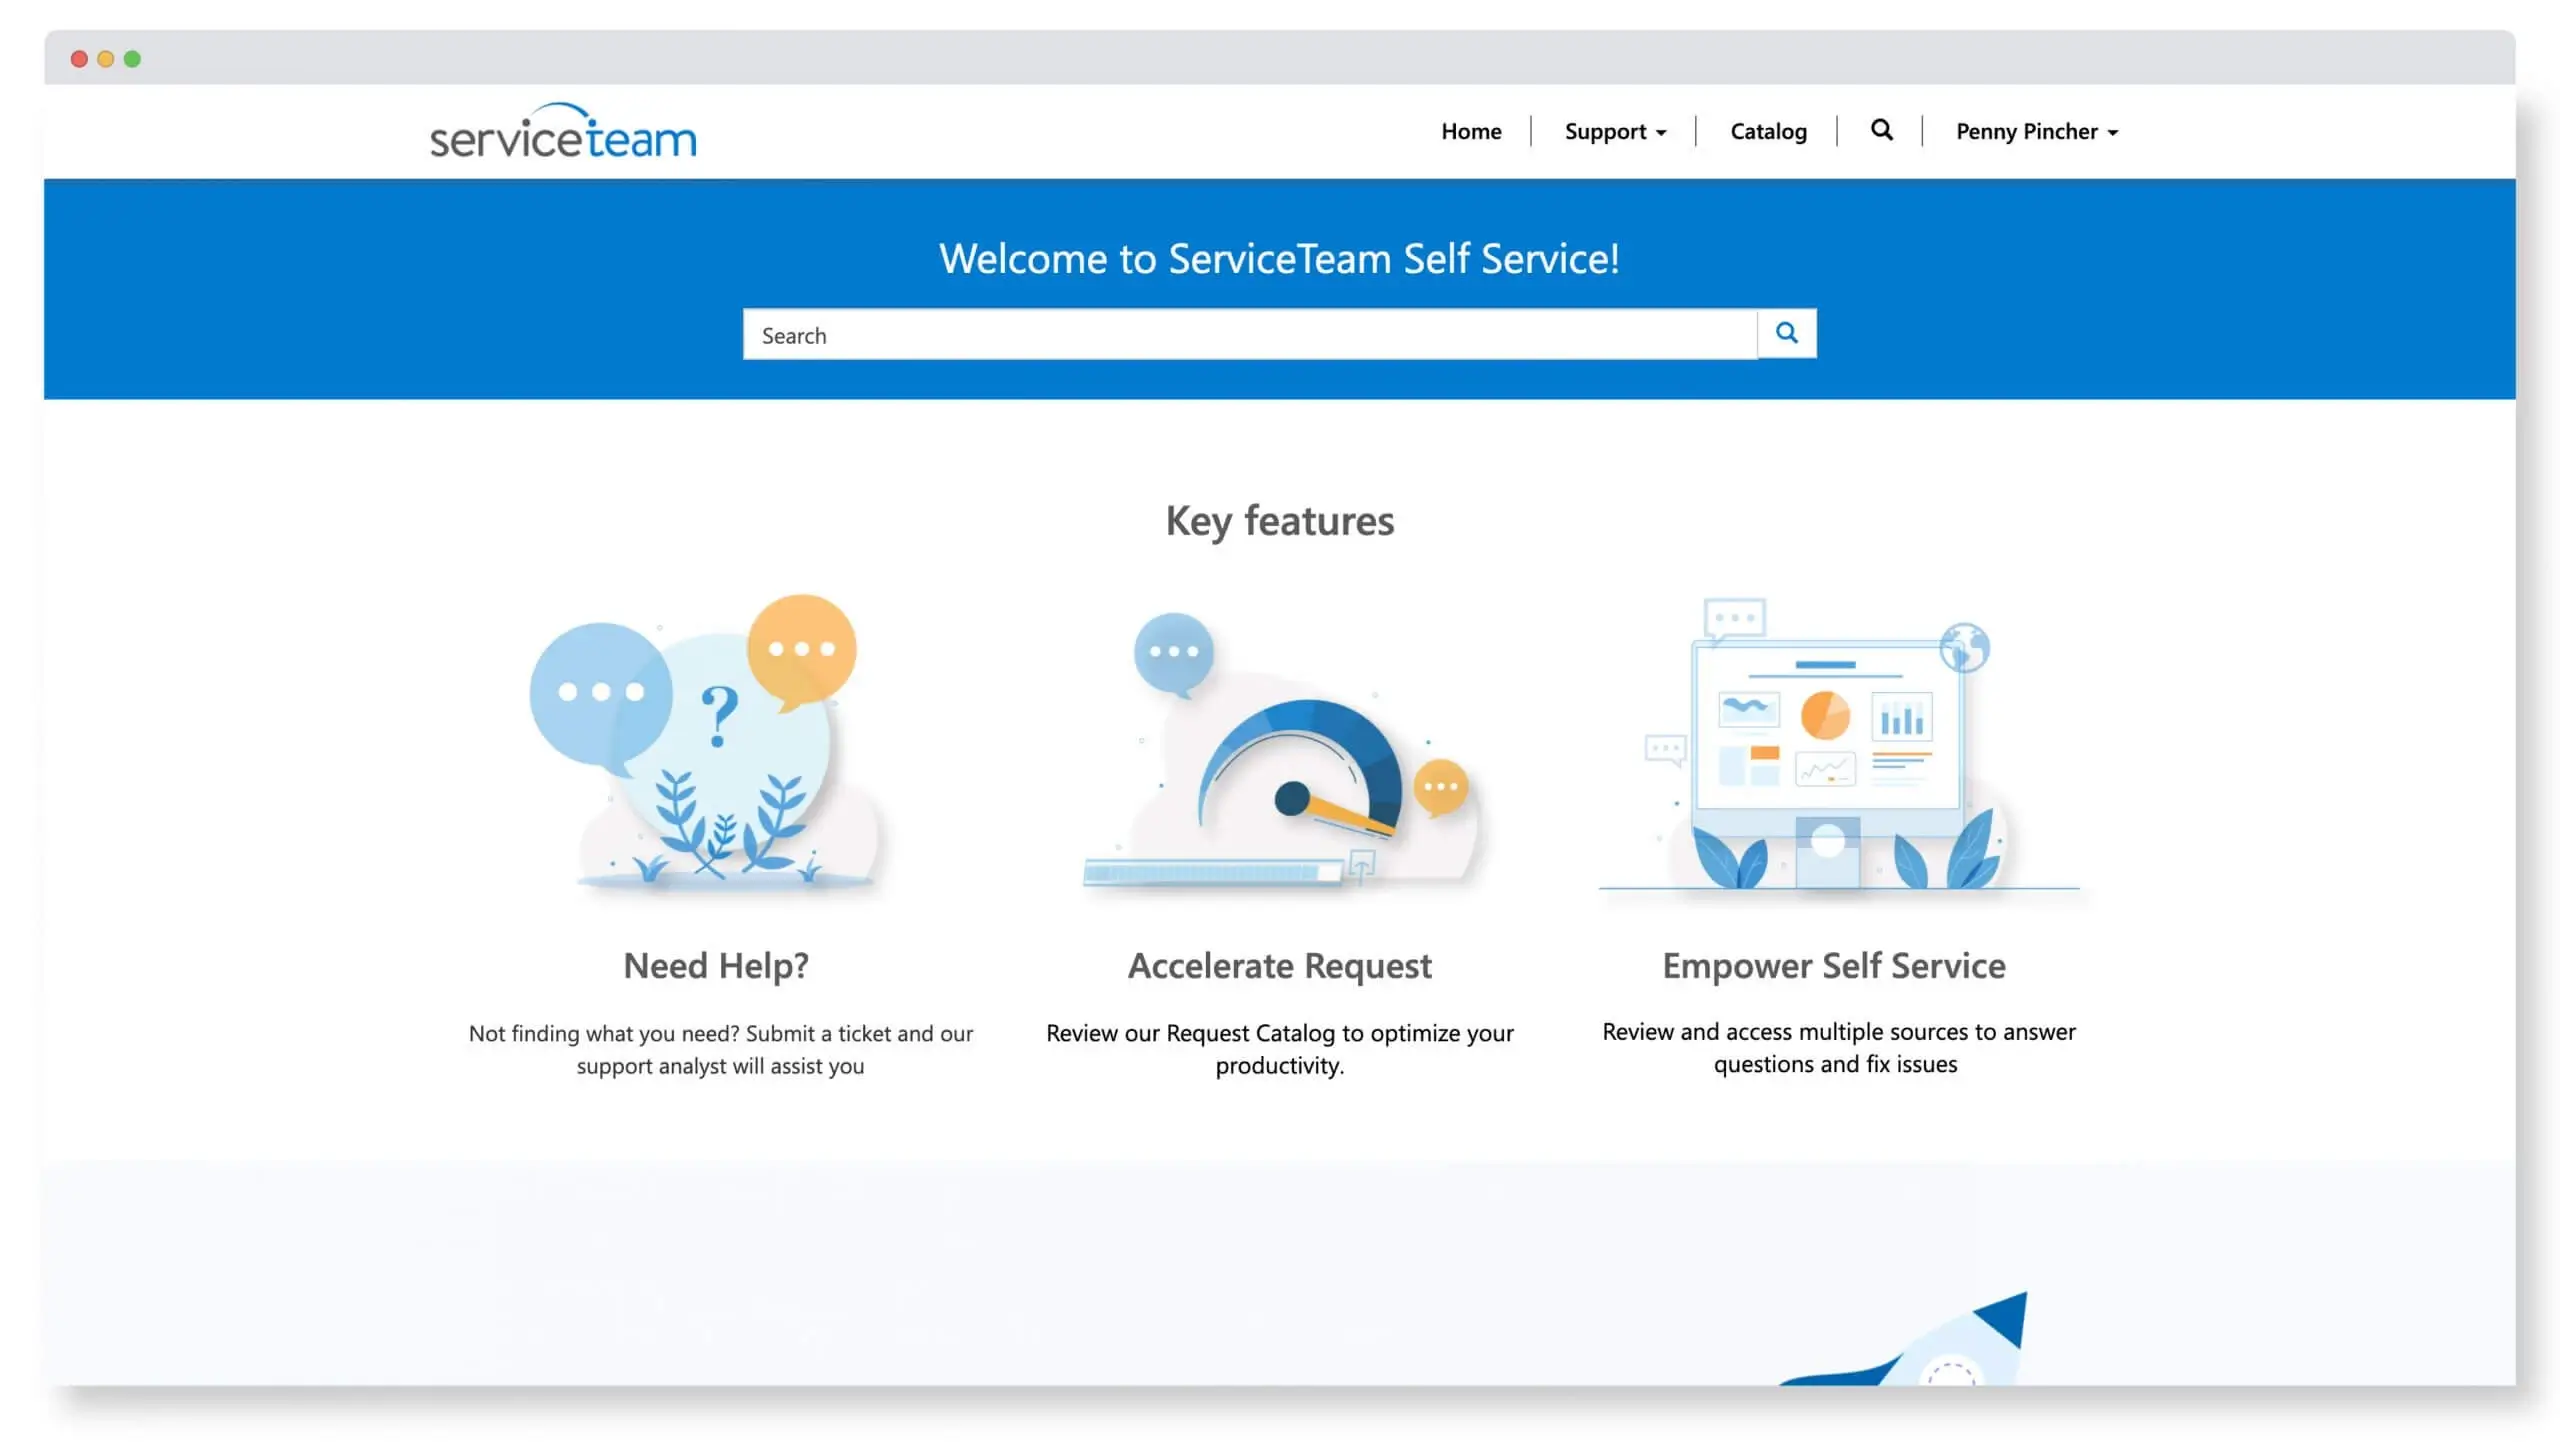
Service Team ITSM lets your users and customers, see announcements, search a knowledge base, raise tickets and more—providing users with an intuitive way to efficiently and effectively resolve common and minor IT issues or easily get more help when needed. With ServiceTeam ITSM, you can inform end-users about available services as well as notifications about known issues, current events, and company news. Categorized knowledge and search capabilities lets contextual results be displayed—helping users to quickly find relevant information. ServiceTeam ITSM also provides your users and customers with visibility and status of their open tickets, service and change requests, providing transparency, visibility and reassuring users their issues are well in hand. Organizations can also deploy surveys to gather feedback as well as leverage conditional questions to improve overall experience and avoid frustration from irrelevant questions. The ServiceTeam ITSM Self-Service Portal is fast, mobile device responsive, completely configurable, and based on Microsoft’s Power Pages technology. You can also brand and tailor the self-service portal for your customers.
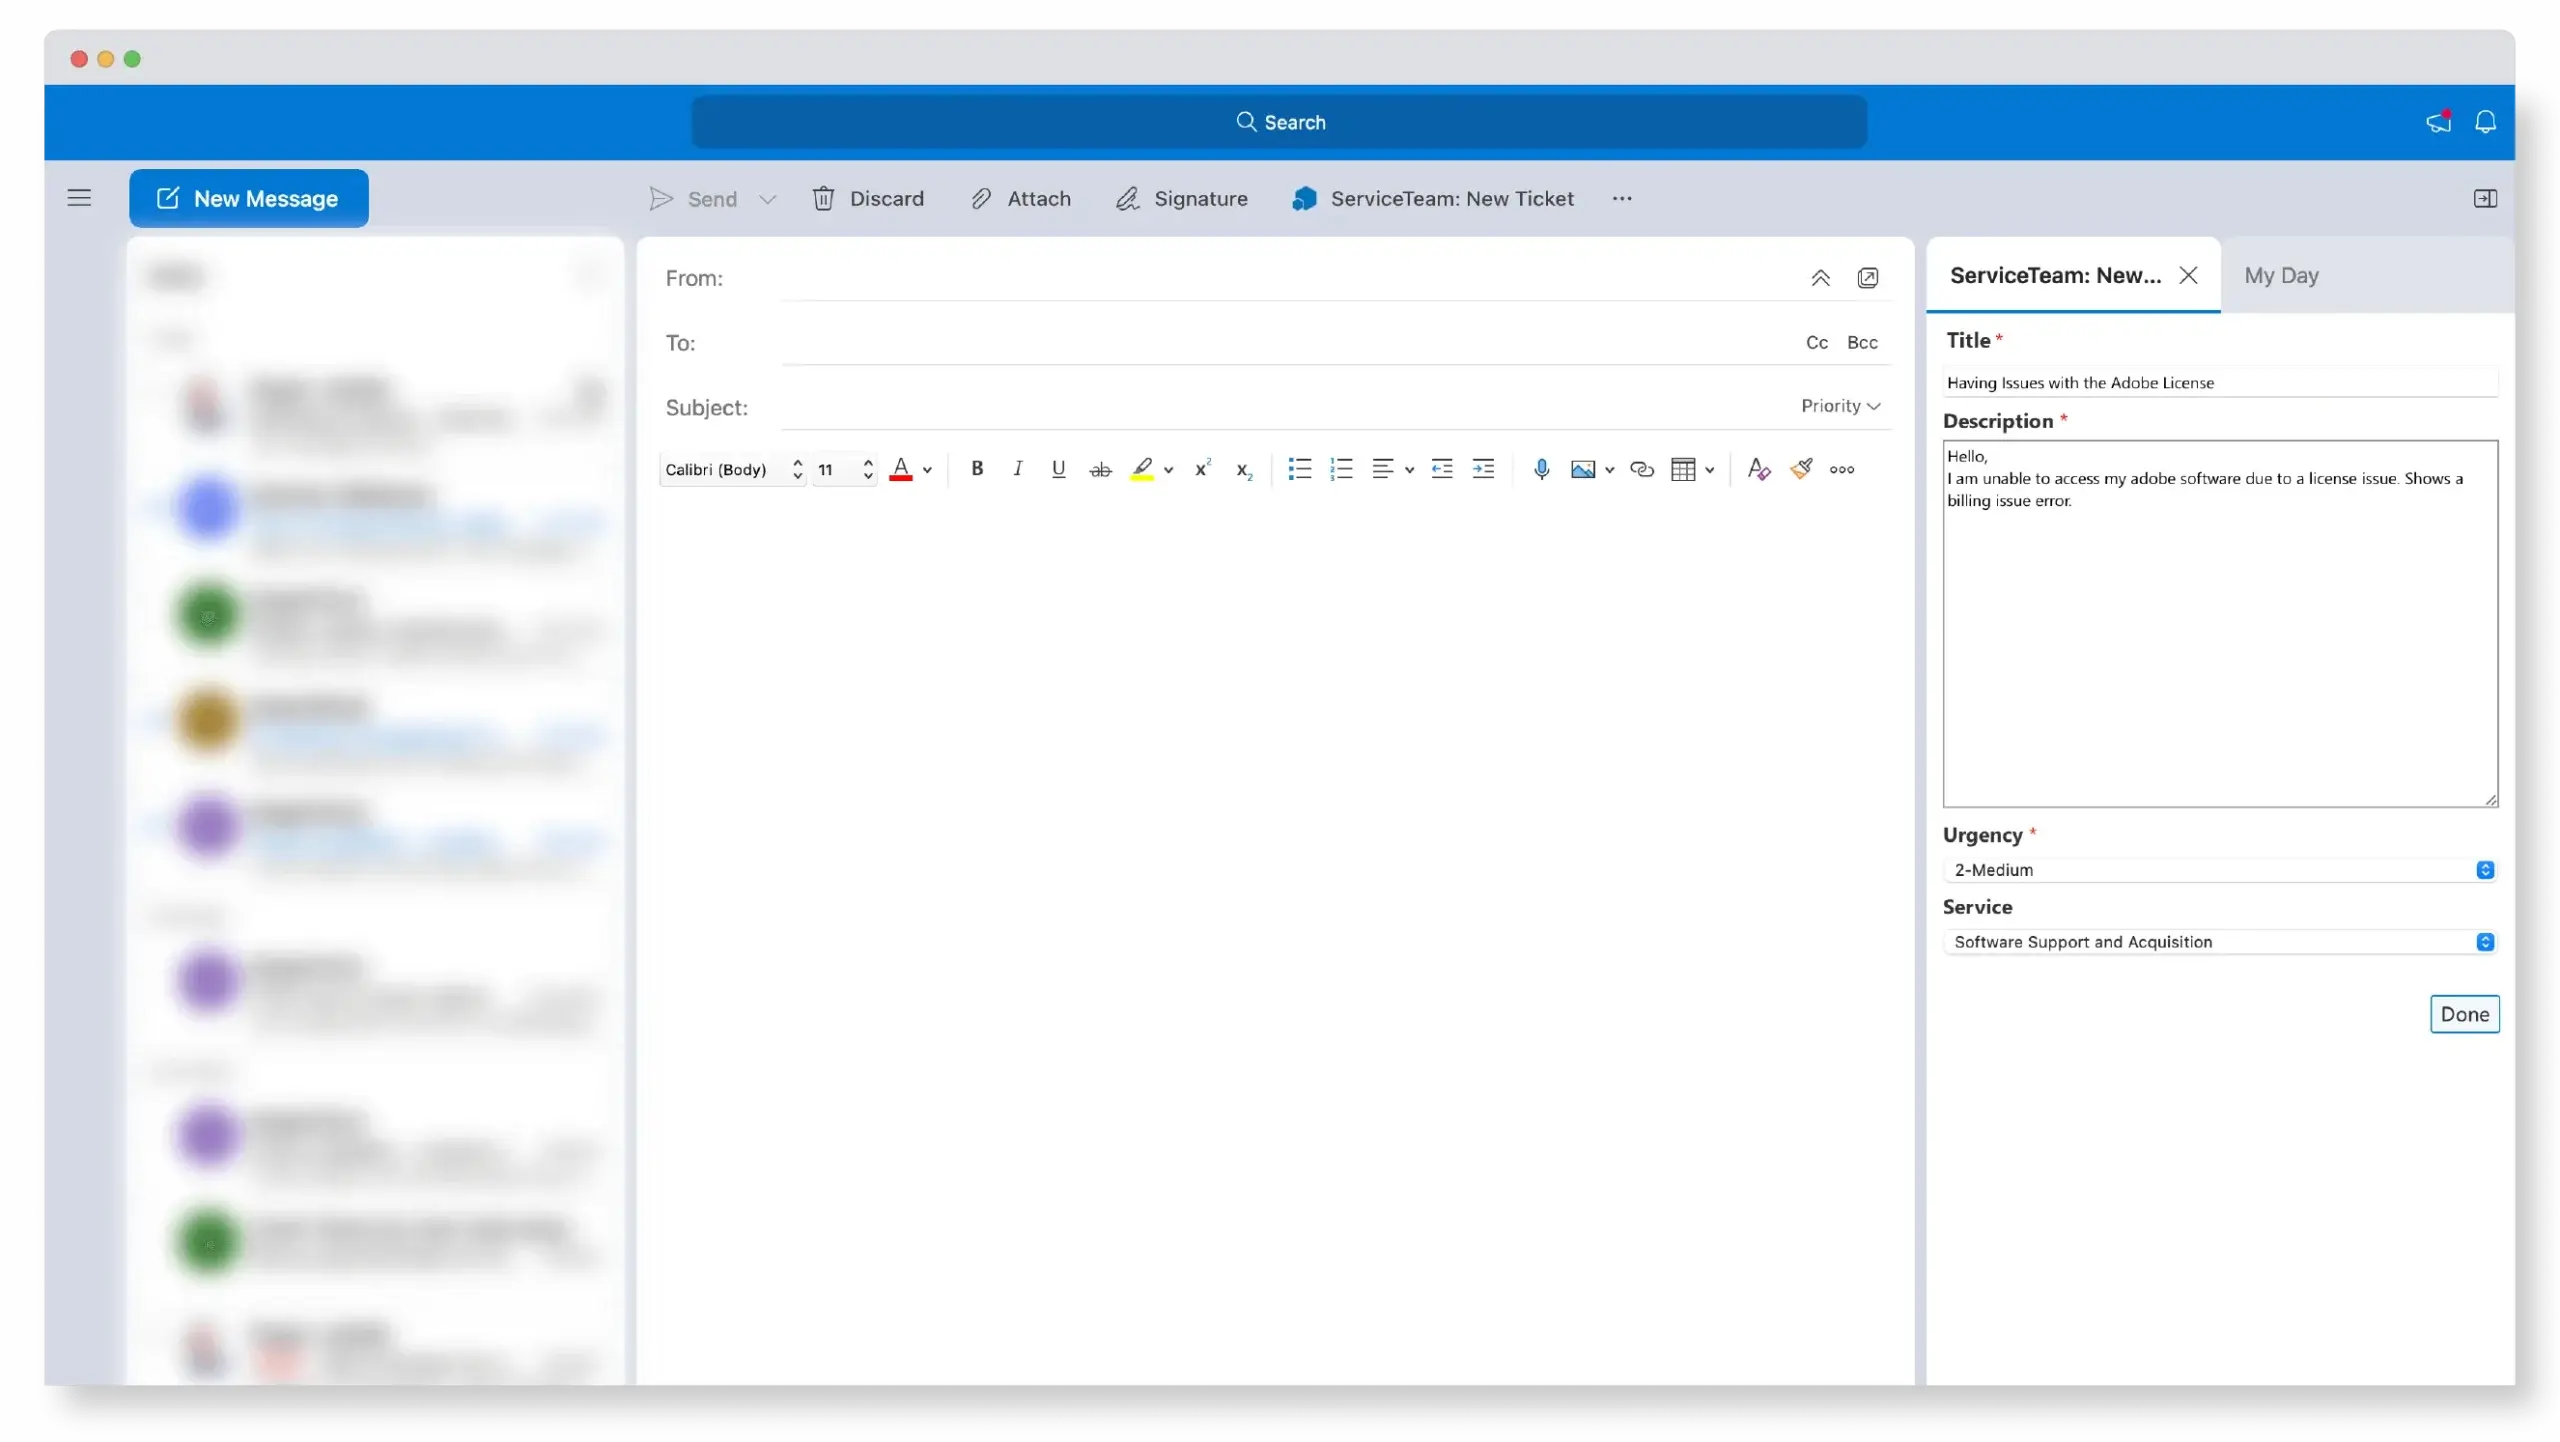
Remove obstacles to adoption and achieve greater standardization and productivity. The ServiceTeam ITSM Outlook Add-In lets you serve up a dose of convenience to employees by letting them create tickets and request services right from Microsoft Outlook. And with the Outlook Add-In standardized email template, you can ensure more complete and structured tickets, reducing the service agents need to contact the end user while triaging tickets.
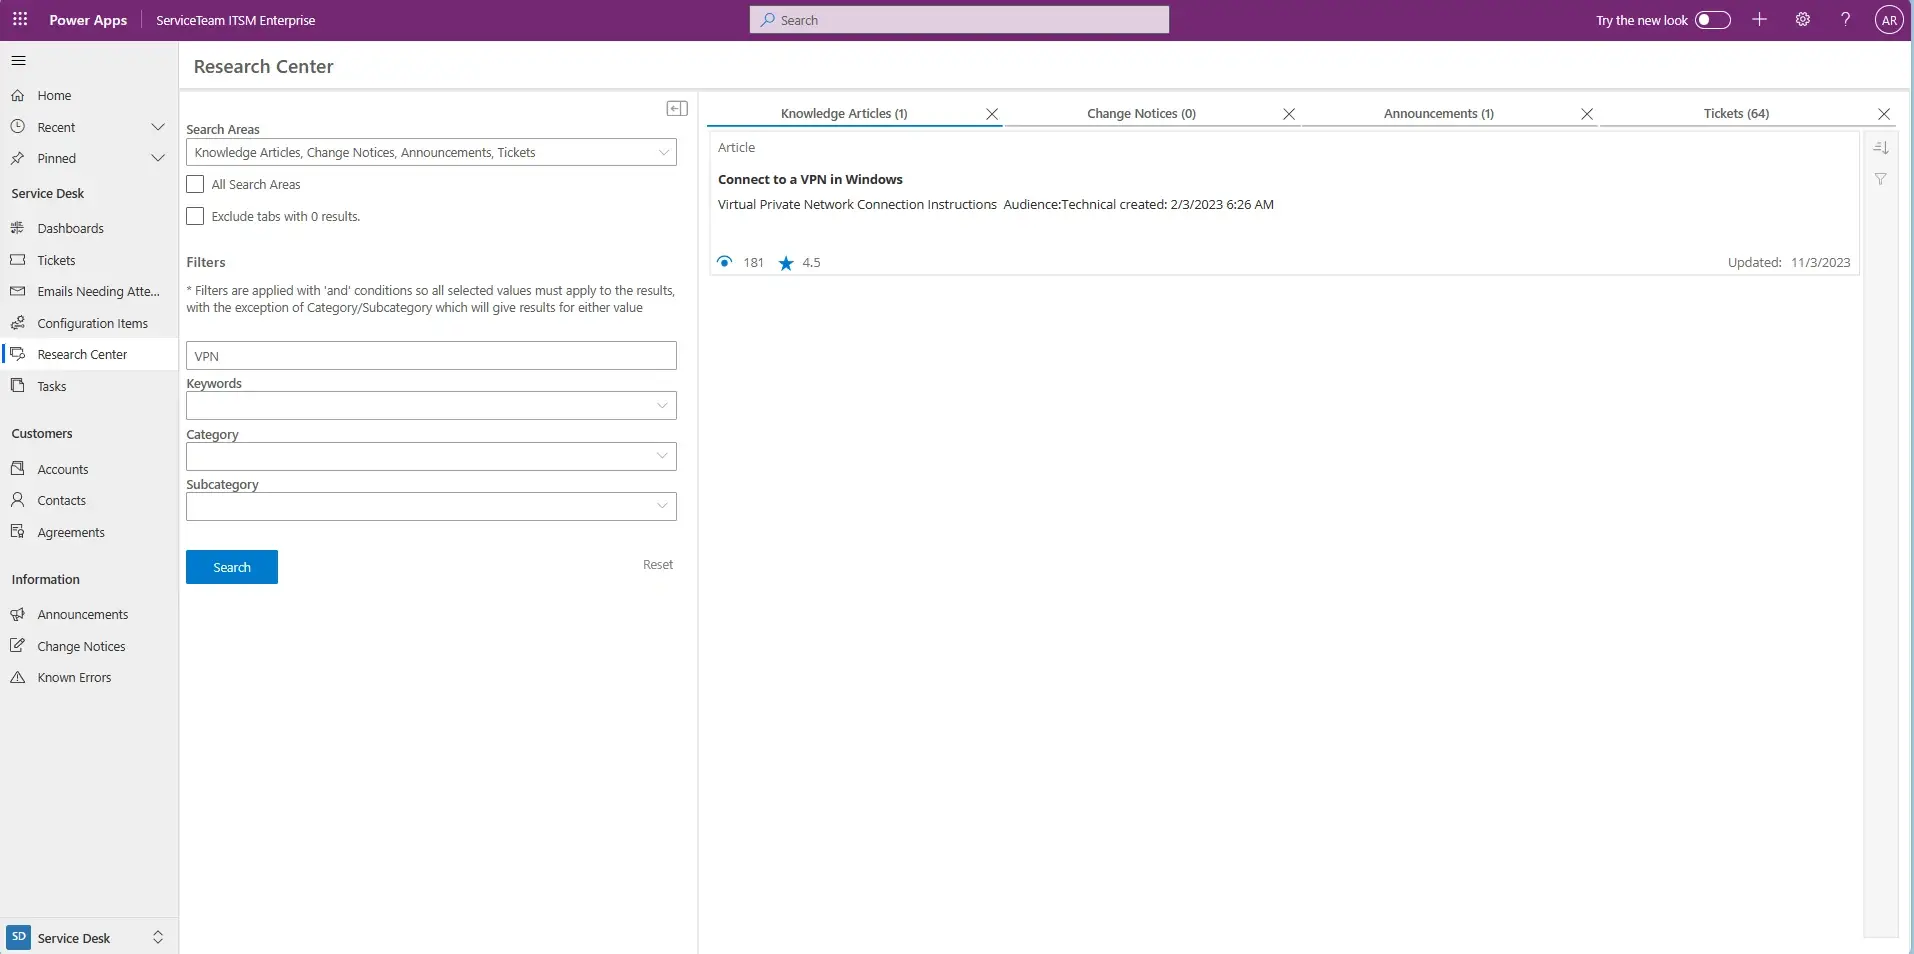
Easily create knowledgebase articles and publish them to the self-service portal and to internal service teams. ServiceTeam ITSM is built with flexibility in mind—define content visibility, audience targeting, and sort order preferences, enabling you to display contextual results no matter the audience—internal or external. The Service Desk always remains in control. Ensure articles are always kept up to date by adding attributes such as ownership and expiry dates. With ServiceTeam ITSM managers are able to measure article usefulness, gather feedback and analyze article metrics to determine their effectiveness. Interested party lists let people stay informed on issues important to them. For your agents, the Productivity Pane within a ticket ensures there is no need to navigate to different areas to look for articles as the information agents need is displayed right in the same view as the ticket itself. Agents can also access a centralized research center, where they can easily search across a range of different sources, including knowledge articles, known errors, announcements, change notices, request offerings, resource profiles, and tickets. ServiceTeam ITSM provides easily searchable and available information, improving agent productivity and self-service. Check out our 2 minute video on the Knowledge Centered Service capability to see it in action.
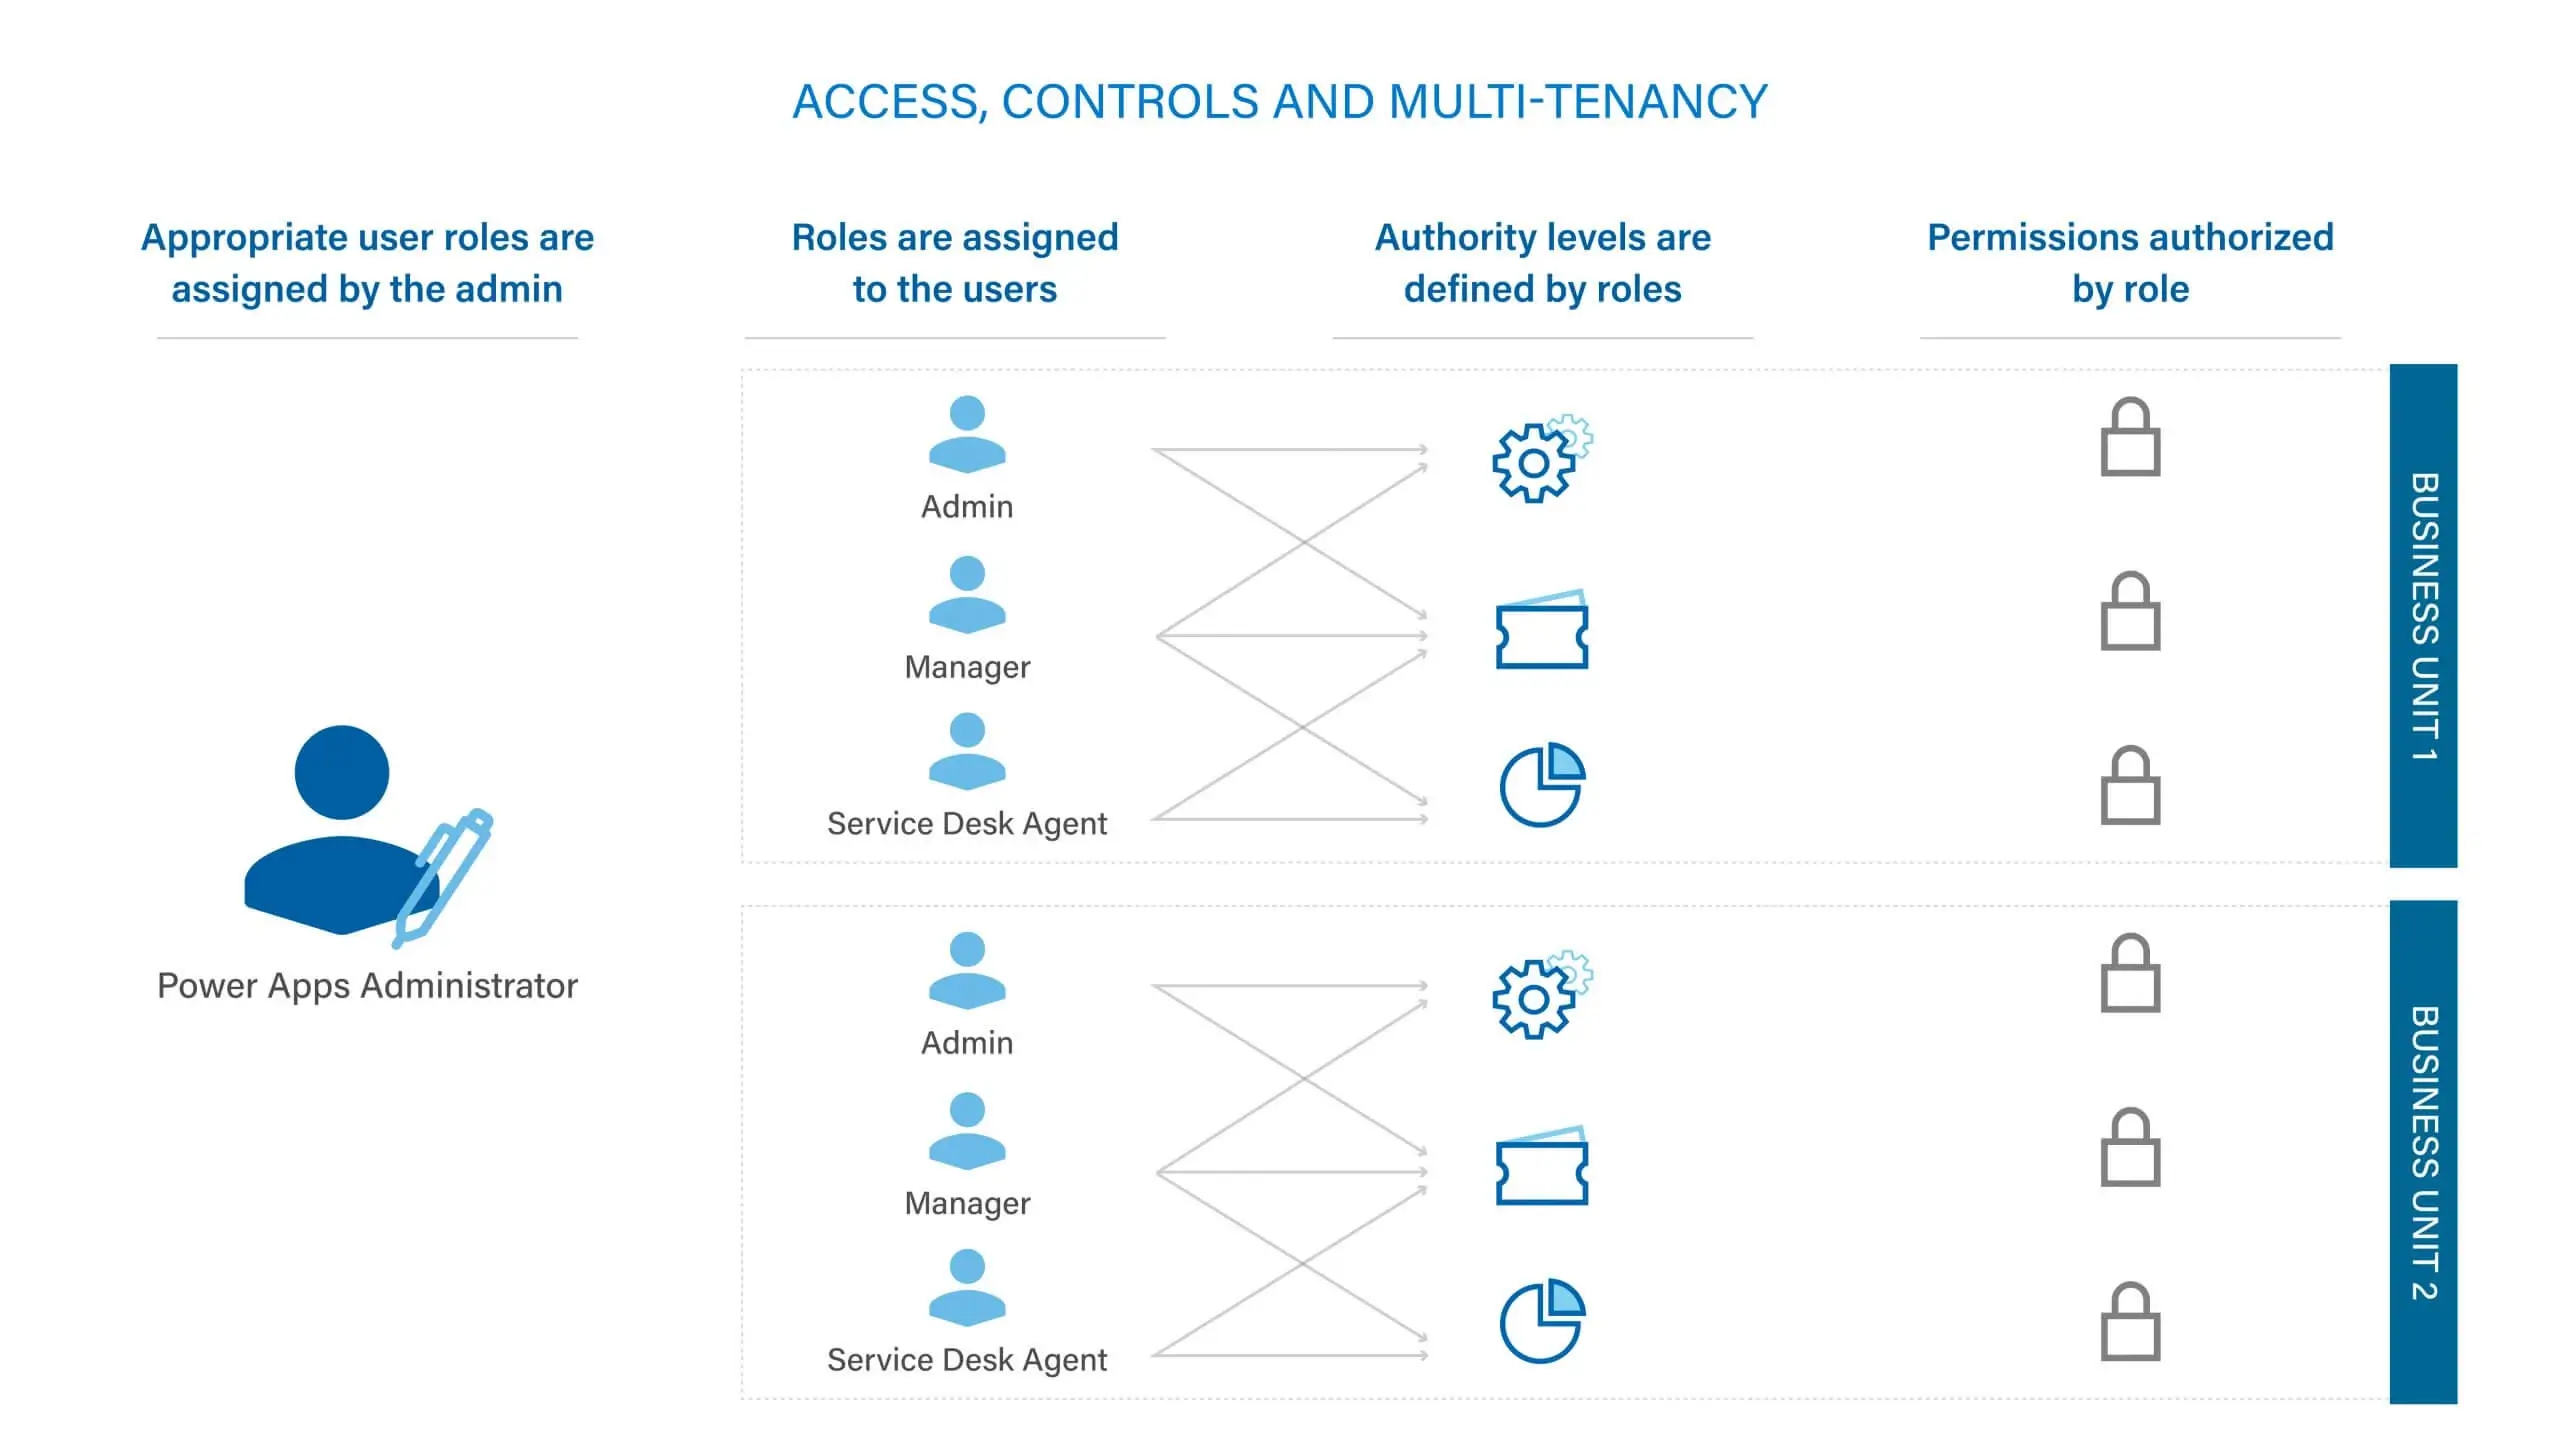
To achieve cost-efficiency and service excellence, we engineered ServiceTeam ITSM to be the single source of truth for service-related data and information across your teams and customers. And to keep the right data and information in the right hands at the right time, we built ServiceTeam ITSM with multi-tenancy in mind including key roles and permissions.
Regardless of your customer needs, you can benefit from the ServiceTeam ITSM multi-tenancy, for example, an MSP can treat its customers as completely separate units, while still benefiting from standardization and economies of scale. Individuals are assigned permissions and roles to ensure only the data, information, tasks or activities are viewed or completed by those you’ve allowed, ensuring secure control of data visibility in more sensitive scenarios like HR on boarding and other scenarios. Although roles are easily configurable, ServiceTeam ITSM includes several roles by default such as service desk agent, service desk manager, and business user.
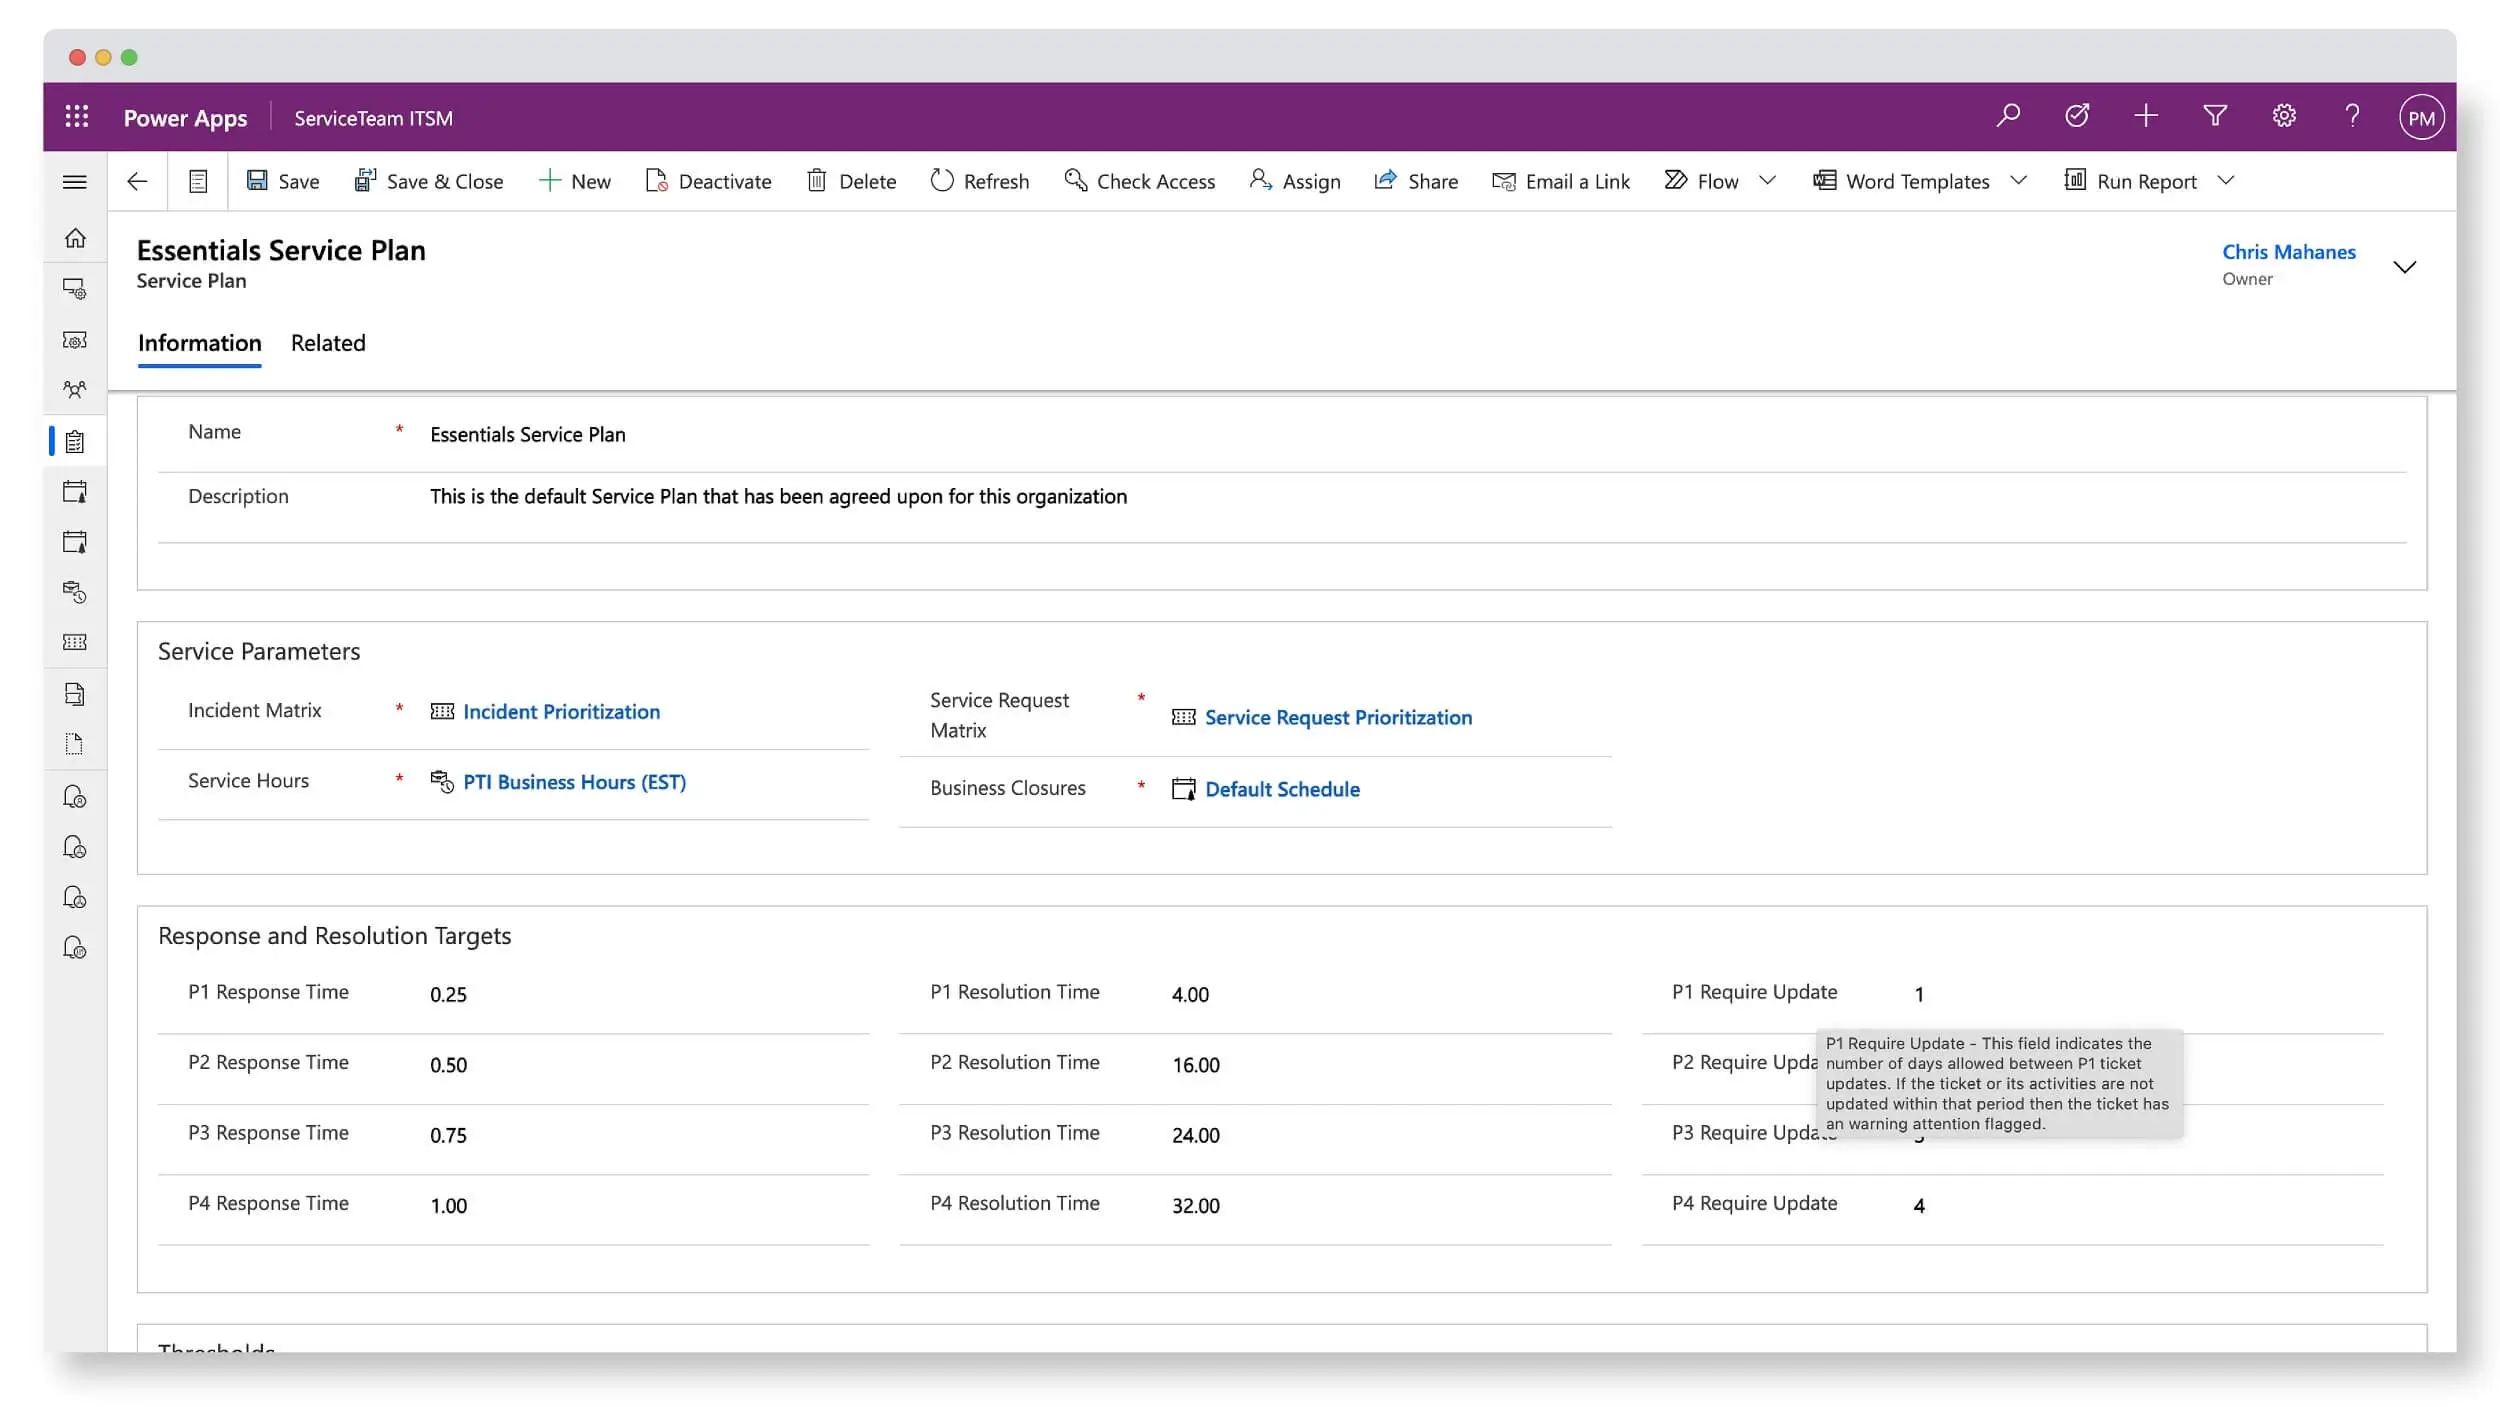
SLAs and Ticket Service Metrics are the backbone of providing successful customer-centric services. ServiceTeam ITSM Ticket Service Metrics includes response and resolution monitoring, while ServiceTeam ITSM SLA Management ensures compliance and fulfillment of customer contracts and expectations.
With ServiceTeam ITSM, you can organize your client agreements into measurable KPIs and rules. Resolve tickets based on priority and criticality. Configure unique SLAs by customer. Customize service plans and requirements by ticket types (incident, service request or problem), subscriptions and configuration items. Leverage countdown clocks, color-coded icons, escalations and notifications to warn of impending ticket service metric breaches. Incident assignments, holds and duration within support tiers are visually displayed, allowing agents and management to quickly view status of ticket processing, resolution targets and more. Since SLA agreements provide a mechanism to define your obligation to your customer, ServiceTeam ITSM lets you document and track Subscriptions—to comply with the services to be provided and their associated entitlements—and Service Plans—to identify business closures, service hours and priority calculations.
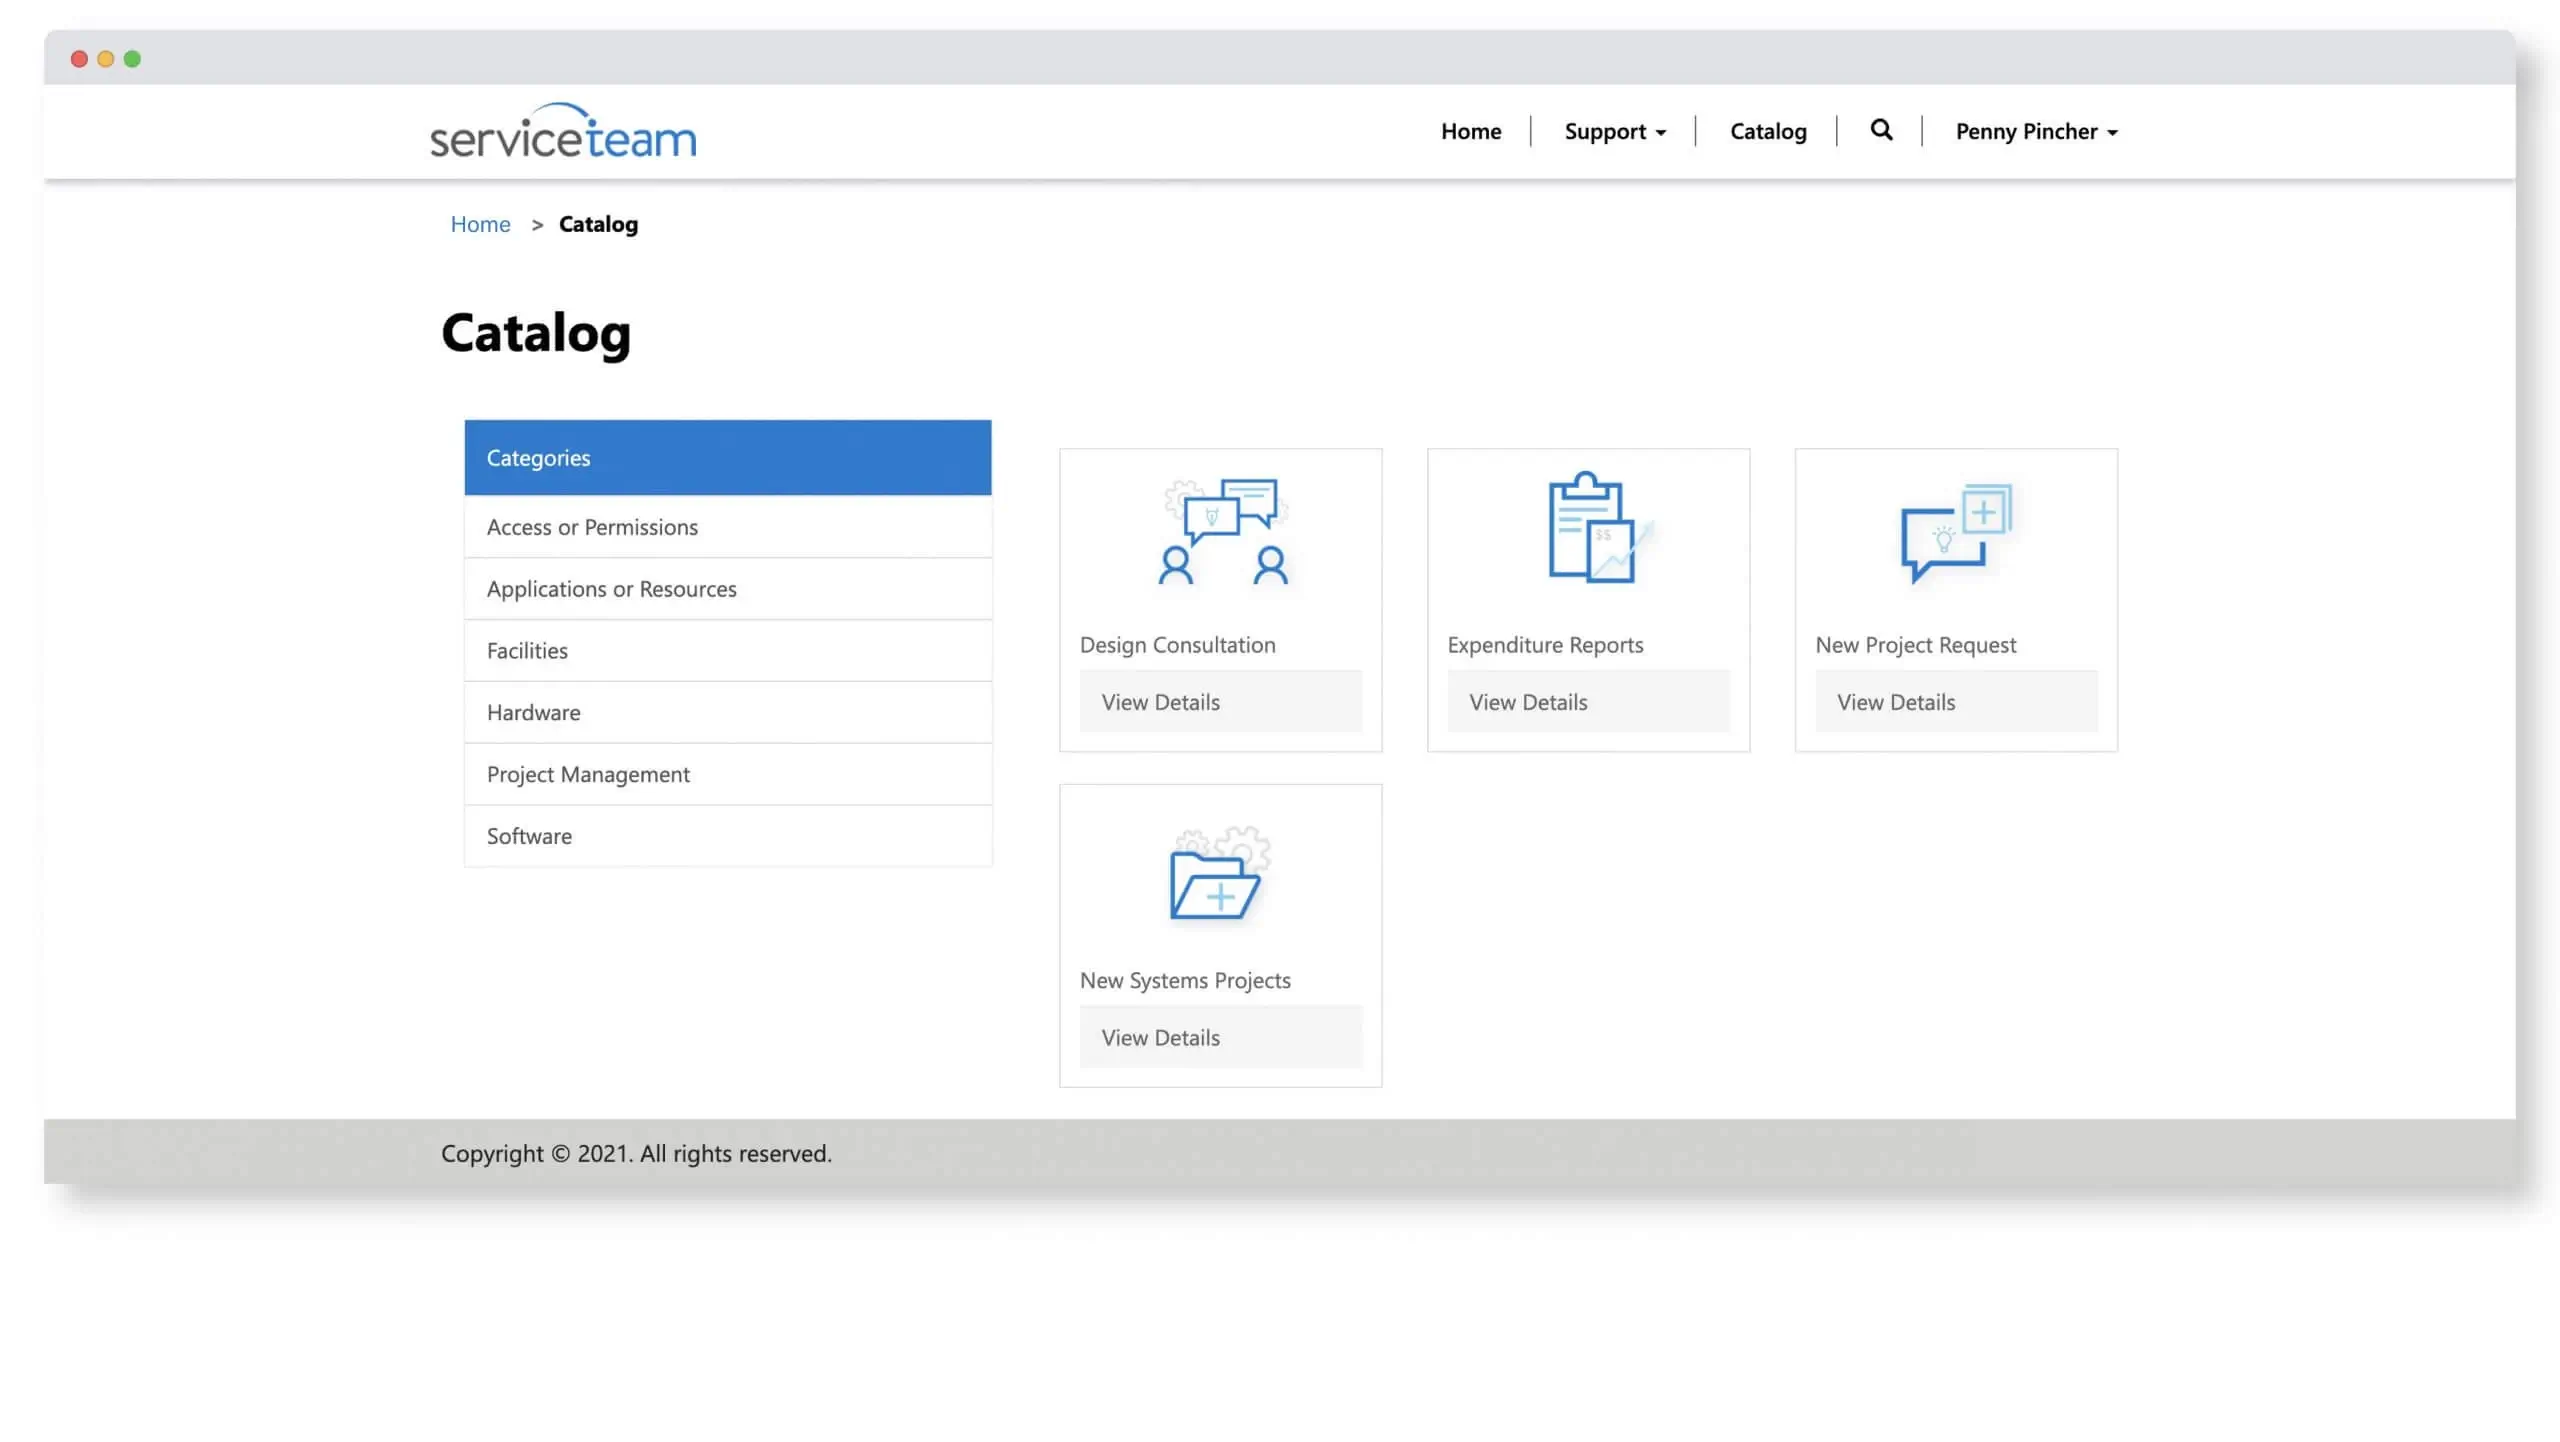
Boost customer satisfaction and save time. The ServiceTeam ITSM Request Catalog lets you build comprehensive and standardized self-service requests that can be automated, allowing customers to choose service requests from a group of common request offerings. Offerings can include common tasks and everyday requests. Predefined question templates can be used to ensure standardization and accuracy. Accessible from the Self-Service Portal, the ServiceTeam ITSM request offerings can be customized with icons, images as well as links to documentation to improve customer access to services.

The ServiceTeam ITSM service catalog lets you easily and effectively maintain accurate service information—from the services offered, to service criticality, to customer benefits, to critical dates—all within a single view. Follow business process flows based on service type (business, technical and managed). Define and track service lifecycles. Associate tickets, problems, announcements and change notices with business, technical and managed services for better understanding and communications. The service health dashboard displays key measurements by service, giving you a snapshot of the health of all the services. Plus service mapping lets you see a quick visualization of the hierarchy between a business service and its technical services. The ServiceTeam ITSM Service Catalog also lets you offer common or unique services to your customers.
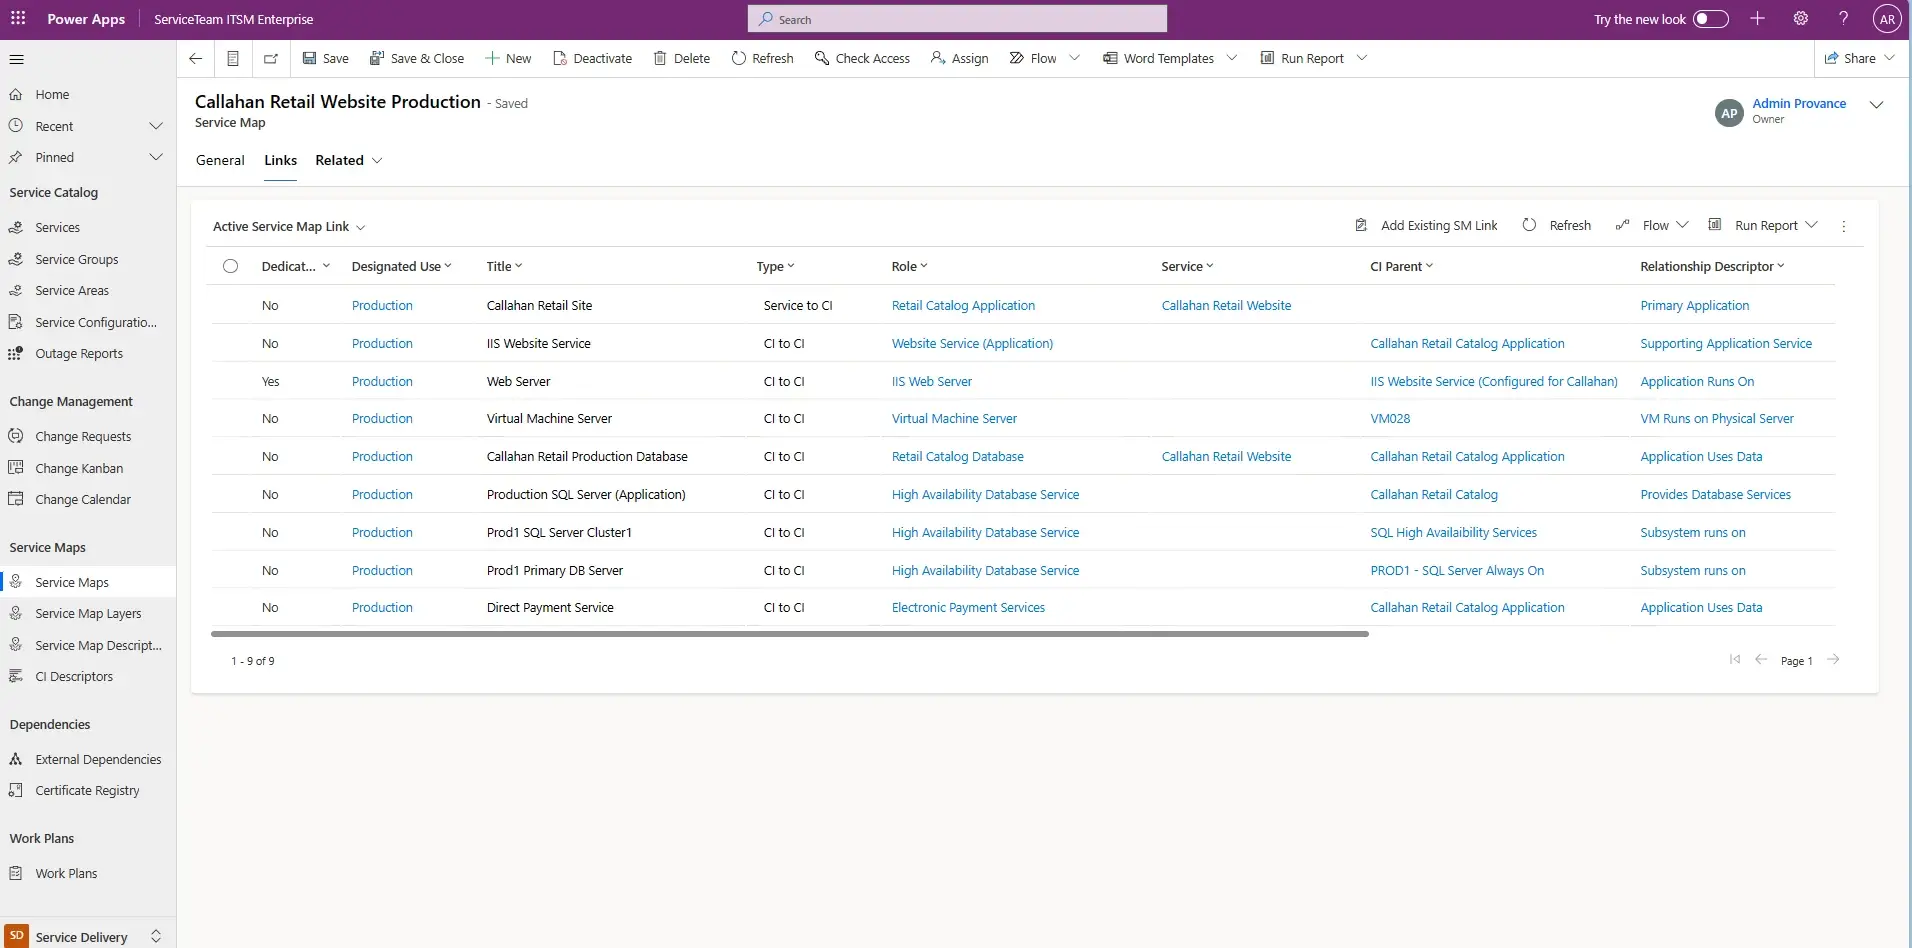
Quickly identify the hierarchy between a business service and its technical services. Service Mapping lets configuration items be mapped to the services they support, and the associated service layer to be defined, letting agents perform analysis and incident resolution faster and with a better understanding of the IT landscape—reducing risk. With Service Impact Analysis, tickets—which are created through event management—automatically identify impacted services and configuration items, providing agents with an immediate understanding of what’s happening and what’s wrong.
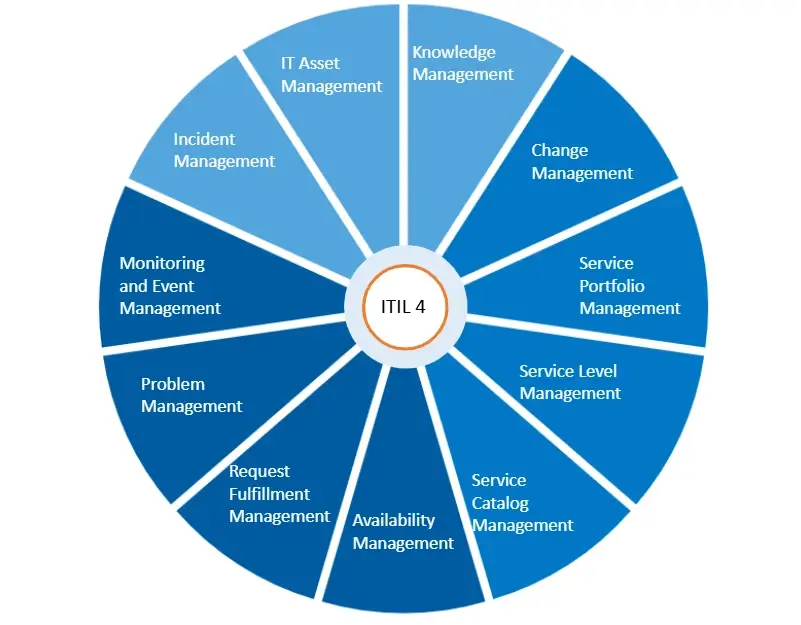
ServiceTeam ITSM is organized by standard ITIL process areas, such as Incidents and Service Request items. ServiceTeam ITSM is ITIL-aligned in the following areas:
ITIL (The Information Technology Infrastructure Library) is the de facto global standard for IT Service Management.
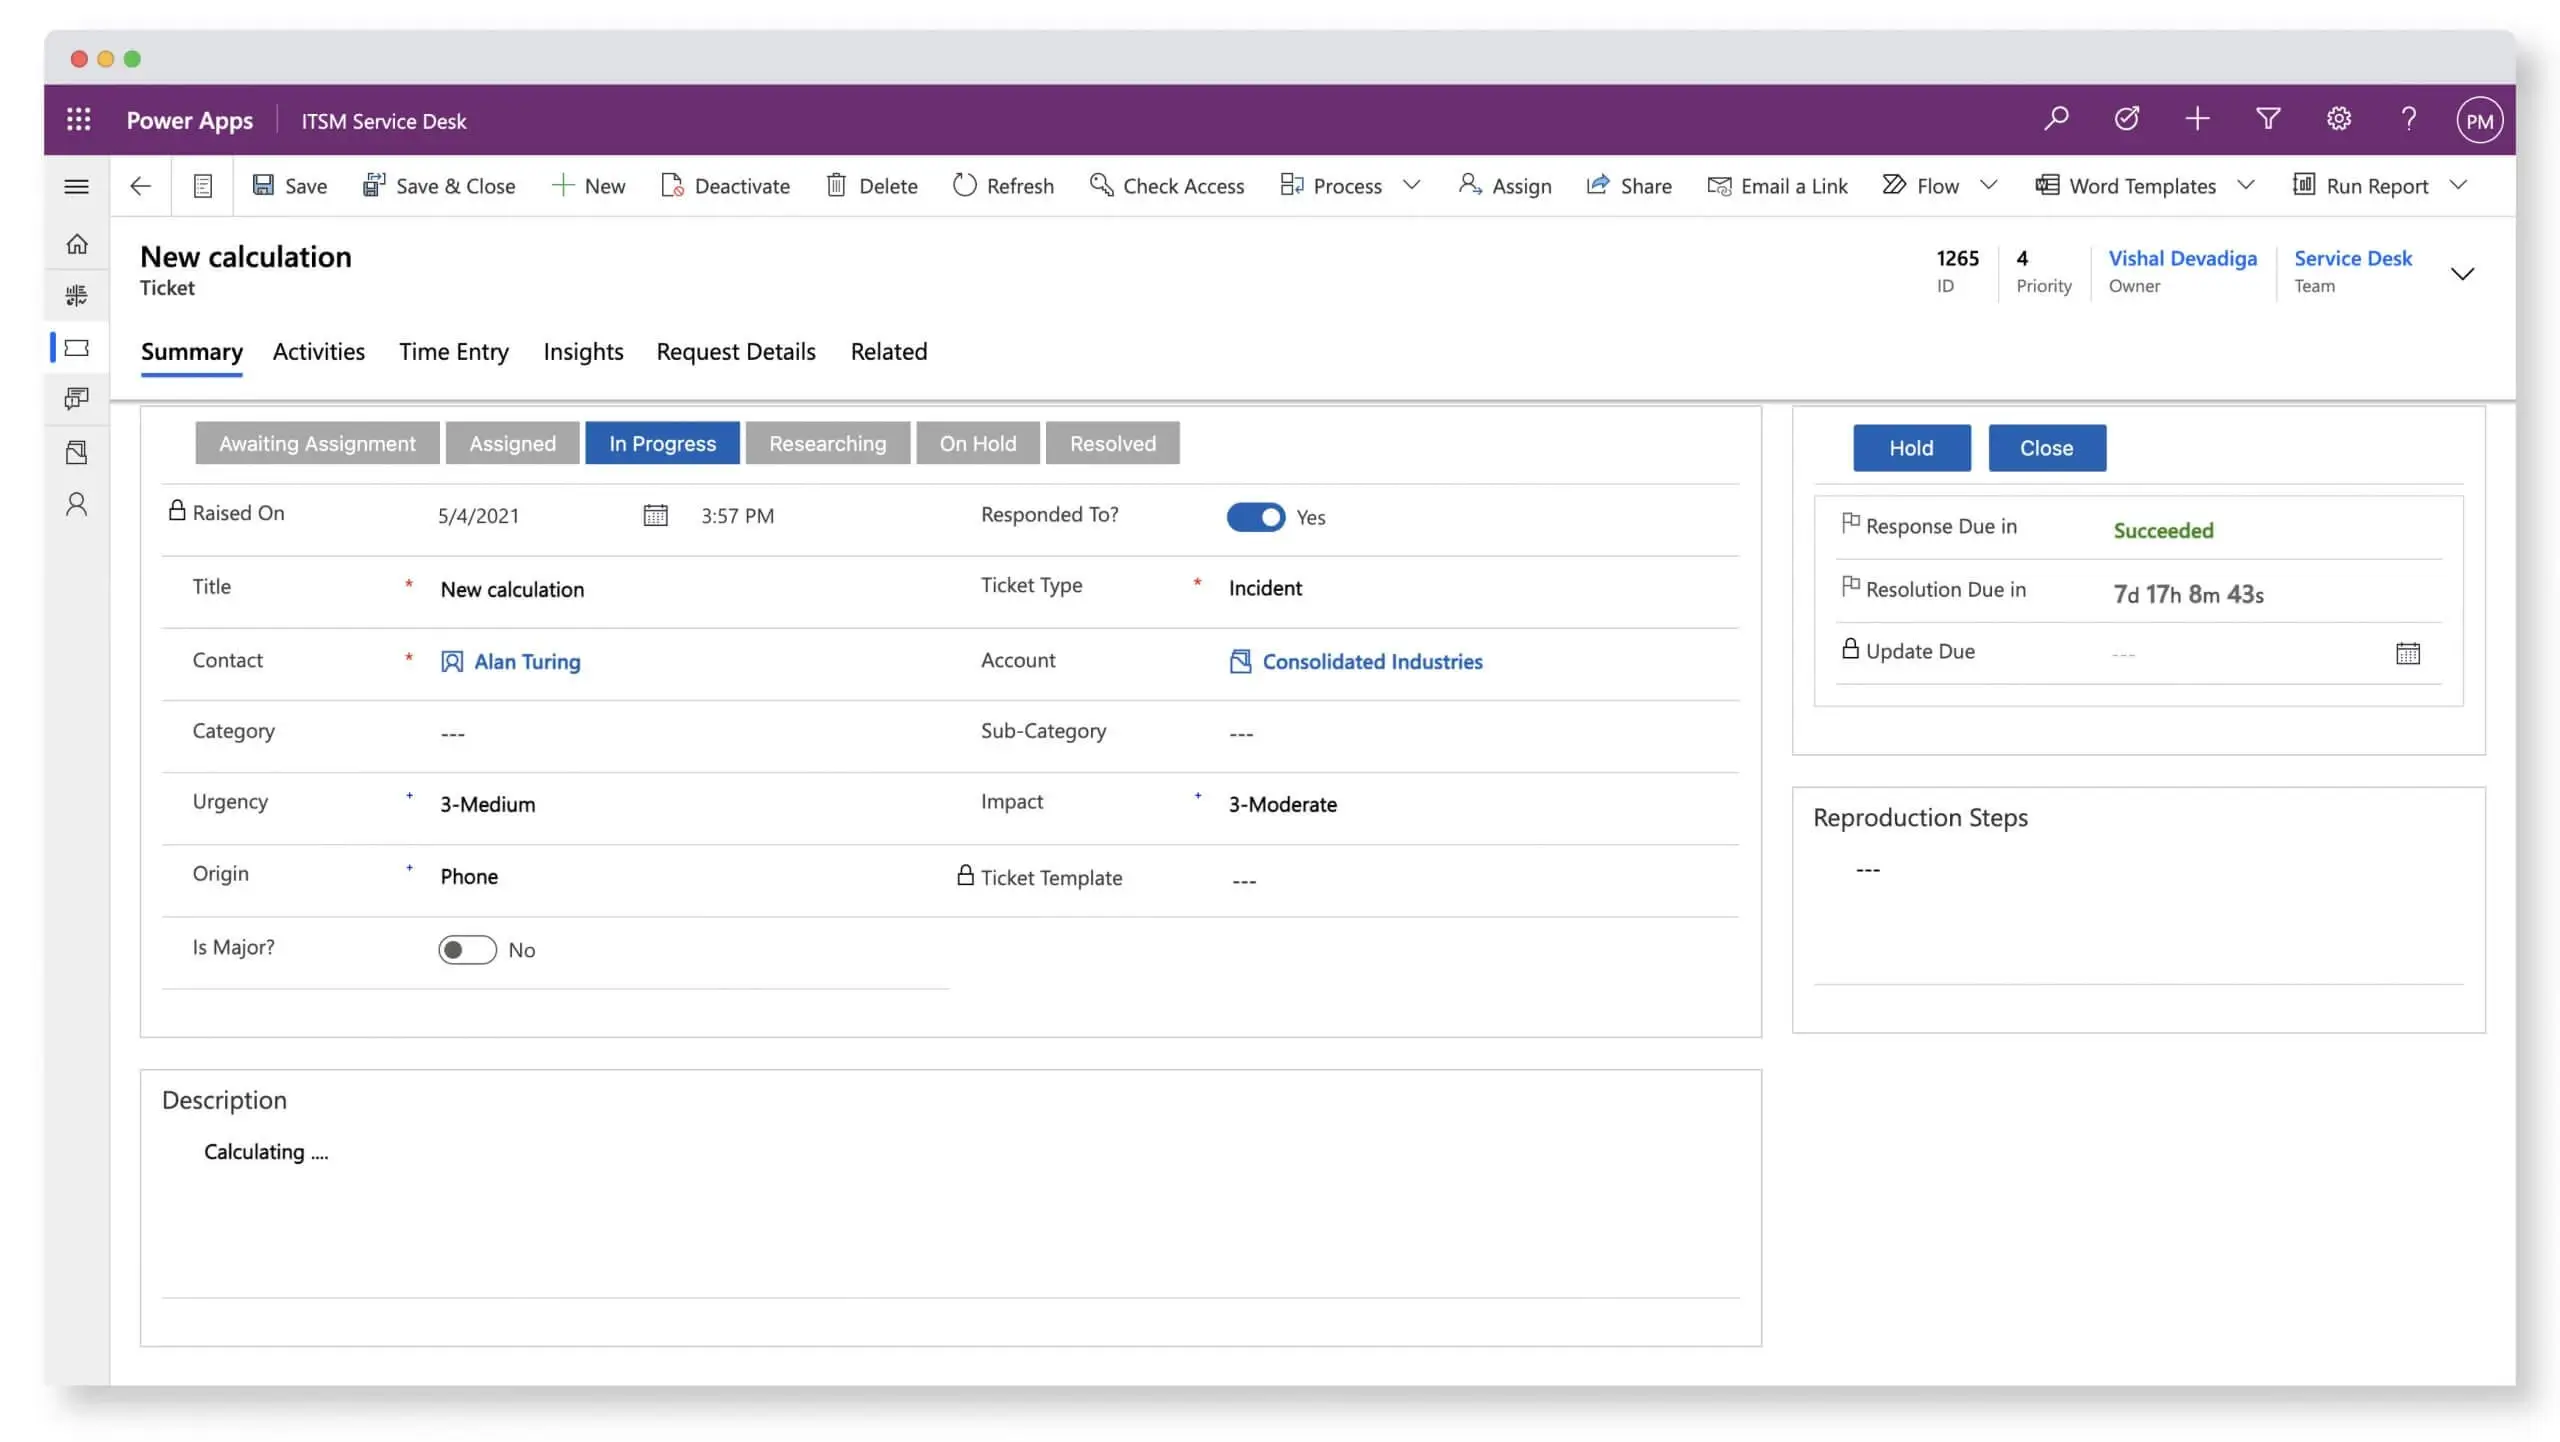
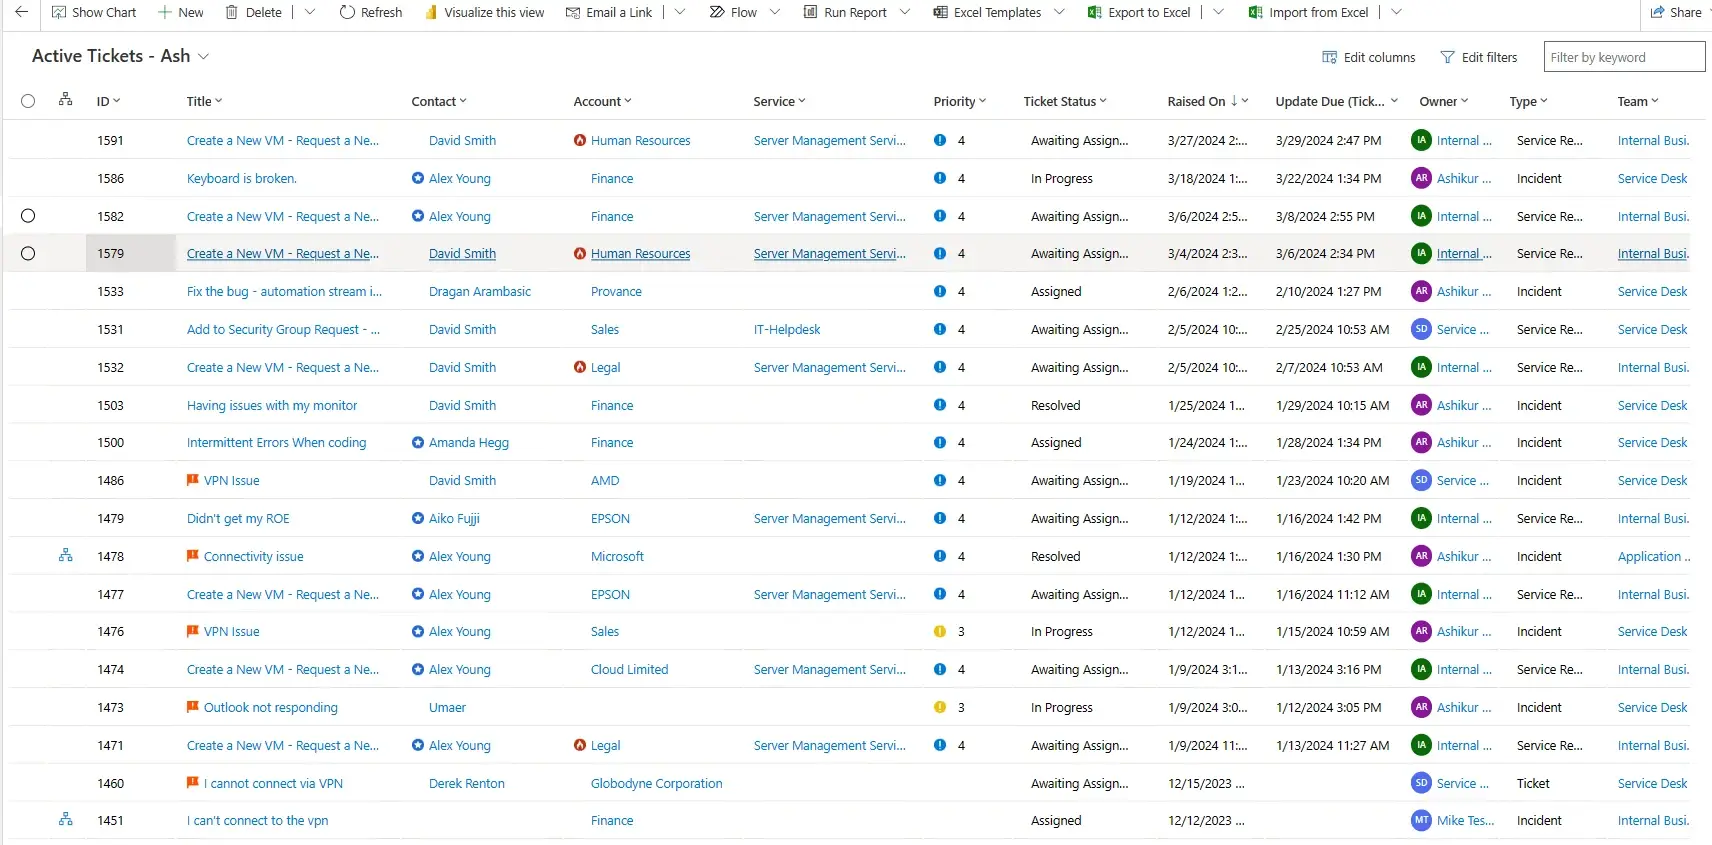
The ServiceTeam ITSM Ticket capability was engineered to focus on the agent experience. Triage incoming tickets to determine priority, urgency and issue type. ServiceTeam ITSM lets you apply standardization and automation to ticket processing—speeding up the processes of triage, assignment routing, and resolving tickets, while also ensuring that tickets opened in a freestyle format can still be aligned to a common standard—without impeding service agents’ productivity.
ServiceTeam ITSM infuses flexibility into the ticket resolution process, letting agent activity define ticket status. ServiceTeam ITSM lets you determine a set of ticket related questions and answers in advance to ensure accurate, reportable and timely data acquisition. Configure additional conditional questions using custom queries and sophisticated question sets to improve user experience and avoid the frustration of lengthy question sets and irrelevant questions. As part of a 360-degree view of the ticket an agent is working on, they can access all attachments from a central location, make comments, see related emails and portal comments as well as share the attachment with the user who created the ticket—eliminating the need for constant navigation between multiple locations.
ServiceTeam ITSM work items let the Service Desk team seamlessly collaborate with other departments, such as HR and Finance, by utilizing cross-departmental workflows enabled by assigned work items—with their own tasks—solving cross-departmental scenarios that require coordination with multiple teams. The ServiceTeam ITSM Timeline Insights capability automates the collection of three types of information, predefined measures, field tracking and status tracking, which helps you understand advanced ticket analytics and audit history, such as ticket and traffic reporting. ServiceTeam ITSM lets you associate tickets to business, technical and managed services. You can also take advantage of the ability to uniquely leverage the ServiceTeam ITSM ticket template capability per customer, including differentiating templates, segmentation and routing depending on your unique customer needs.
See ServiceTeam ITSM Tickets capability in action. Only two minutes long.

Benefit from hands-free approval management by leveraging the ServiceTeam ITSM built-in approval feature, which helps you manage approvals automatically and effectively. You can customize your approval process with the ability to have parallel, serial or pre-conditional steps to ensure consistent, timely, accurate and easily tracked approvals. Master approval allows for control and visibility into the “who?” and “have they approved?” to ensure a smoother approval process. End users can use email and out-of-the-box Microsoft Team’s approval application to accept, reject or provide additional information for maximum flexibility. Leverage the self-service portal to incorporate external contacts into the approval process. Plus, approvals can be marked with conditions such as “First to Respond” and “Everyone Must Approve” to allow for greater flexibility within a single approval stream.
Increase profitability and gain insight into the “what’s happening” with customer accounts and employee activity by easily tracking time spent against incidents and service requests. The ServiceTeam ITSM Time Entry feature lets you record time spent, categorize activities by work types, and mark time as billable or non-billable. The ServiceTeam ITSM Time Capture feature includes a stopwatch capability as well as the ability for time to be captured from activities. Approved time entries can be recorded as consumption against entitlement. ServiceTeam ITSM also lets you establish an approval process, so no time gets billed to a client without authorization, ensuring that customer invoices meet contractual requirements.
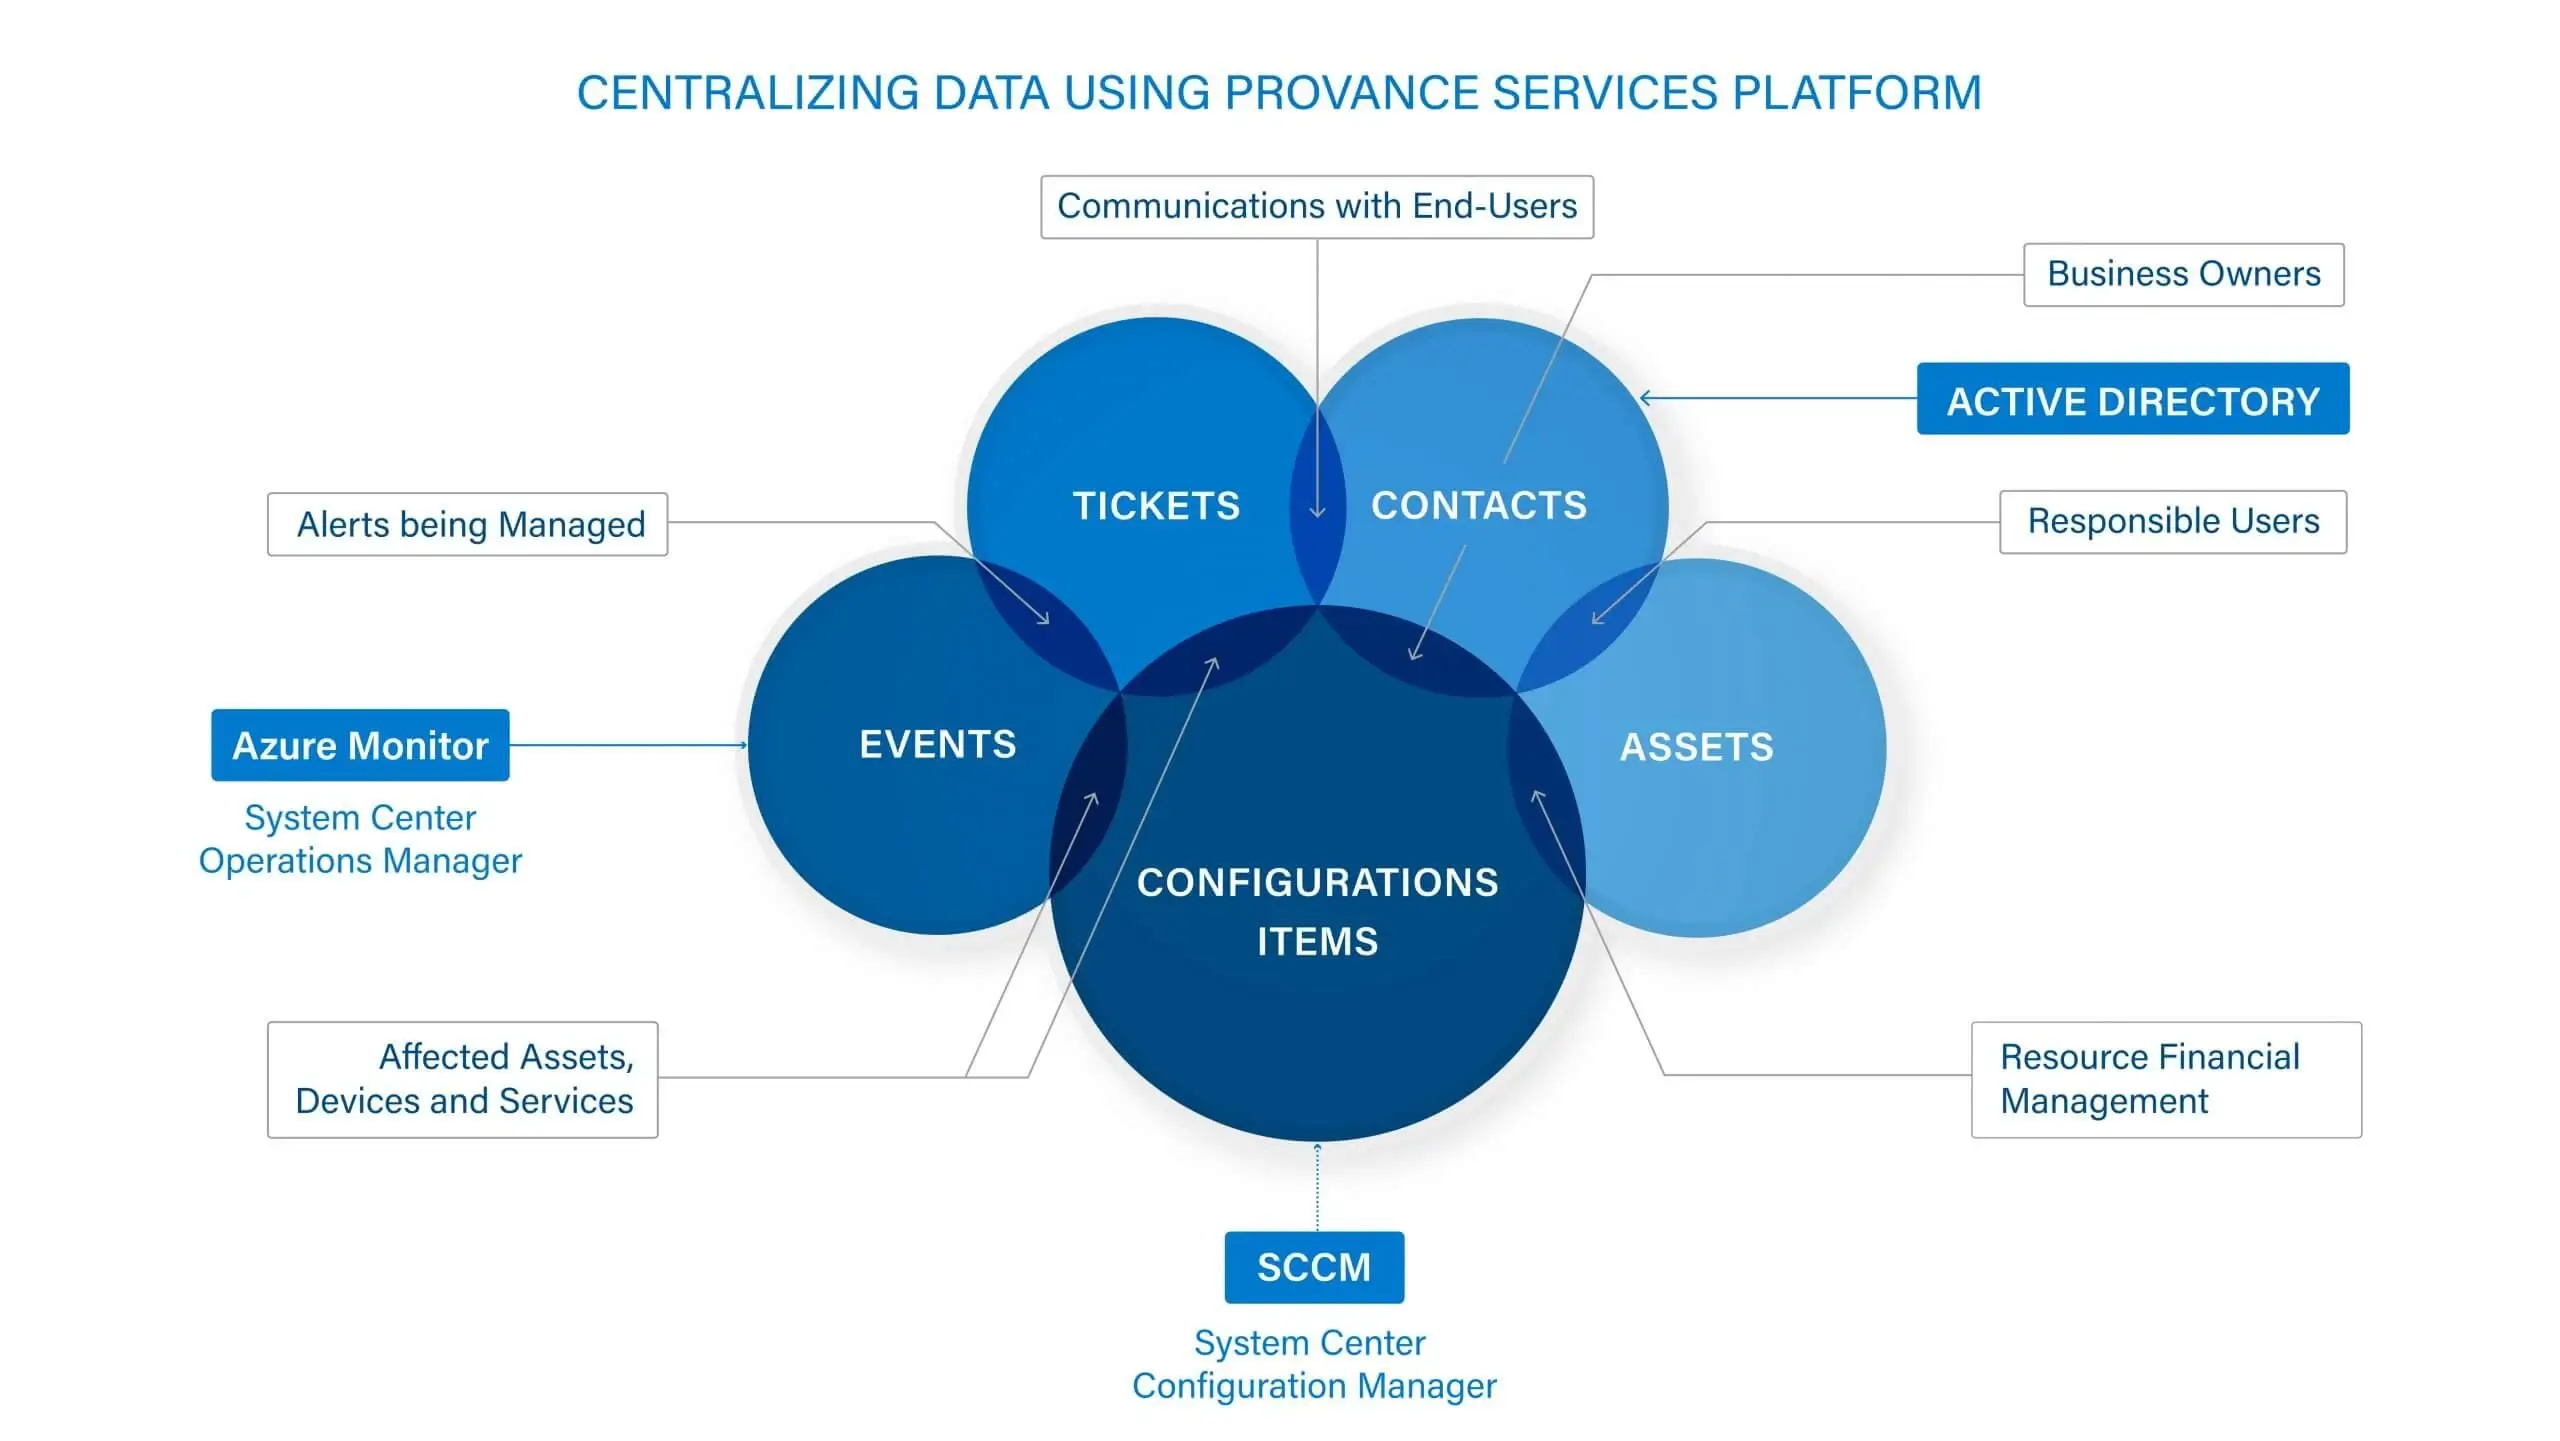
The Provance Services Platform seamlessly connects with your data ecosystem, providing you with painless in-depth integrations to the technologies you depend on. Service Desk agents can easily see related services within a customers’ environment, such as Microsoft Office 365 services to deliver better and more knowledgeable customer services. Using the power of Microsoft Dataverse, ServiceTeam ITSM creates a comprehensive CMDB, which allows you to have 360-degree view of your services and configuration items. Whether you are a Microsoft Customer, Partner, or MSP, you can take advantage of an array of built-in gateways to various Microsoft and non-Microsoft products, including Azure Monitor, Azure Intune, System Center (SCCM, SCOM), Power BI, Azure DevOps, Microsoft Entra (formerly Azure Active Directory), Jira, Cisco Technical Assistance Center, SolarWinds® Network Performance Monitor, N-able™ N-central®, Martello Vantage DX™ Analytics, and more to keep the CMDB accurate and automatically updated.
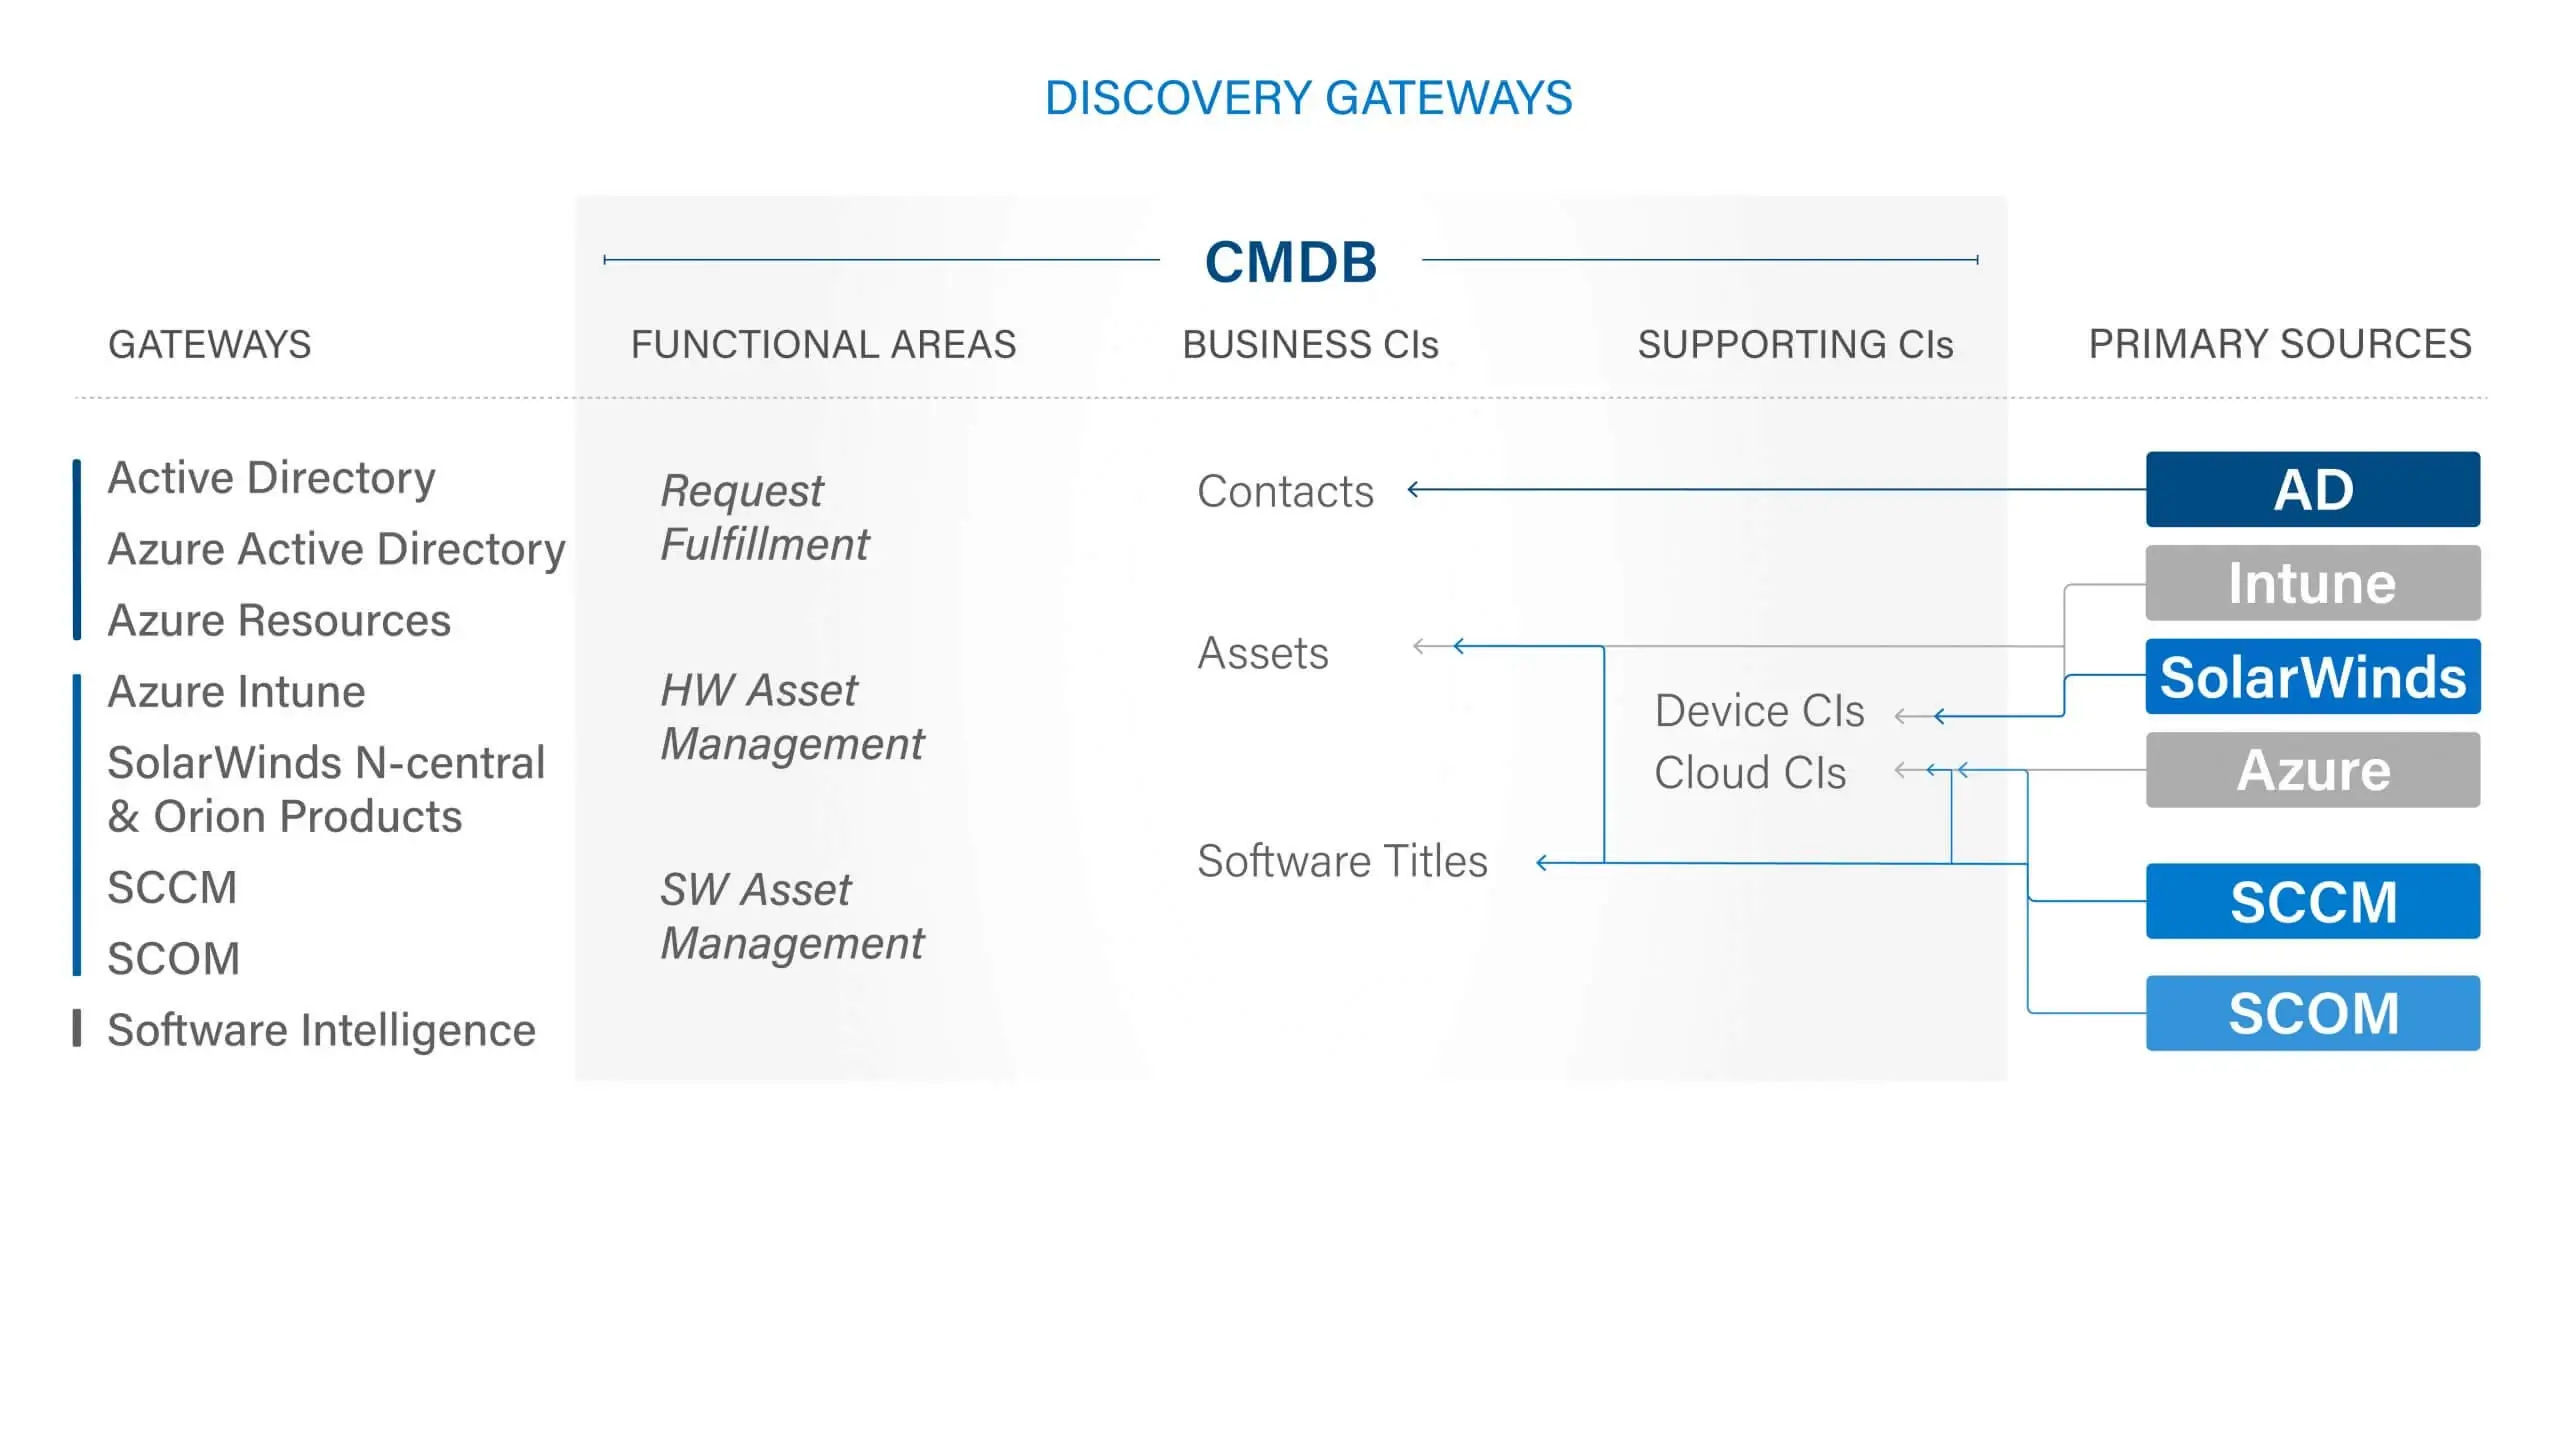
The ServiceTeam ITSM discovery gateways keep data synchronized between all sources, whether contacts, configuration items, Device CIs, or Service CIs come from Microsoft Entra (Formerly Azure Active Directory), Azure Intune, Microsoft Defender, System Center Configuration Manager, System Center Operations Manager, SolarWinds, N-able N-central, Microsoft SQL and Microsoft Graph. You can also configure ServiceTeam ITSM to import and transform any standard attributes and custom collected data from anywhere, anytime.
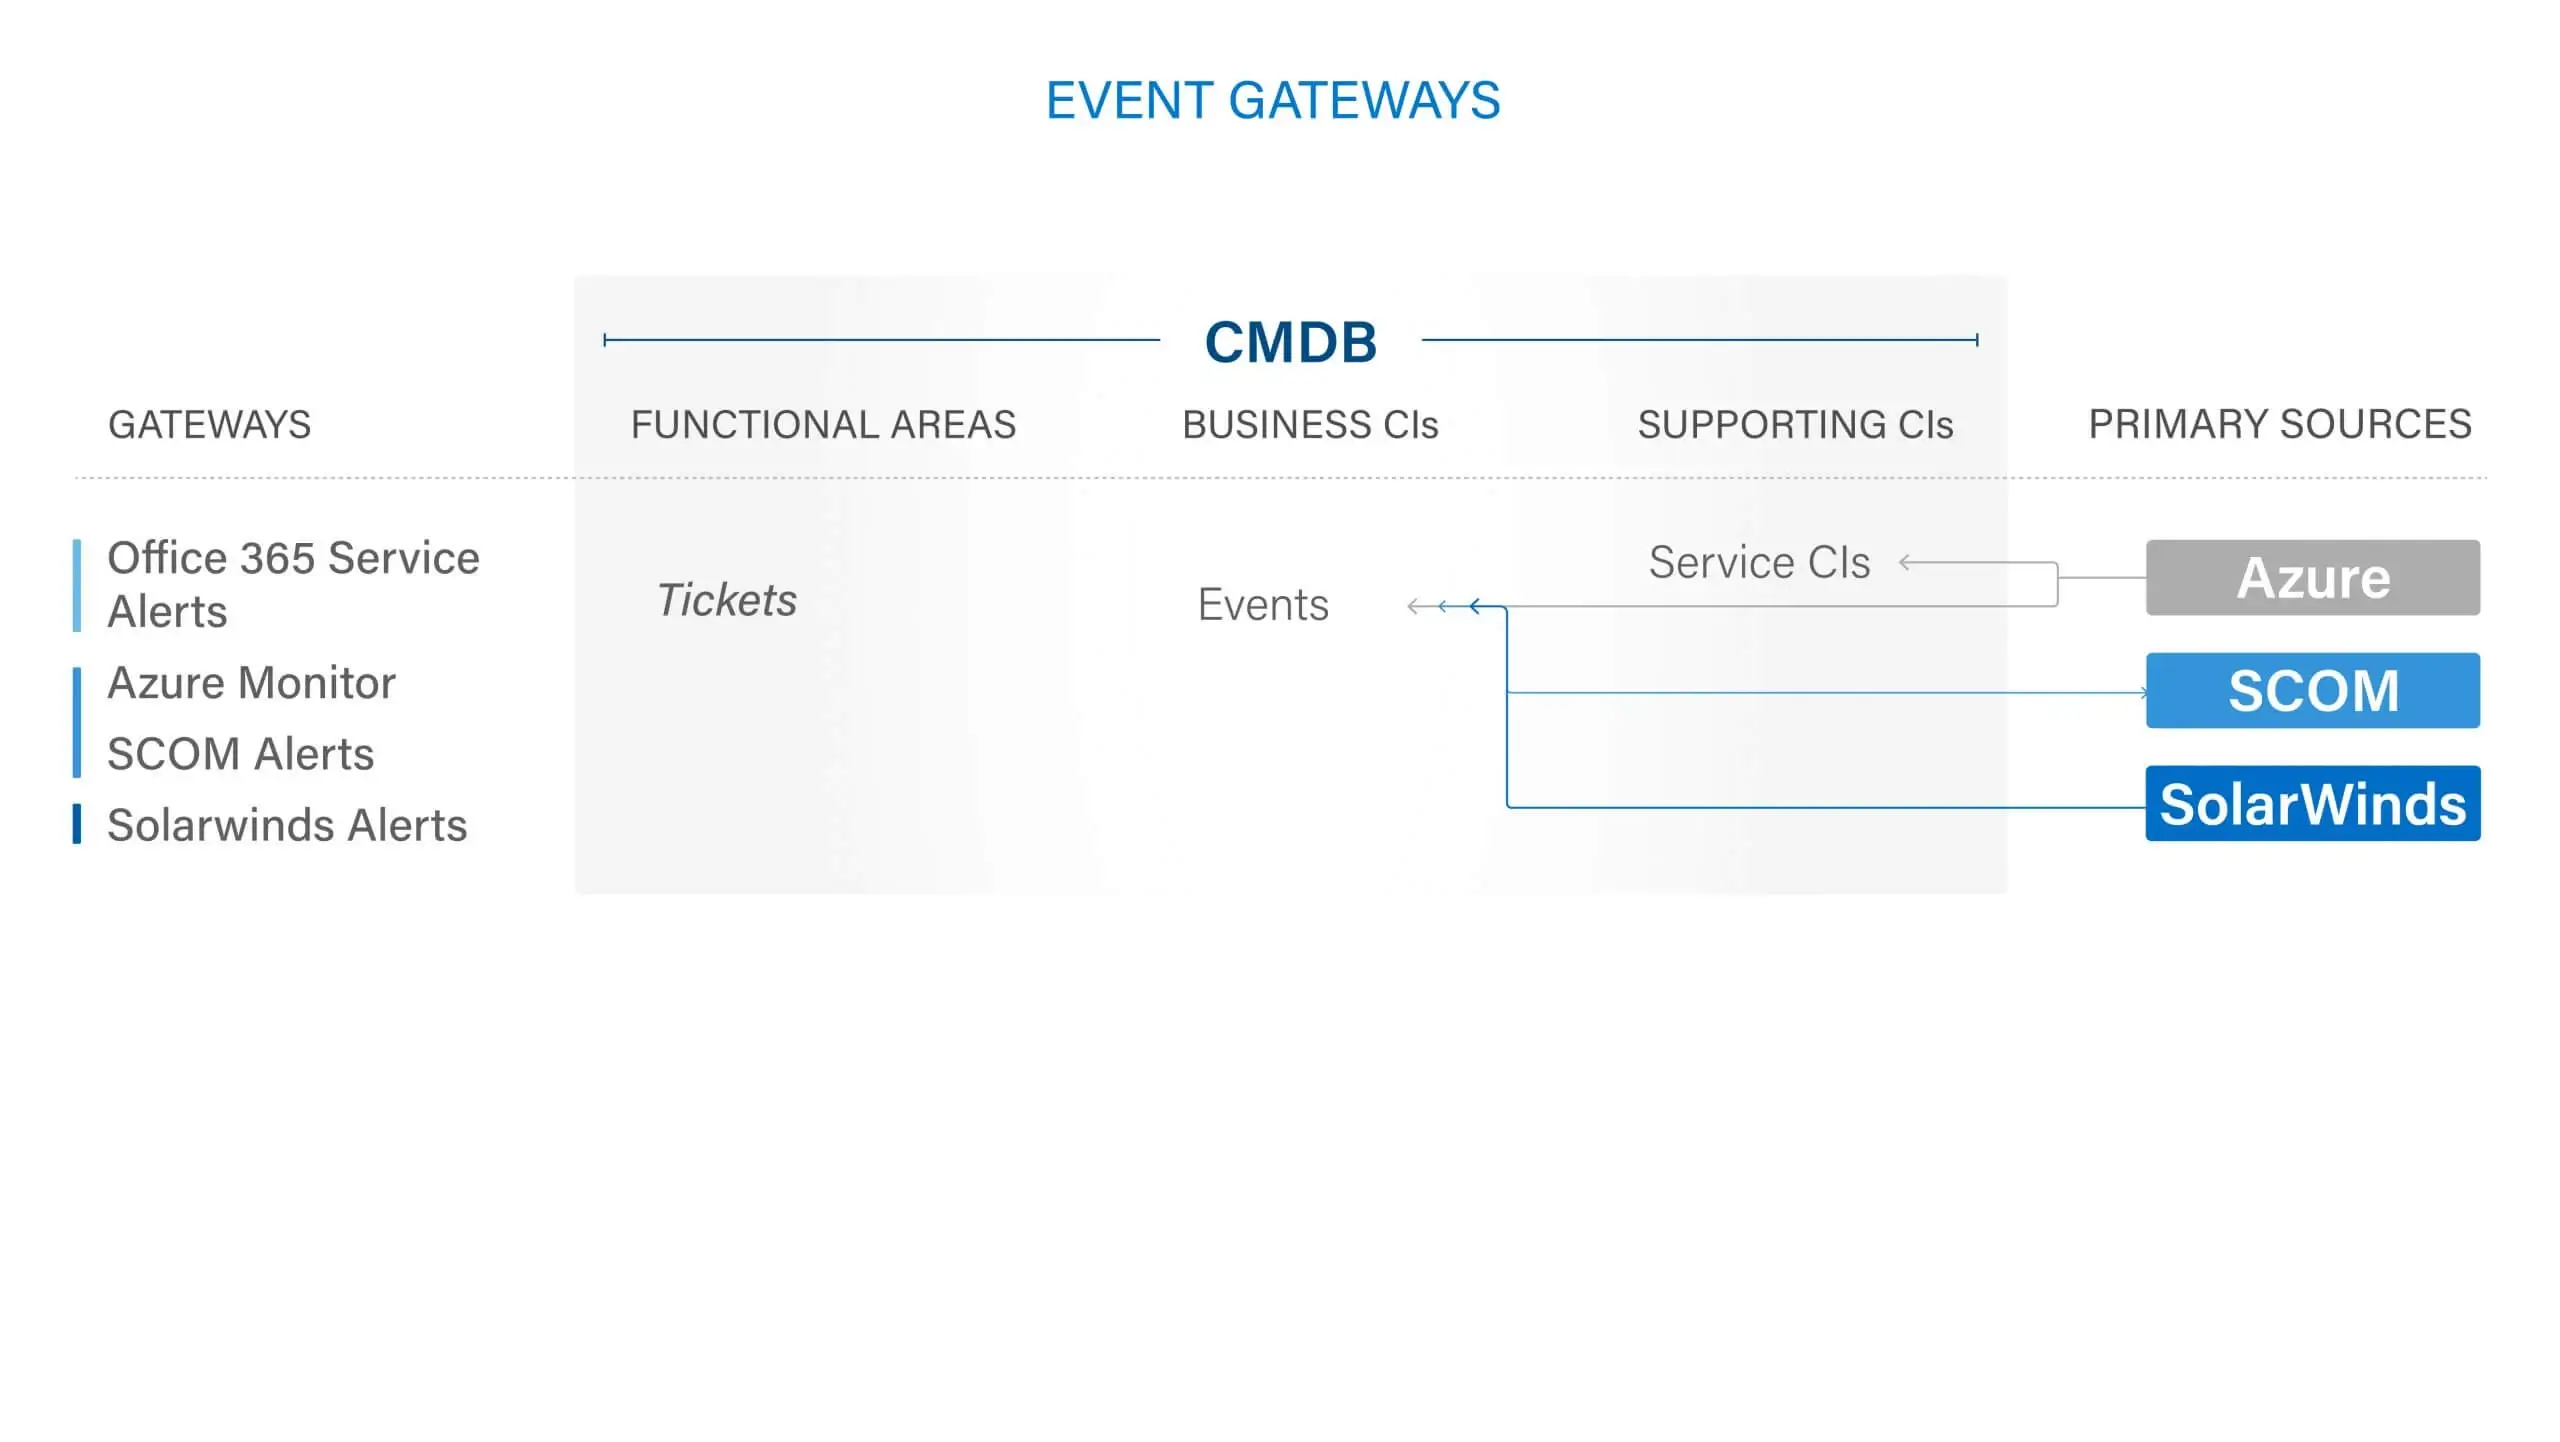
The ServiceTeam ITSM event monitor gateways provide service desk agents with a real-time, automated and bi-directional integration with Azure Monitor, System Center and SolarWinds. Events will automatically create ServiceTeam ITSM tickets and can be associated with Automations, PowerShell Scripts, Azure runbooks or any other automations enabled via ticket templates. Conversely, all ServiceTeam ITSM incidents and configuration items can be viewed within Azure Monitor or within System Center Operations Manager, providing administrators with greater insight and a historical record of incidents and change requests to continuously fine-tune how alerts should be treated.
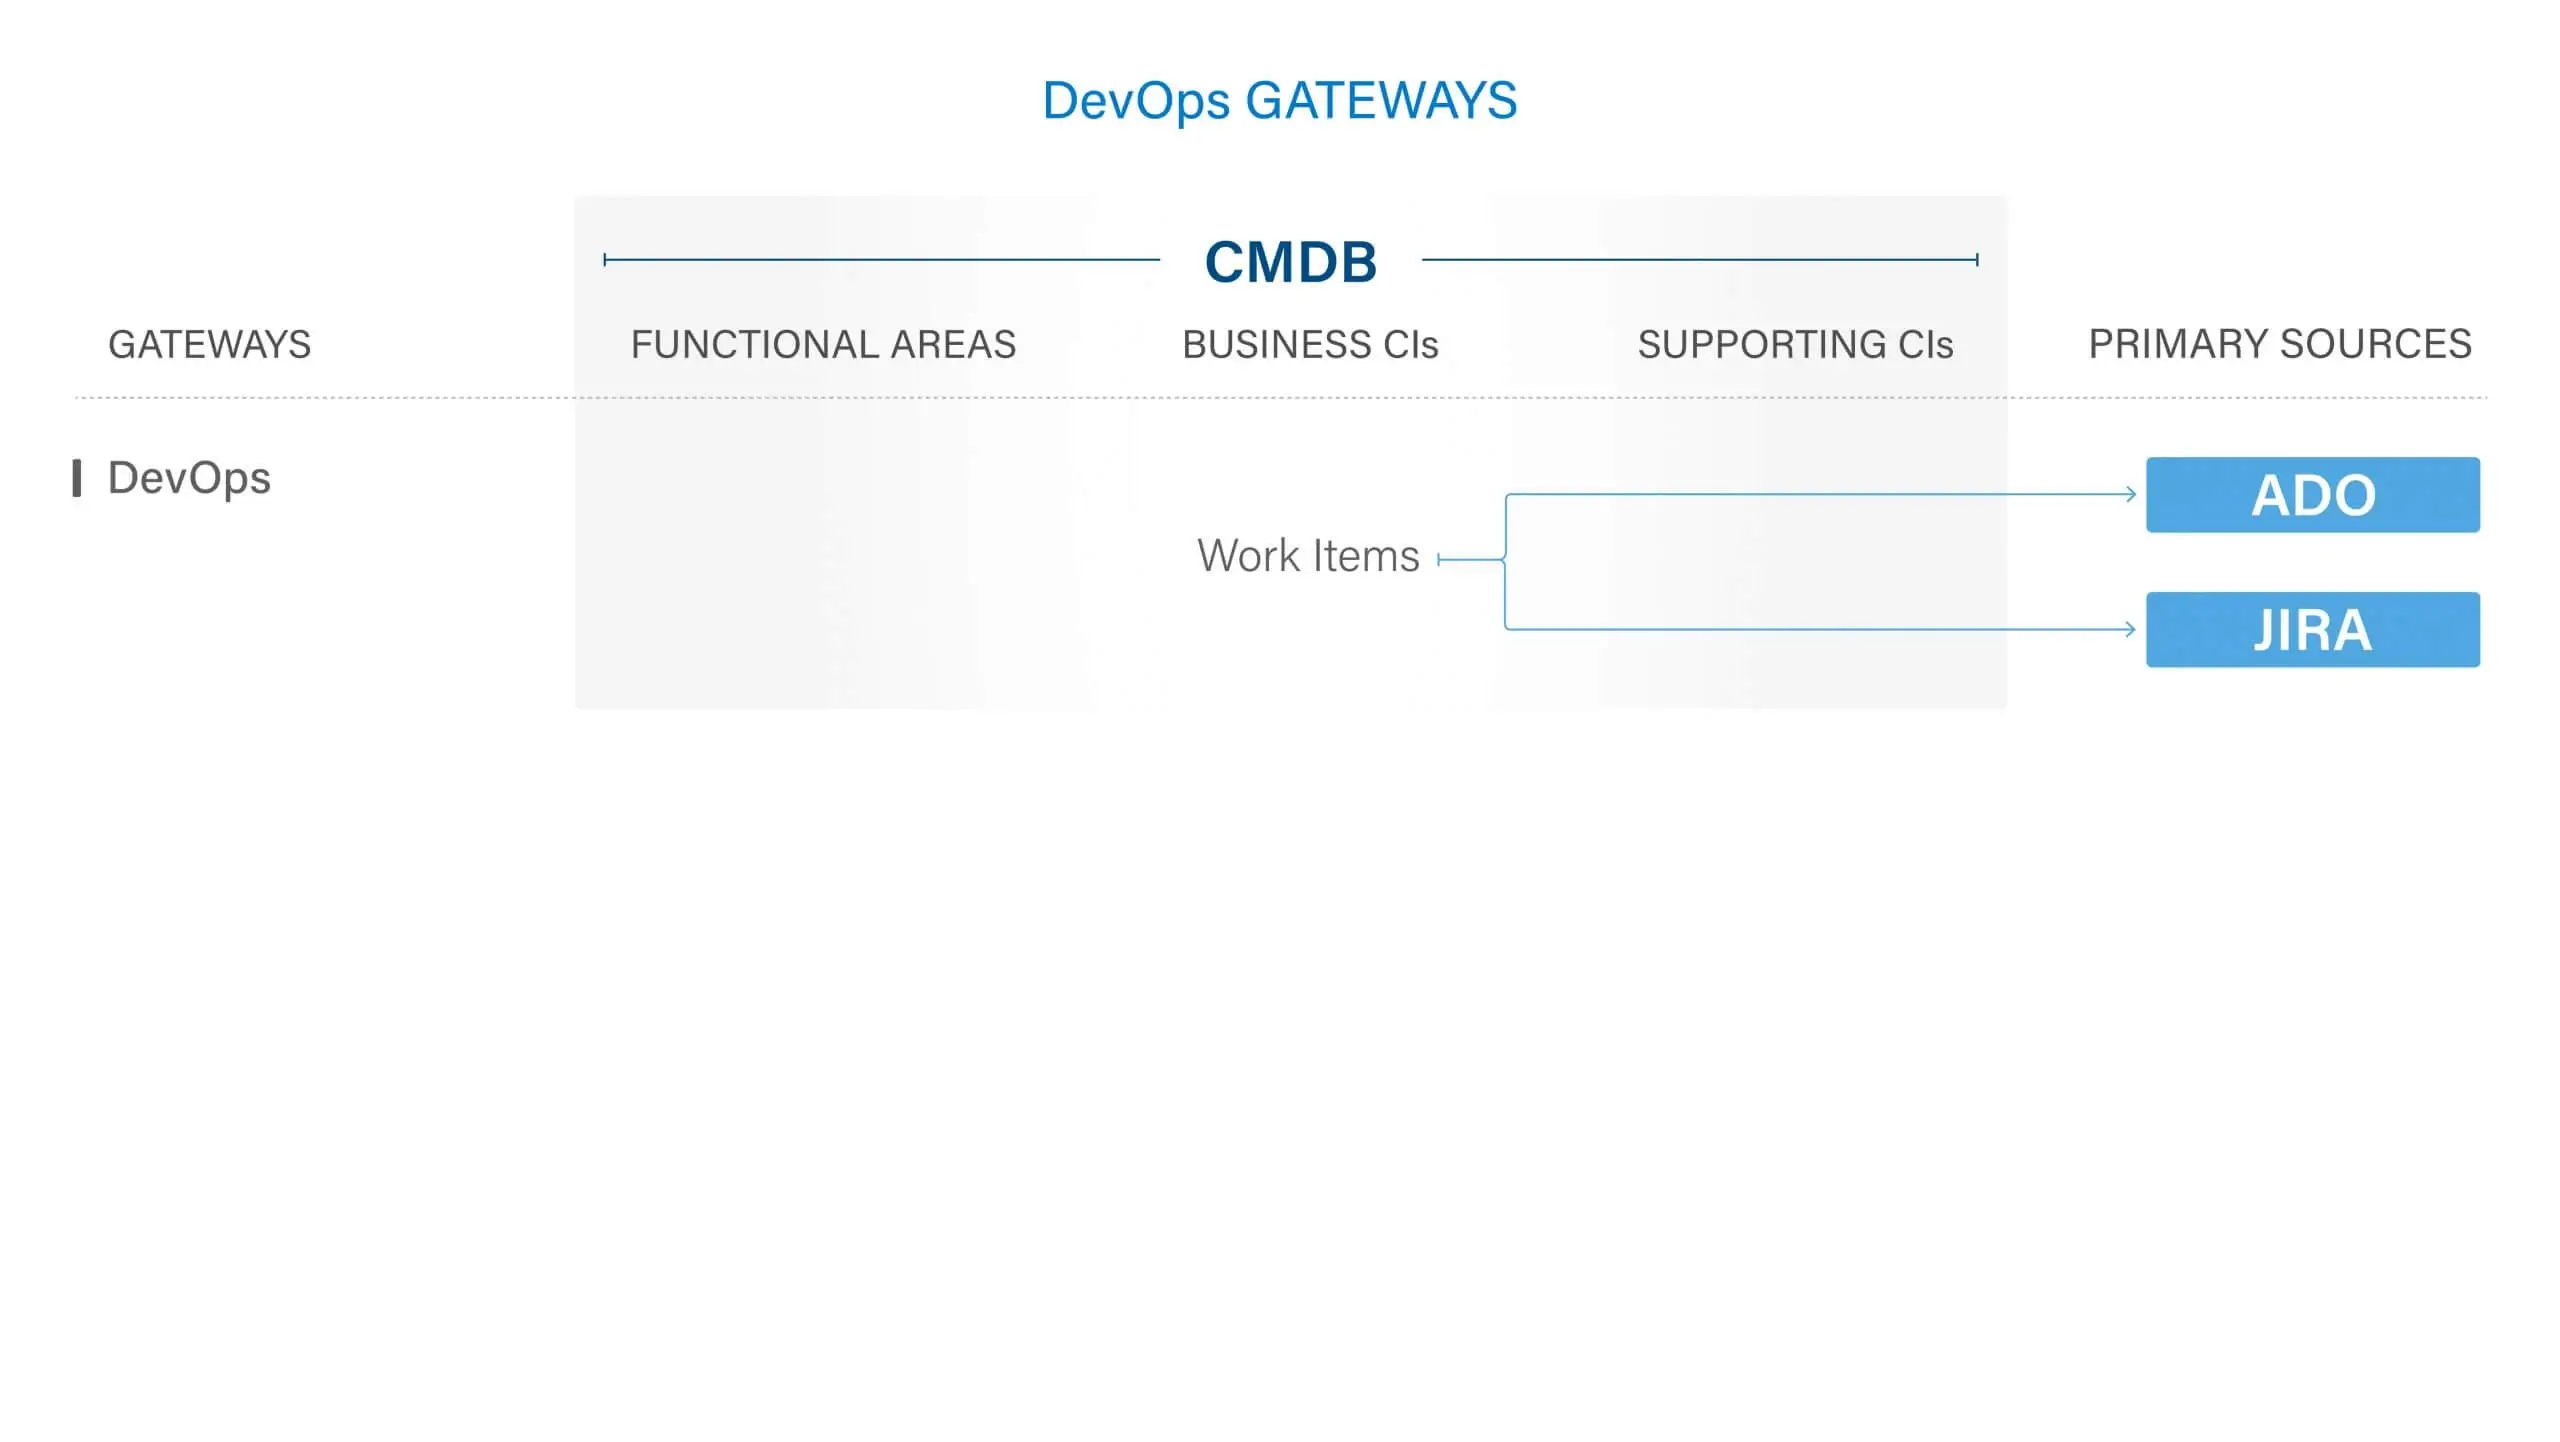
The ServiceTeam ITSM DevOps gateways facilitate communications between service desk teams and development groups, allowing both teams to be operating in their primary applications while communicating collaboratively. Reduce time spent, streamline communications and solve problems more quickly by breaking down the silos between DevOps and the Services teams with our real-time integration. Supporting both tickets and change management, the DevOps gateway operates bi-directionally, allowing developers to create tickets and changes. Moreover, ITSM related tasks can be populated directly into Azure DevOps, Jira, or Cisco Technical Assistance Center, while developers also easily track and provide updates on their work items back to the service desk team. The ServiceTeam ITSM DevOps gateways also provides a customizable list of project settings, including areas, iterations and work item types that can be used—helping to improve agent and developer communications and productivity.
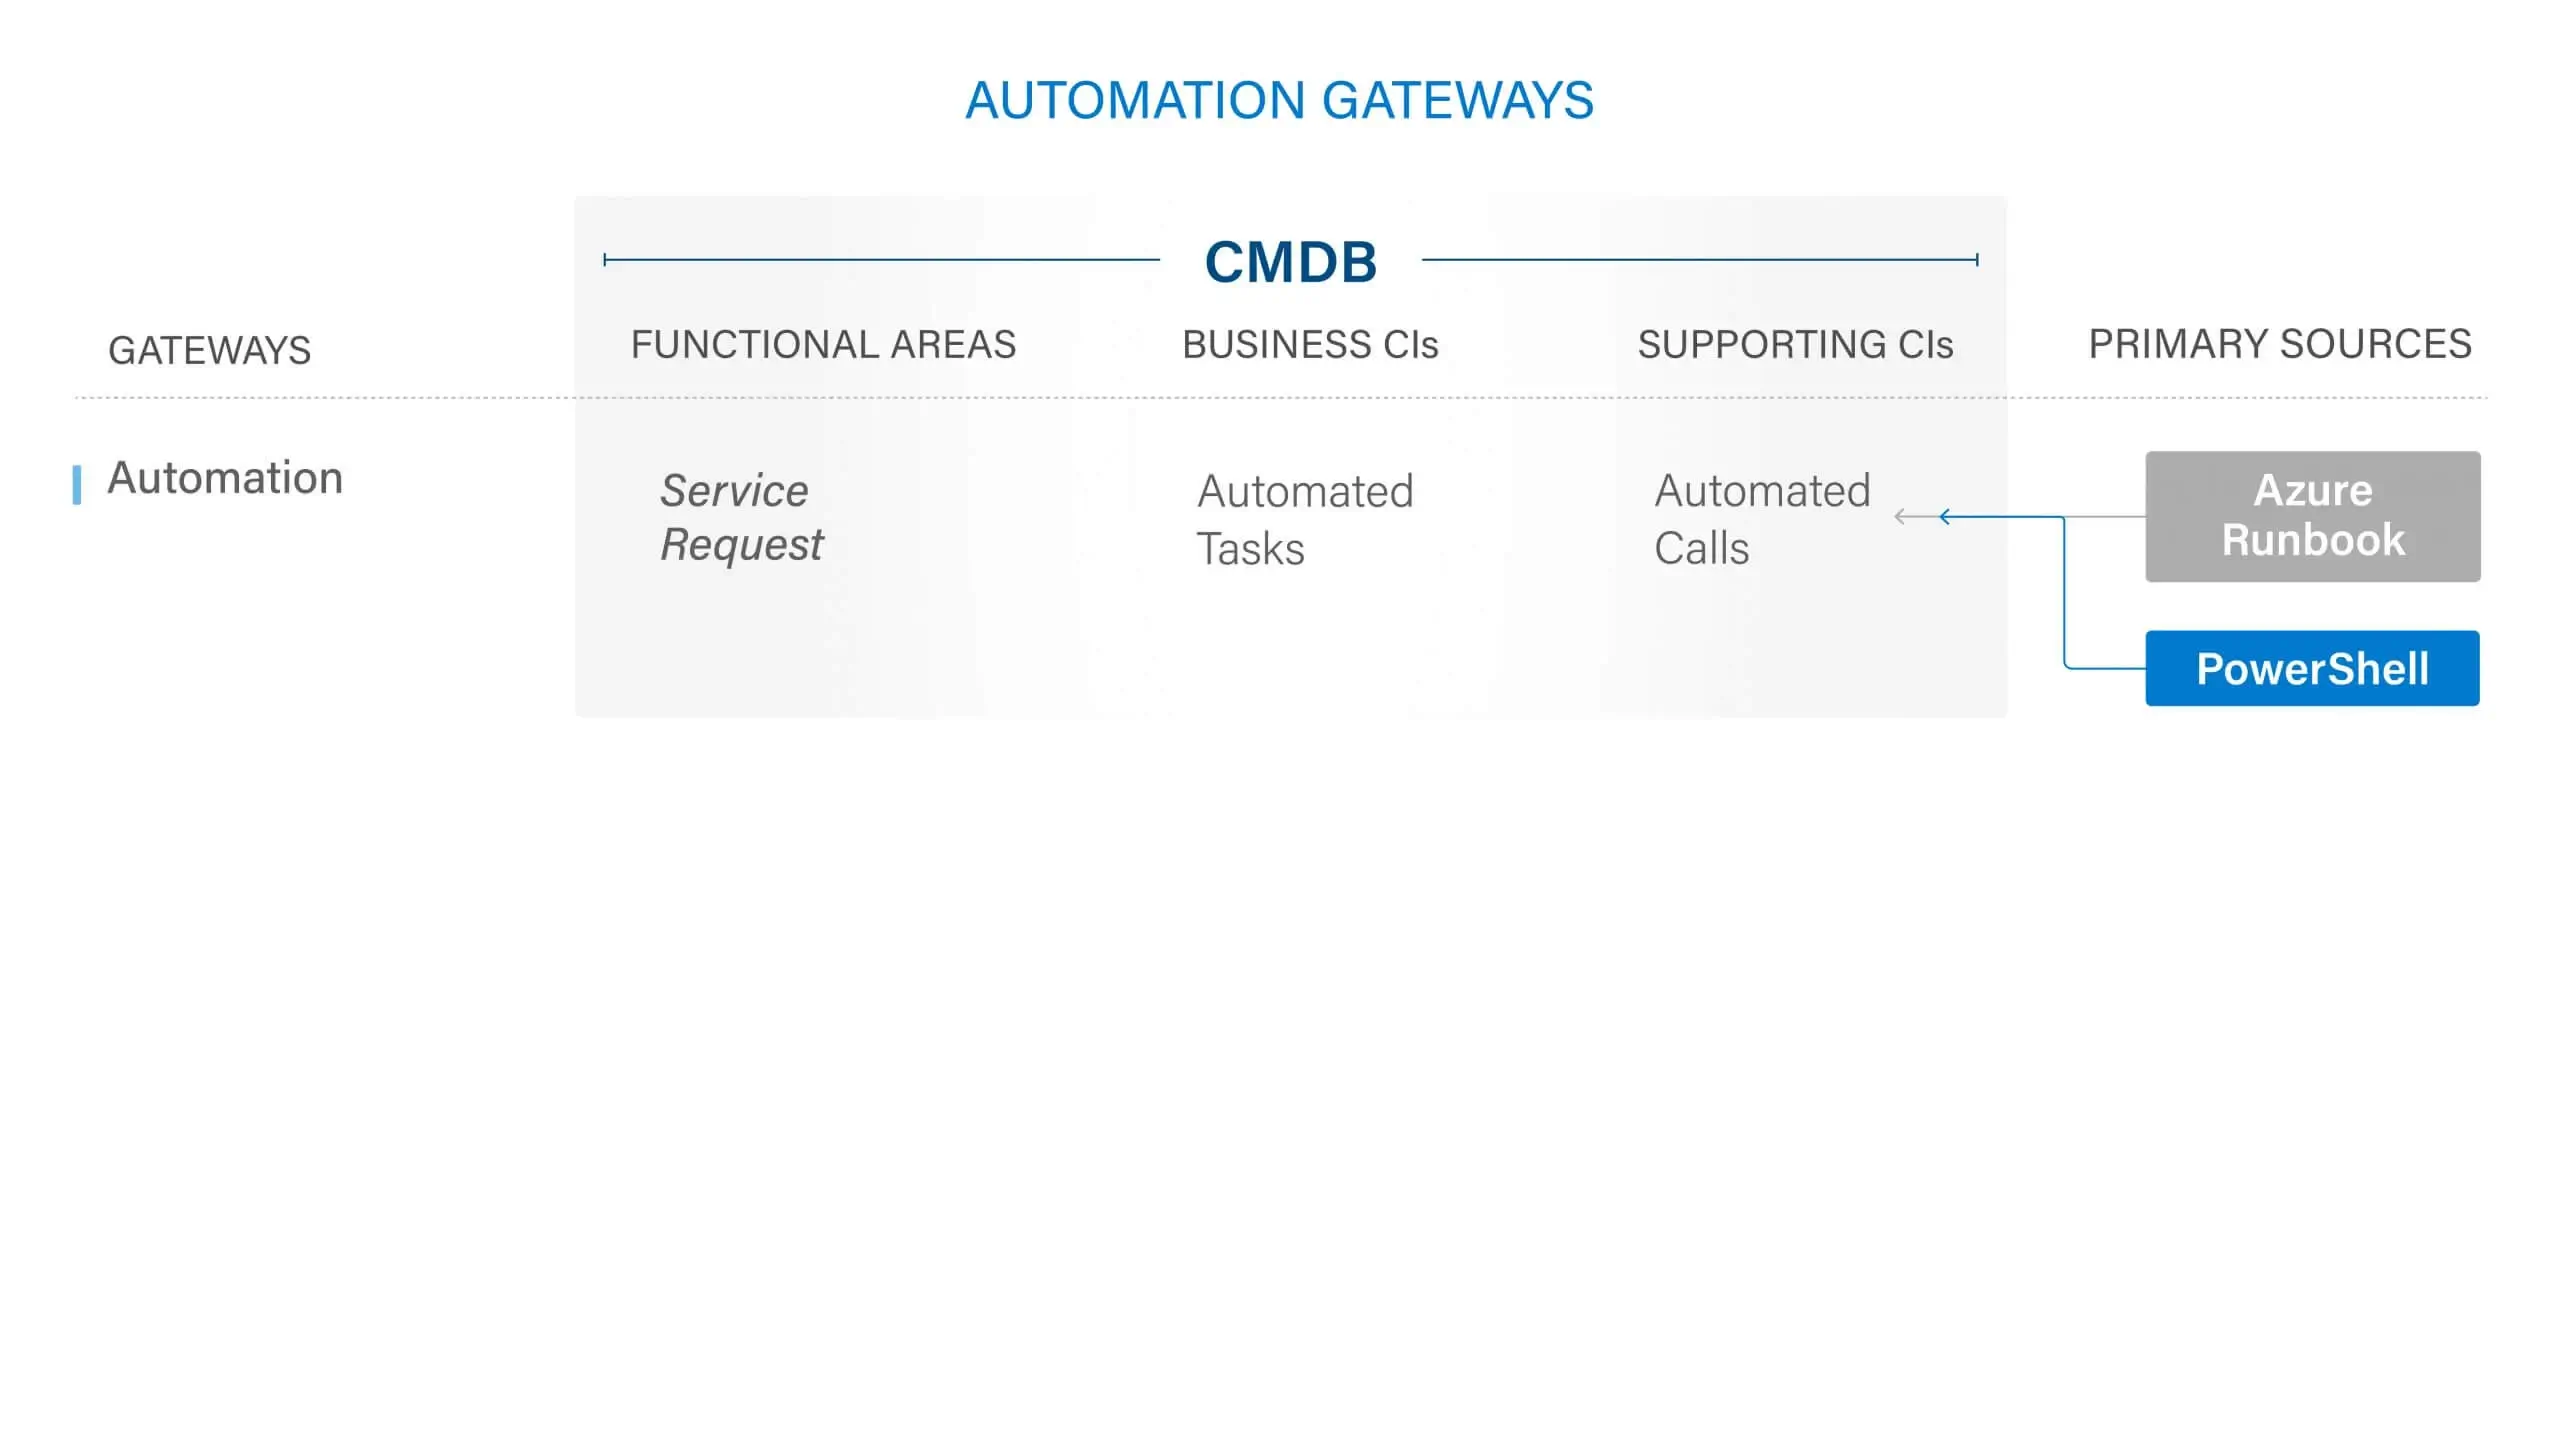
The ServiceTeam ITSM Automation gateways allow customers to leverage existing automation tools such as PowerShell or Azure Runbooks to replace manual processes. Automation gateways schedule and run automation tasks on-demand, providing responsive standardized, cost-effective solutions. Automation gateways can run in conjunction with automation streams to manage complex and long-running workflows, such as employee onboarding, provisioning and deprovisioning.
per user, per month
Capabilities Include:
per user, per month
You’ll receive all Professional capabilities Plus:
Change Management – Includes:
DevOps:
Other:
Take advantage of ServiceTeam ITSM for better productivity, improved agent and customer satisfaction, and reduced costs
Imagine service management as a strategic driver of success within your business — quick, nimble, and evolving to take full advantage of the Microsoft technologies that run your business.
What if your ITSM solution saved costs and helped drive business? ServiceTeam ITSM eliminates the need for painful integrations and expensive customizations.
ServiceTeam ITSM doesn’t just give you intelligent insight, it provides the answers you need to achieve great customer service without impacting the bottom line.
ITIL-Aligned, ServiceTeam ITSM lets you leverage ITSM best practices and processes while still using familiar Microsoft tools, such as Office 365 and Power BI.
“We are absolutely able to listen to our users and resolvers more today than in the past... ServiceTeam ITSM is a great tool which we will continually evolve and adapt based on our needs,”
Dawn Polain,

Choosing the Right ITSM Tool Makes or Breaks Your Daily Workflow…
At Provance, we go out of our way to bring you great service. That’s in our digital DNA. Your IT success is our success.